API开放平台
前言
背景
1.前端开发需要用到后台接口 2.使用现成的系统的功能(http://api.btstu.cn/ )
做一个API接口开放平台:
防止攻击(安全性)
不能随便调用(限制、开通)
统计调用次数
计费
流量保护
API接入
项目介绍
做一个提供API接口调用的平台,用户可以注册登录,开通接口调用权限。用户可以使用接口,并且每次调用会进行统计。管理员可以发布接口、下线接口、接入接口,以及可视化接口的调用情况、数据。
业务流程
image-20230112101821991
技术选型
前端:
Ant Design Pro
React
Ant Design Procomponents
Umi
Umi Request (Axios的封装)
后端:
Java Spring Boot
Spring Boot Starter (SDK开发)
Dubbo
Nacos
Spring Cloud Gateway (网关、限流、日志实现)
一、项目初始化
1、Ant Design Pro
快速开始使用,可以查看官方教程
初始化
1 2 npm i @ant-design/pro-cli -g
打开将要存放项目的文件夹
选择umi版本
1
2
3
? 🐂 使用 umi@4 还是 umi@3 ? (Use arrow keys) ❯ umi@4 umi@3
选择4版的
安装依赖
启动
在package.json 里面 点击start
这里我遇到了一个坑,登录页面无法登录 状态码404
在GitHub issue里找到了解决方案:https://github.com/ant-design/ant-design-pro/issues/10446
image-20230112105451611
删除不必要的东西
移除国际化
先跳过 有BUG
运行package.json中的i18n-remove 然后发现又报错了..
解决方法:执行
yarn add eslint-config-prettier
yarn add eslint-plugin-unicorn
然后修改node_modules/@umijs/lint/dist/config/eslint/index.js
// es2022: true把这个注释掉就可以解决问题
image-20230112110408577
然后删除src/locales目录
删除tests测试
2、后端
1、初始化
使用SpringBoot 项目初始模板
Java SpringBoot
项目初始模板,整合了常用框架和示例代码,大家可以在此基础上快速开发自己的项目。(springboot-init)
模板功能
Spring Boot 2.7.0(贼新)
Spring MVC
MySQL 驱动
MyBatis
MyBatis Plus
Spring Session Redis 分布式登录
Spring AOP
Apache Commons Lang3 工具类
Lombok 注解
Swagger + Knife4j 接口文档
Spring Boot 调试工具和项目处理器
全局请求响应拦截器(记录日志)
全局异常处理器
自定义错误码
封装通用响应类
示例用户注册、登录、搜索功能
示例单元测试类
示例 SQL(用户表)
需要更改yaml文件中的MySQL、Redis的配置
访问 localhost:7529/api/doc.html
就能在线调试接口了,不需要前端配合啦~
image-20230112141458799
2、数据库设计
基本结构
id 用户id
name 名称
description 描述
url 接口地址
request_header 请求头
reponse_header 响应头
status 接口状态(0-关闭 1-开启)
method 请求类型
user_id 创建人
create_time 创建时间
update_time 更新时间
is_delete 逻辑删除 (0-未删 ,1-已删)
代码
可以用鱼皮写的sql生成工具生成一下代码 SQL之父
image-20230112153403987
填对应的数据,一键生成即可
1
2
3
4
5
6
7
8
9
10
11
12
13
14
15
16
17
18
19
20
21
22
23
24
25
26
27
28
29
30
31
32
33
34
35
36
37
38
39
40
41
create database if not exists api_platform;use api_platform; create table if not exists api_platform.`interface_info`( `id` bigint not null auto_increment comment '主键' primary key , `name` varchar (256 ) not null comment '名称' , `description` varchar (256 ) null comment '描述' , `url` varchar (512 ) not null comment '接口地址' , `request_header` text null comment '请求头' , `response_header` text null comment '响应头' , `status` int default 0 not null comment '接口状态(0-关闭,1-开启)' , `method ` varchar (256 ) not null comment '请求类型' , `user_id` bigint not null comment '创建人' , `create_time` datetime default CURRENT_TIMESTAMP not null comment '创建时间' , `update_time` datetime default CURRENT_TIMESTAMP not null on update CURRENT_TIMESTAMP comment '更新时间' , `is_deleted` tinyint default 0 not null comment '是否删除(0-未删, 1-已删)' ) comment '接口信息' ; insert into api_platform.`interface_info` (`name`, `description`, `url`, `request_header`, `response_header`, `status`, `method `, `user_id`) values ('廖立轩' , '脱颖而出' , 'www.foster-larkin.co' , '龙嘉懿' , '秦天磊' , 0 , 'GET' , 1718083101 );insert into api_platform.`interface_info` (`name`, `description`, `url`, `request_header`, `response_header`, `status`, `method `, `user_id`) values ('曹明辉' , '举一反三' , 'www.tony-kiehn.com' , '任擎苍' , '陈凯瑞' , 0 , 'GET' , 28978 );insert into api_platform.`interface_info` (`name`, `description`, `url`, `request_header`, `response_header`, `status`, `method `, `user_id`) values ('金乐驹' , '首当其冲' , 'www.coleen-prosacco.net' , '毛浩' , '陆致远' , 0 , 'GET' , 208 );insert into api_platform.`interface_info` (`name`, `description`, `url`, `request_header`, `response_header`, `status`, `method `, `user_id`) values ('廖思' , '来之不易' , 'www.don-sipes.net' , '梁彬' , '白君浩' , 0 , 'GET' , 470 );insert into api_platform.`interface_info` (`name`, `description`, `url`, `request_header`, `response_header`, `status`, `method `, `user_id`) values ('董煜祺' , '长治久安' , 'www.terry-turner.co' , '覃绍齐' , '胡雪松' , 0 , 'GET' , 611007 );insert into api_platform.`interface_info` (`name`, `description`, `url`, `request_header`, `response_header`, `status`, `method `, `user_id`) values ('侯聪健' , '精心设计' , 'www.augustus-yost.info' , '傅鸿煊' , '潘鹏飞' , 0 , 'GET' , 0 );insert into api_platform.`interface_info` (`name`, `description`, `url`, `request_header`, `response_header`, `status`, `method `, `user_id`) values ('魏弘文' , '玩忽职守' , 'www.guadalupe-beatty.biz' , '江梓晨' , '魏思淼' , 0 , 'GET' , 1162536022 );insert into api_platform.`interface_info` (`name`, `description`, `url`, `request_header`, `response_header`, `status`, `method `, `user_id`) values ('于苑博' , '各式各样' , 'www.nolan-metz.net' , '韦果' , '金胤祥' , 0 , 'GET' , 0 );insert into api_platform.`interface_info` (`name`, `description`, `url`, `request_header`, `response_header`, `status`, `method `, `user_id`) values ('姚炫明' , '翻天覆地' , 'www.jodie-schultz.info' , '许越彬' , '毛晋鹏' , 0 , 'GET' , 973 );insert into api_platform.`interface_info` (`name`, `description`, `url`, `request_header`, `response_header`, `status`, `method `, `user_id`) values ('孙鑫鹏' , '络绎不绝' , 'www.liza-sporer.co' , '孙彬' , '傅鸿煊' , 0 , 'GET' , 30308 );insert into api_platform.`interface_info` (`name`, `description`, `url`, `request_header`, `response_header`, `status`, `method `, `user_id`) values ('唐展鹏' , '铤而走险' , 'www.hayden-purdy.co' , '杨哲瀚' , '陆凯瑞' , 0 , 'GET' , 473462835 );insert into api_platform.`interface_info` (`name`, `description`, `url`, `request_header`, `response_header`, `status`, `method `, `user_id`) values ('曹擎苍' , '赞不绝口' , 'www.phung-glover.org' , '邱志泽' , '张健雄' , 0 , 'GET' , 32155653 );insert into api_platform.`interface_info` (`name`, `description`, `url`, `request_header`, `response_header`, `status`, `method `, `user_id`) values ('夏烨霖' , '哭笑不得' , 'www.augustine-funk.org' , '宋聪健' , '郝鹏涛' , 0 , 'GET' , 3964 );insert into api_platform.`interface_info` (`name`, `description`, `url`, `request_header`, `response_header`, `status`, `method `, `user_id`) values ('董浩' , '对症下药' , 'www.erik-hamill.biz' , '黎立果' , '廖鹤轩' , 0 , 'GET' , 2275 );insert into api_platform.`interface_info` (`name`, `description`, `url`, `request_header`, `response_header`, `status`, `method `, `user_id`) values ('罗荣轩' , '喜闻乐见' , 'www.gia-hermann.biz' , '韩煜城' , '阎耀杰' , 0 , 'GET' , 847 );insert into api_platform.`interface_info` (`name`, `description`, `url`, `request_header`, `response_header`, `status`, `method `, `user_id`) values ('沈正豪' , '统筹兼顾' , 'www.isabella-reinger.io' , '邓子轩' , '廖伟诚' , 0 , 'GET' , 997378602 );insert into api_platform.`interface_info` (`name`, `description`, `url`, `request_header`, `response_header`, `status`, `method `, `user_id`) values ('任立果' , '出人意料' , 'www.geoffrey-koss.name' , '覃浩然' , '萧雨泽' , 0 , 'GET' , 403 );insert into api_platform.`interface_info` (`name`, `description`, `url`, `request_header`, `response_header`, `status`, `method `, `user_id`) values ('张炫明' , '名不虚传' , 'www.ellan-gleason.com' , '黎正豪' , '韦炎彬' , 0 , 'GET' , 35127293 );insert into api_platform.`interface_info` (`name`, `description`, `url`, `request_header`, `response_header`, `status`, `method `, `user_id`) values ('方雨泽' , '衣食住行' , 'www.wilton-walsh.biz' , '黎越泽' , '白远航' , 0 , 'GET' , 62264 );insert into api_platform.`interface_info` (`name`, `description`, `url`, `request_header`, `response_header`, `status`, `method `, `user_id`) values ('袁天翊' , '卷土重来' , 'www.lynetta-mclaughlin.info' , '邹熠彤' , '叶潇然' , 0 , 'GET' , 9884455 );
运行即可
3、使用MabatisX插件
生成domain、mapper、service
打开新建的表,右击选择MybatisX-Generator
勾上驼峰
image-20230112155202934
根据版本跟需要打勾 ,点击完成
image-20230112161220300
查看目录
image-20230112161257033
然后将它们放到我自己的路径下
4、Controller
接下来到controller层
我们只需要将PostController 复制一份改名为InterfaceInfoController 即可,因为逻辑是差不多,都是进行增删改查
然后将post改成interfaceInfo、Post改成InterfaceInfo
根据报错信息我们来补充信息
5、DTO
首先先增加DTO,在InterfaceInfo类从拿我们需要的信息做成三个DTO类(分别是新增、查询、更新)删除的请求我们封装在common包下
image-20230112184904561
1
2
3
4
5
6
7
8
9
10
11
12
13
14
15
16
17
18
19
20
21
22
23
24
25
26
27
28
29
30
package com.xuan.project.model.dto.interfaceinfo;import lombok.Data;import java.io.Serializable;@Data public class InterfaceInfoAddRequest implements Serializable { private String name; private String description; }
6、Service
根据报错可知 service层缺少一个方法validInterfaceInfo
1 2 3 4 5 6 7 8 9 10 11 12 13 14 15 16 17 18 19 20 21 22 23 24 25 26 27 28 29 30 31 32 33 34 35 36 37 38 39 40 @Service public class InterfaceInfoServiceImpl extends ServiceImpl <InterfaceInfoMapper, InterfaceInfo> implements InterfaceInfoService { @Override public void validInterfaceInfo (InterfaceInfo interfaceInfo, boolean add) { if (interfaceInfo == null ) { throw new BusinessException (ErrorCode.PARAMS_ERROR); } String name = interfaceInfo.getName(); String description = interfaceInfo.getDescription(); String url = interfaceInfo.getUrl(); String requestHeader = interfaceInfo.getRequestHeader(); String responseHeader = interfaceInfo.getResponseHeader(); Integer status = interfaceInfo.getStatus(); String method = interfaceInfo.getMethod(); Long userId = interfaceInfo.getUserId(); if (add) { if (StringUtils.isAnyBlank(name, description, url, requestHeader, responseHeader, method) || ObjectUtils.anyNull(userId, status)) { throw new BusinessException (ErrorCode.PARAMS_ERROR); } } if (StringUtils.isNotBlank(name) && name.length() > 256 ) { throw new BusinessException (ErrorCode.PARAMS_ERROR, "名字过长" ); } if (StringUtils.isNotBlank(description) && description.length() > 512 ) { throw new BusinessException (ErrorCode.PARAMS_ERROR, "描述过长" ); } } }
这里的大量getter 是使用插件 GenerateAllSetter 生成
macOS在变量上摁住 option + Enter 即可
3、前端
1、配置插件
为了项目更加规范
搜索 eslint 选上自动识别
image-20230112193957977
搜索prettier 打√ 美化代码
image-20230112194107217
2、接口调用
使用 oneapi 插件自动生成
如果要前端自动生成,需要将后端的遵循openapi 规范的json 文档
后端的遵循openapi 规范的json 文档
找到我们起的后端主页
image-20230112195321863
在地址栏输入http://localhost:7529/api/v3/api-docs
发现如下所示
image-20230112195351679
那么我们就可以使用这个url了
打开config目录下config.ts
找到openApi 修改如下
1
2
3
4
5
6
7
8
9
10
11
12
13
14
openAPI : [ { requestLibPath : "import { request } from '@umijs/max'" , schemaPath : 'http://localhost:7529/api/v3/api-docs' , projectName : 'api-platform-backend' , }, ],
测试一下是否能用
找到package.json ,执行openapi 命令
执行成功,我们去service 看一下
image-20230112195813202
由于我们有后端
,应请求真实环境,所以直接用dev模式 运行
可以将项目中的requestErrorConfig.ts 改为requestConfig.ts
然后在app.tsx 找到
request配置,将其修改成我们改的
再打开requestConfig.ts
修改名字,并设置一下后端地址
image-20230112200749537
测试一下
使用它提示账户密码登录,失败了
我们查看一下发现是前后端接口定义不一致
image-20230112201646377
3、修改登录的接口
找到src/pages/User/Login/index.tsx 下的handleSubmit
1
2
3
4
5
6
7
8
9
10
11
12
13
14
15
16
17
18
const handleSubmit = async (values : API.UserLoginRequest try { const res = await userLoginUsingPOST ({ ...values }); if (res.data ) { const urlParams = new URL (window .location .href ).searchParams ; history.push (urlParams.get ('redirect' ) || '/' ); return ; } } catch (error) { const defaultLoginFailureMessage = intl.formatMessage ({ id : 'pages.login.failure' , defaultMessage : '登录失败,请重试!' , }); console .log (error); message.error (defaultLoginFailureMessage); } };
修改用户名和密码的字段和我们后端一样
1 2 3 4 5 6 7 8 9 10 11 12 13 14 15 16 17 18 19 20 21 22 <ProFormText name="userAccount" fieldProps={{ size : 'large' , prefix : <UserOutlined /> }} placeholder={intl.formatMessage ({ id : 'pages.login.username.placeholder' , defaultMessage : '用户名: admin or user' , })} rules={[ { required : true , message : ( <FormattedMessage id ="pages.login.username.required" defaultMessage ="请输入用户名!" /> ), }, ]} />
返回登录页面,进行登录
image-20230112202314036
请求成功但是没跳转
为什么没跳转?因为我们没有记录用户的登录态 ,不知道它是否登录成功
设置用户的登录态
回到app.tsx
找到getInitialState() 这个方法
这个方法当我们首次访问页面的时候,获取用户的信息,获取当前全局的一些状态,可以把它当成全局变量
我们先找到typings.d.ts
1 2 3 4 5 6 7 interface InitialState { loginUser ?: API .UserVO ; }
返回getInitialState() 将它改为
1
2
3
4
5
6
7
8
9
10
11
12
13
14
15
export async function getInitialState (Promise <InitialState > { const state : InitialState = { loginUser : undefined , }; try { const res = await getLoginUserUsingGET (); if (res.data ) { state.loginUser = res.data ; } } catch (error) { history.push (loginPath); } return state; }
返回src/pages/User/Login/index.tsx 下的handleSubmit
设置登录状态
1
2
3
4
5
6
7
8
9
10
11
12
13
14
15
16
17
18
19
20
21
const handleSubmit = async (values : API.UserLoginRequest try { const res = await userLoginUsingPOST ({ ...values }); if (res.data ) { const urlParams = new URL (window .location .href ).searchParams ; history.push (urlParams.get ('redirect' ) || '/' ); setInitialState ({ loginUser : res.data }); return ; } } catch (error) { const defaultLoginFailureMessage = intl.formatMessage ({ id : 'pages.login.failure' , defaultMessage : '登录失败,请重试!' , }); console .log (error); message.error (defaultLoginFailureMessage); } };
测试
image-20230113103454564
成功进入
But,
有bug,我们刷新一下发现又要重新登录,这是为什么呢?
我们推测是前端向后端发送请求的时候没有带上cookie !!!
找到requestConfig.ts
添加
1
2
3
4
5
export const requestConfig : RequestConfig = { baseURL : 'http://localhost:7529' , withCredentials : true , }
刷新测试一下 问题解决
4、注销
和登录差不多,同理
全局搜索logout
发现在src/components/RightContent/AvatarDropdown.tsx 中有loginOut()
将其改成我们的后端方法
1
2
3
4
5
6
7
8
9
10
11
12
13
14
const onMenuClick = useCallback ( (event : MenuInfo { const { key } = event; if (key === 'logout' ) { flushSync (() => { setInitialState ((s ) => ({ ...s, currentUser : undefined })); }); userLogoutUsingPOST () return ; } history.push (`/account/${key} ` ); }, [setInitialState], );
自动生成的好处
如果我们后端的实体类修改了,我们可以直接运行 openapi
来直接更新
5、管理权限
是否为管理员
打开access.ts
1 2 3 4 5 6 7 8 9 10 11 12 export default function access (initialState : { currentUser?: API.CurrentUser } | undefined const { currentUser } = initialState ?? {}; return { canAdmin : currentUser && currentUser.access === 'admin' , }; } 将canAdmin改成 canAdmin : true ,
发现前端管理界面出来了,所以逻辑就是在这里控制的
image-20230113104939414
所以代码修改如下
1
2
3
4
5
6
7
export default function access (initialState : InitialState | undefined const { loginUser } = initialState ?? {}; return { canUser : loginUser, canAdmin : loginUser?.userRole === 'admin' , }; }
6、表格页面
找到src/pages/TableList/index.tsx
找到columns
image-20230113112228199
换成我们自己的
1
2
3
4
5
6
7
8
9
10
11
12
13
14
15
16
17
18
19
20
21
22
23
24
25
26
27
28
29
30
31
32
33
34
35
36
37
38
39
40
41
42
43
44
45
46
47
48
49
50
51
52
53
54
55
56
57
58
59
60
61
62
63
64
65
66
67
68
69
70
71
72
73
74
75
76
77
78
79
80
81
82
83
const columns : ProColumns <API .InterfaceInfo >[] = [ { title : 'id' , dataIndex : 'id' , valueType : 'index' , }, { title : '接口名称' , dataIndex : 'name' , valueType : 'text' , }, { title : '描述' , dataIndex : 'description' , valueType : 'textarea' , }, { title : '请求方法' , dataIndex : 'method' , valueType : 'text' , }, { title : 'url' , dataIndex : 'url' , valueType : 'text' , }, { title : '请求头' , dataIndex : 'requestHeader' , valueType : 'textarea' , }, { title : '响应头' , dataIndex : 'responseHeader' , valueType : 'textarea' , }, { title : '状态' , dataIndex : 'status' , hideInForm : true , valueEnum : { 0 : { text : '关闭' , status : 'Default' , }, 1 : { text : '开启' , status : 'Processing' , }, }, }, { title : '创建时间' , dataIndex : 'createTime' , valueType : 'dateTime' , }, { title : '更新时间' , dataIndex : 'updateTime' , valueType : 'dateTime' , }, { title : '操作' , dataIndex : 'option' , valueType : 'option' , render : (_, record ) => [ <a key ="config" onClick ={() => { handleUpdateModalVisible(true); setCurrentRow(record); }} > 配置 </a > , <a key ="subscribeAlert" href ="https://procomponents.ant.design/" > 订阅警报 </a > , ], }, ];
加载出来了
image-20230113113509859
但是没有数据,我们需要让它有数据
向下找,发现有一个request 我们需要将他改成自己的listInterfaceInfoByPageUsingGET
这样就有数据了
image-20230113113932612
刷新查看页面
image-20230113114748766
无法加载,但是我们发现数据已经有了
对于这种错误,我们需要检查
你的请求参数和他的请求参数是否一致
你的响应值和他要求的响应值是否一致
所以我们不能完全替换
查看request 的请求参数
1
2
3
4
5
request ?: (params : U & { pageSize?: number ; current?: number ; keyword?: string ; }, sort : Record <string , SortOrder >, filter : Record <string , React .ReactText [] | null > ) =>Promise <Partial <RequestData <T>>>;
在request 在点击RequestData
查看响应参数
1
2
3
4
5
export type RequestData<T> = { data: T[] | undefined; success?: boolean; total?: number; } & Record<string, any>;
所以刚刚简单替换请求方法的代码我们重新写
1 2 3 4 5 6 7 8 9 10 11 12 13 14 15 16 17 18 19 20 21 request={async ( params : { pageSize ?: number ; current ?: number ; keyword ?: string ; }, sort : Record <string , SortOrder >, filter : Record <string , React .ReactText [] | null >,) => { const res = await listInterfaceInfoByPageUsingGET ({ ...params }); if (res.data ) { return { data : res.data .records || [], success : true , total : res.data .total , }; } else { return { data : [], success : false , total : 0 , }; } }}
刷新页面,显示成功
image-20230113121556718
二、基础增删改查
1、修改路由
打开config 包找到 routes.ts
将原来pages下的TableList 表单名称改为我们的interfaceInfo ,再把接口管理页面配置到管理员页面下
1
2
3
4
5
6
{ name : '接口管理' , icon : 'table' , path : '/admin/interface_info' , component : './InterfaceInfo' , }
1
2
3
4
5
6
7
8
9
10
11
12
13
14
15
16
17
18
19
20
21
22
23
24
25
26
27
28
29
30
31
32
33
34
35
36
37
38
39
40
41
42
43
44
45
46
47
48
49
50
51
52
export default [ { path : '/user' , layout : false , routes : [ { name : 'login' , path : '/user/login' , component : './User/Login' , }, ], }, { path : '/welcome' , name : 'welcome' , icon : 'smile' , component : './Welcome' , }, { path : '/admin' , name : 'admin' , icon : 'crown' , access : 'canAdmin' , routes : [ { path : '/admin' , redirect : '/admin/sub-page' , }, { path : '/admin/sub-page' , name : 'sub-page' , component : './Admin' , }, { name : '接口管理' , icon : 'table' , path : '/admin/interface_info' , component : './InterfaceInfo' , }, ], }, { path : '/' , redirect : '/welcome' , }, { path : '*' , layout : false , component : './404' , }, ];
效果如下
image-20230113145422228
2、新增接口信息
1)表单模块
interfaceInfo 中的index.tsx 找到新建的Button
image-20230113153334776
我们点击新建的时候,他会打开一个模态框。往下找,发现它已经给我们提供了这个组件。但是我们需要重新写
image-20230113153512970
我们可以就像更新模态框一样新建一个CreateModal.tsx
image-20230113153639726
接下来修改从UpdateForm中粘贴的CreateModal.tsx 的代码
1
2
3
4
5
6
7
8
9
10
11
12
13
14
15
16
17
18
19
20
21
22
import { Modal } from 'antd' ;import React from 'react' ;import { ProColumns , ProTable } from '@ant-design/pro-components' ;import '@umijs/max' ;export type Props = { columns : ProColumns <API .InterfaceInfo >[]; onCancel : () => void ; onSubmit : (values : API.InterfaceInfo Promise <boolean >; open : boolean ; }; const CreateModal : React .FC <Props > = (props ) => { const { columns, open, onCancel } = props; return ( <Modal open ={open} onCancel ={() => onCancel?.()}> <ProTable columns ={columns} /> </Modal > ); }; export default CreateModal ;
这里我们复用了index中的columns
这里我顺便把取消也写了
在index.tsx 中使用
1 2 3 4 5 6 7 8 9 10 11 12 13 14 15 16 17 18 19 20 21 22 const [createModalOpen, handleModalOpen] = useState<boolean >(false ); const columns : ProColumns <API .InterfaceInfo >[] = [ { title : 'id' , dataIndex : 'id' , valueType : 'index' , }, ] <CreateModal columns={columns} onCancel={() => handleModalOpen (false )} onSubmit={() => {}} open={createModalOpen} />
测试一下
image-20230113164234500
emmmm… 这是什么玩意??
查询官方文档可知,这是ProTable的默认type
所以我们需要给它指定一个form的type
1
2
3
4
5
6
7
8
const CreateModal : React .FC <Props > = (props ) => { const { columns, open, onCancel } = props; return ( <Modal open ={open} onCancel ={() => onCancel?.()}> <ProTable columns ={columns} type ={ 'form '} /> </Modal > ); };
再测试一下就正常啦~
image-20230113164846052
发现创建时间、更新时间我们并不需要。增加hideInForm属性
1
2
3
4
5
6
7
8
9
10
11
12
{ title : '创建时间' , dataIndex : 'createTime' , valueType : 'dateTime' , hideInForm : true , }, { title : '更新时间' , dataIndex : 'updateTime' , valueType : 'dateTime' , hideInForm : true , },
2)请求后端
先简单处理一下请求报错的情况
找到src/requestConfig.ts 修改一下响应拦截器
1 2 3 4 5 6 7 8 9 10 11 12 responseInterceptors : [ (response ) => { const { data } = response as unknown as ResponseStructure ; console .log ('data' , data); if (data.code !== 0 ) { throw new Error (data.message ); } return response; }, ],
再在interfaceinfo/index.tsx中新增请求后端的方法
1
2
3
4
5
6
7
8
9
10
11
12
13
14
15
16
17
18
19
20
21
22
23
24
25
const handleAddInterfaceInfo = async (fields : API.InterfaceInfoAddRequest const hide = message.loading ('正在添加' ); try { await addInterfaceInfoUsingPOST ({ ...fields }); hide (); message.success ('创建成功!' ); handleModalOpen (false ); return true ; } catch (error : any ) { hide (); console .log (error); message.error ('创建失败!' + error.message ); return false ; } }; <CreateModal columns ={columns} onCancel ={() => handleModalOpen(false)} onSubmit={(values) => handleAddInterfaceInfo(values)} open={createModalOpen} />
再修改CreateModal.tsx
1
2
3
4
5
6
7
8
const CreateModal : React .FC <Props > = (props ) => { const { columns, open, onCancel, onSubmit } = props; return ( <Modal title ={ '新建接口 '} open ={open} onCancel ={() => onCancel?.()}> <ProTable columns ={columns} type ={ 'form '} onSubmit ={async (value ) => onSubmit?.(value)} /> </Modal > ); };
测试添加成功
image-20230113183349785
3、编辑接口信息
先把Modal的footer干掉 footer={null}
1 2 3 <Modal title={'更新接口' } footer={null } open={open} onCancel={() => onCancel?.()}> );
1)表单模块
新建文件src/pages/InterfaceInfo/components/UpdateModal.tsx
这里使用的useRef、formRef参考了官方文档
1
2
3
4
5
6
7
8
9
10
11
12
13
14
15
16
17
18
19
20
21
22
23
24
25
26
27
28
29
30
31
32
33
34
35
36
37
38
39
40
import { Modal } from 'antd' ;import React , {useEffect, useRef} from 'react' ;import { ProColumns , ProFormInstance , ProTable } from '@ant-design/pro-components' ;import '@umijs/max' ;export type Props = { value : API .InterfaceInfo ; columns : ProColumns <API .InterfaceInfoUpdateRequest >[]; onCancel : () => void ; onSubmit : (values : API.InterfaceInfoUpdateRequest Promise <void >; open : boolean ; }; const UpdateModal : React .FC <Props > = (props ) => { const { value, columns, open, onCancel, onSubmit } = props; const formRef = useRef<ProFormInstance >(); useEffect (() => { if (formRef) { formRef.current ?.setFieldsValue (value); } }, [value]); return ( <Modal title ={ '更新接口 '} footer ={null} open ={open} onCancel ={() => onCancel?.()}> <ProTable columns ={columns} formRef ={formRef} type ={ 'form '} onSubmit ={async (value ) => onSubmit?.(value)} // 设置默认值 form={{ initialValues: value }} /> </Modal > ); }; export default UpdateModal ;
2)请求后端
在interfaceinfo/index.tsx中新增请求后端的方法
1 2 3 4 5 6 7 8 9 10 11 12 13 14 15 16 17 18 19 20 21 22 23 24 25 26 27 28 29 30 31 32 33 34 35 36 37 38 39 40 41 42 43 44 45 46 47 const handleUpdateInterfaceInfo = async (updateValue : API.InterfaceInfoUpdateRequest const hide = message.loading ('正在更新' ); try { let res = await updateInterfaceInfoUsingPOST ({ ...updateValue }); if (res.data ) { hide (); handleUpdateModalOpen (false ); message.success ('更新成功!' ); return true ; } } catch (error : any ) { hide (); message.error ('更新失败!' + error.message ); return false ; } }; <UpdateModal value ={currentRow || {}} columns ={columns} open ={updateModalOpen} onSubmit ={async (value ) => { const success = await handleUpdateInterfaceInfo(value); if (success) { handleUpdateModalOpen(false); setCurrentRow(undefined); if (actionRef.current) { actionRef.current.reload(); } } }} onCancel={() => { handleUpdateModalOpen(false); if (!showDetail) { setCurrentRow(undefined); } }} />
出错了,猜测是Ant Design
Pro的问题,猜错了,其实是columns中的id的type为index的原因。并没有id字段,所以我手动给一下
image-20230113222955554
修改代码如下
1 2 3 4 5 6 7 8 9 10 11 12 13 14 15 16 17 18 19 20 21 22 23 24 25 26 27 28 29 30 31 32 const handleUpdateInterfaceInfo = async (fields : API.InterfaceInfoUpdateRequest const hide = message.loading ('正在更新' ); try { if (!currentRow){ return false ; } let res = await updateInterfaceInfoUsingPOST ({ id : currentRow.id , ...fields, }); if (res.data ) { hide (); handleUpdateModalOpen (false ); message.success ('更新成功!' ); actionRef.current ?.reload (); return true ; } } catch (error : any ) { hide (); message.error ('更新失败!' + error.message ); return false ; } };
测试更新成功~
4、删除接口信息
删除按钮
1 2 3 4 5 6 7 8 9 10 11 12 13 14 15 16 17 18 19 20 21 22 23 24 25 { title : '操作' , dataIndex : 'option' , valueType : 'option' , render : (_, record ) => [ <a key ="config" onClick ={() => { handleUpdateModalOpen(true); setCurrentRow(record); }} > 编辑 </a > , <a key ="delete" onClick ={() => { handleRemoveInterfaceInfo(record); }} > 删除 </a > , ], },
调用方法
1
2
3
4
5
6
7
8
9
10
11
12
13
14
15
16
17
18
const handleRemoveInterfaceInfo = async (record : API.InterfaceInfo const hide = message.loading ('正在删除' ); if (!record) return true ; try { await deleteInterfaceInfoUsingPOST ({ id : record.id , }); hide (); message.success ('删除成功!' ); actionRef.current ?.reload (); return true ; } catch (error : any ) { hide (); message.error ('删除失败!' + error.message ); return false ; } };
测试删除成功~
image-20230114154218713
三、API开发
1、模拟接口
创建项目
快速创建一个spring Boot项目 勾选SpringWeb、Lombok、Spring Boot
DevTools
提供三个模拟接口
接口大体内容
GET 接口
POST 接口(url传参)
POST接口(Restful)
简单的项目结构
image-20230114233348076
1
2
3
4
5
6
7
8
9
10
11
12
13
14
15
16
17
18
19
20
21
22
23
24
25
26
27
28
29
30
31
32
33
34
package com.xuan.controller;import com.xuan.model.User;import org.springframework.web.bind.annotation.*;@RestController @RequestMapping("/name") public class NameController { @GetMapping("/{name}") public String getNameByGet (@PathVariable(value = "name") String name) { return "发送GET请求 你的名字是:" + name; } @PostMapping() public String getNameByPost (@RequestParam(value = "name") String name) { return "发送POST请求 你的名字是:" + name; } @PostMapping("/user") public String getNameByPostWithJson (@RequestBody User user) { return "发送POST请求 JSON中你的名字是:" + user.getName(); } }
application.yml配置一下端口、然后指定一下全局接口的地址
1
2
3
4
server: port: 8123 servlet: context-path: /api
2、调用接口
几种HTTP的调用方式:
HttpClient
RestTemplate
第三方库(OKHttp,Hutool)
这里我使用了Hutool 调用 hutool文档
maven中添加
1 2 3 4 5 <dependency > <groupId > cn.hutool</groupId > <artifactId > hutool-all</artifactId > <version > 5.8.11</version > </dependency >
查看文档中的Http请求相关用法 编写XuanApiClient类
1
2
3
4
5
6
7
8
9
10
11
12
13
14
15
16
17
18
19
20
21
22
23
24
25
26
27
28
29
30
31
32
33
34
35
36
37
38
39
40
41
42
43
package com.xuan.client;import cn.hutool.http.HttpRequest;import cn.hutool.http.HttpResponse;import cn.hutool.http.HttpUtil;import cn.hutool.json.JSONUtil;import com.xuan.model.User;import java.util.HashMap;public class XuanApiClient { public String getNameByGet (String name) { return HttpUtil.get("http://localhost:8123/api/name/" + name); } public String getNameByPost (String name) { HashMap<String, Object> paramMap = new HashMap <>(); paramMap.put("name" , name); return HttpUtil.post("http://localhost:8123/api/name" , paramMap); } public String getNameByPostWithJson (User user) { String json = JSONUtil.toJsonStr(user); HttpResponse response = HttpRequest.post("http://localhost:8123/api/name/user" ) .body(json) .execute(); System.out.println("response = " + response); System.out.println("status = " + response.getStatus()); if (response.isOk()) { return response.body(); } return "fail" ; } }
创建测试类调用测试
image-20230115162508894
四、API签名认证
本质:
签发签名
使用签名(校验签名)
为什么需要
保证安全性,不能随便一个人就可以调用
怎么实现
accessKey 调用的标识(复杂,无序,无规律)secretKey 密钥 (复杂,无序,无规律)
类似用户名 和密码 ,区别:accessKey、secretKey是无状态 的
千万不能把密钥直接在服务器间进行传递,有可能被拦截
加密看第二点
1、修改数据库
由于我们的user表 里面没有access_key、secret_key
所以我们要修改数据库表
1
2
3
4
5
6
7
8
9
10
11
12
13
14
15
16
17
create table if not exists user ( id bigint auto_increment comment 'id' primary key , user_name varchar (256 ) null comment '用户昵称' , user_account varchar (256 ) not null comment '账号' , user_avatar varchar (1024 ) null comment '用户头像' , gender tinyint null comment '性别' , user_role varchar (256 ) default 'user' not null comment '用户角色:user / admin' , user_password varchar (512 ) not null comment '密码' , access_key varchar (256 ) null comment 'access_key' , secret_key varchar (256 ) null comment 'secret_key' , create_time datetime default CURRENT_TIMESTAMP not null comment '创建时间' , update_time datetime default CURRENT_TIMESTAMP not null on update CURRENT_TIMESTAMP comment '更新时间' , is_delete tinyint default 0 not null comment '是否删除' , constraint uni_user_account unique (user_account) ) comment '用户' ;
直接drop掉之前的table重新建表,插入一条测试数据。
标准的话 应该新建一个表
主要字段为接口id、使用用户id、access_key、secret_key等等
2、加密
1、加密方式
将accessKey、secretKey放在Header里明文传递安全吗
答案是否定的,因为我们的请求可能被人拦截 ,而我们把密码放进请求头里面,可能会被别人获取
一般是根据密钥,生成签名sign
加密方式
对称加密
非对称加密
md5 签名(不可解密)
签名的做法
假如
,我们有用户参数,我们用密钥与他拼接,用签名算法得到一个不可解密的值
用户参数 + 密钥 => 签名生成算法(MD5,HMac,Sha1) =>
不可解密的值
例子: xuan + abc =>
7e7b9583aa0bc3e834fe8bcaebda38b5(这里是我随便输的,得到的值是随机的)
怎么知道签名对不对?
服务端用一模一样的参数和算法去生成签名,只要和用户传的一致,就表示密钥一致
怎么防重放?
加nonce随机数 只能用一次
服务端要保存用过的随机数
加timestamp 时间戳,校验它的有效期
综上所属
传递的参数
accessKey
sign
(由accessKey(或者使用用户请求参数body等)、secretKey签名而来)
nonce随机数
timestamp
body(用户请求参数 可要可不要)
API签名认证是一个很灵活的设计,具体要有哪些参数,尽量服务端调用,参数名如何要根据场景来。
2、签名代码
我这里直接使用了body、和secretKey进行签名
先创建一个签名类SignUtil.java
1
2
3
4
5
6
7
8
9
10
11
12
13
14
15
16
17
18
package com.xuan.util;import cn.hutool.crypto.digest.DigestUtil;public class SignUtil { public static String getSign (String body, String secretKey) { String content = body + "." + secretKey; return DigestUtil.md5Hex(content); } }
在Client类中新增构造Header的方法
1
2
3
4
5
6
7
8
9
10
11
12
13
14
15
16
17
18
19
20
21
22
23
24
25
26
27
28
29
30
31
32
33
34
35
36
37
38
public class XuanApiClient { private final String accessKey; private final String secretKey; public XuanApiClient (String accessKey, String secretKey) { this .accessKey = accessKey; this .secretKey = secretKey; } public String getNameByPostWithJson (User user) { String json = JSONUtil.toJsonStr(user); HttpResponse response = HttpRequest.post("http://localhost:8123/api/name/user" ) .addHeaders(getHeaders(json)) .body(json) .execute(); System.out.println("response = " + response); System.out.println("status = " + response.getStatus()); if (response.isOk()) { return response.body(); } return "fail" ; } private Map<String, String> getHeaders (String body) throws UnsupportedEncodingException { Map<String, String> header = new HashMap <>(); header.put("accessKey" , accessKey); header.put("sign" , SignUtil.getSign(body, secretKey)); header.put("body" , URLEncoder.encode(body, StandardCharsets.UTF_8.name())); header.put("nonce" , RandomUtil.randomNumbers(5 )); header.put("timestamp" , String.valueOf(System.currentTimeMillis())); return header; } }
调用API的时候签名代码已经写好了,显然我们在API中需要用同样的方法来验证签名。这里以携带JSON
body的POST请求为例
1
2
3
4
5
6
7
8
9
10
11
12
13
14
15
16
17
18
19
20
21
22
23
24
25
26
27
28
29
30
31
32
33
34
35
36
37
38
39
40
41
42
43
44
45
46
47
48
49
50
51
52
53
54
55
56
package com.xuan.controller;import cn.hutool.core.util.NumberUtil;import cn.hutool.core.util.StrUtil;import com.xuan.model.User;import com.xuan.util.SignUtil;import org.springframework.web.bind.annotation.*;import javax.servlet.http.HttpServletRequest;@RestController @RequestMapping("/name") public class NameController { @PostMapping("/user") public String getNameByPostWithJson (@RequestBody User user, HttpServletRequest request) throws UnsupportedEncodingException { String accessKey = request.getHeader("accessKey" ); String body = URLDecoder.decode(request.getHeader("body" ), StandardCharsets.UTF_8.name()); String sign = request.getHeader("sign" ); String nonce = request.getHeader("nonce" ); String timestamp = request.getHeader("timestamp" ); boolean hasBlank = StrUtil.hasBlank(accessKey, body, sign, nonce, timestamp); if (hasBlank) { return "无权限" ; } String secretKey = "abc" ; String sign1 = SignUtil.getSign(body, secretKey); if (!StrUtil.equals(sign, sign1)) { return "无权限" ; } if (!NumberUtil.isNumber(timestamp)) { return "无权限" ; } if (System.currentTimeMillis() - Long.parseLong(timestamp) > 5 * 60 * 1000 ) { return "无权限" ; } return "发送POST请求 JSON中你的名字是:" + user.getName(); } }
进行测试secretKey = “abc”
可以正确访问,当secret错误时返回无权限~
五、开发一个SDK(starter)
理想情况:开发者只需要关心调用哪些接口、传递哪些参数。就跟调用自己写的代码一样简单。
开发starter的好处:开发者引入之后,可以直接在application.yml中写配置,自动创建客户端
1、新建项目
创建一个xuanapi-client-sdk的springboot项目 勾选lombok、Spring
Configuration Processor(作用:自动生成配置的代码提示)
然后处理pom.xml
一定需要删除 因为这个是maven的构建项目成可运行jar包。现在是制作starter依赖包
image-20230116142827466
2、编写配置类
我们不需要spring boot启动类,将其删去。
然后将之前编写好的client、util、model粘贴过来
image-20230116153646366
再新建配置类
1
2
3
4
5
6
7
8
9
10
11
12
13
14
15
@Data @ComponentScan @Configuration @ConfigurationProperties(prefix = "xuan.api.client") public class XuanApiClientConfig { private String accessKey; private String secretKey; @Bean public XuanApiClient xuanApiClient () { return new XuanApiClient (accessKey, secretKey); } }
3、指定配置类
新建resources/META-INF/spring.factories并指定
1 2 org.springframework.boot.autoconfigure.EnableAutoConfiguration =com.xuan.XuanApiClientConfig
image-20230116153954227
4、发布starter
双击Maven lifecycle下的install或者命令行mvn install
image-20230116154259164
1
2
[INFO] Installing /Users/xuan/Desktop/project/api-platform/xuanapi-client-sdk/target/xuanapi-client-sdk-0.0.1.jar to /Users/xuan/.m2/repository/com/xuan/xuanapi-client-sdk/0.0.1/xuanapi-client-sdk-0.0.1.jar [INFO] Installing /Users/xuan/Desktop/project/api-platform/xuanapi-client-sdk/pom.xml to /Users/xuan/.m2/repository/com/xuan/xuanapi-client-sdk/0.0.1/xuanapi-client-sdk-0.0.1.pom
5、测试
引入依赖
回到xuan-Interface项目,把之前的client、util、model全部删掉。然后在pom中引入我们刚刚制作好的starter
注意: 这里能直接引入,是因为刚刚我们install的stater在我们的本地,可以发布到Maven仓库或者提供jar包供大家使用。
1 2 3 4 5 6 <dependency > <groupId > com.xuan</groupId > <artifactId > xuanapi-client-sdk</artifactId > <version > 0.0.1</version > </dependency >
配置信息
image-20230116155915000
我们在yml文件中配置的时候有提示就是之前引入的Spring Configuration
Processor发挥的作用。打开依赖源码分析可得是这个json文件的作用
image-20230116160142141
在测试类使用@Resource注入XuanApiClient进行测试
image-20230116160643683
yml中secret不正确也会返回 “无权限”
六、接口发布/下线
这个功能首先是仅管理员使用的
发布接口
校验该接口是否存在
判断接口是否可以被调用
修改数据库接口字段为1
下线接口
校验该接口是否存在
修改数据库接口字段为 0
1、后端
通用请求类
上下线都是通过id来控制的
1 2 3 4 5 6 7 8 9 10 11 12 13 14 @Data public class IdRequest implements Serializable { private Long id; private static final long serialVersionUID = 1L ; }
枚举类
使用枚举类来表示上线/下线状态
1
2
3
4
5
6
7
8
9
10
11
12
13
14
15
16
17
18
19
20
21
22
23
24
25
26
27
28
29
30
31
32
33
34
35
36
37
38
39
40
41
42
package com.xuan.project.model.enums;import java.util.Arrays;import java.util.List;import java.util.stream.Collectors;public enum InterfaceInfoStatusEnum { OFFLINE("下线" , 0 ), ONLINE("上线" , 1 ); private final String text; private final int value; InterfaceInfoStatusEnum(String text, int value) { this .text = text; this .value = value; } public static List<Integer> getValues () { return Arrays.stream(values()).map(item -> item.value).collect(Collectors.toList()); } public int getValue () { return value; } public String getText () { return text; } }
在controller里编写上下线代码
这里有个TODO
判断该接口是否可以调用时,由XuanApiClient固定方法名改为根据测试地址来调用
1 2 3 4 5 6 7 8 9 10 11 12 13 14 15 16 17 18 19 20 21 22 23 24 25 26 27 28 29 30 31 32 33 34 35 36 37 38 39 40 41 42 43 44 45 46 47 48 49 50 51 52 53 54 55 56 57 58 59 60 61 62 63 64 65 66 67 68 69 70 71 72 73 74 75 76 77 78 79 80 81 82 @RestController @RequestMapping("/interfaceInfo") @Slf4j public class InterfaceInfoController { @Resource private InterfaceInfoService interfaceInfoService; @Resource private UserService userService; @Resource private XuanApiClient xuanApiClient; @PostMapping("/online") @AuthCheck(mustRole = "admin") public BaseResponse<Boolean> onlineInterfaceInfo (@RequestBody IdRequest idRequest) throws UnsupportedEncodingException { if (idRequest == null || idRequest.getId() < 0 ) { throw new BusinessException (ErrorCode.PARAMS_ERROR); } long id = idRequest.getId(); InterfaceInfo oldInterfaceInfo = interfaceInfoService.getById(id); if (oldInterfaceInfo == null ) { throw new BusinessException (ErrorCode.NOT_FOUND_ERROR); } com.xuan.model.User user = new com .xuan.model.User(); user.setName("MARS" ); String name = xuanApiClient.getNameByPostWithJson(user); if (StrUtil.isBlank(name)) { throw new BusinessException (ErrorCode.SYSTEM_ERROR, "接口验证失败" ); } InterfaceInfo interfaceInfo = new InterfaceInfo (); interfaceInfo.setId(id); interfaceInfo.setStatus(InterfaceInfoStatusEnum.ONLINE.getValue()); boolean isSuccessful = interfaceInfoService.updateById(interfaceInfo); return ResultUtils.success(isSuccessful); } @PostMapping("/offline") @AuthCheck(mustRole = "admin") public BaseResponse<Boolean> offlineInterfaceInfo (@RequestBody IdRequest idRequest) { if (idRequest == null || idRequest.getId() < 0 ) { throw new BusinessException (ErrorCode.PARAMS_ERROR); } long id = idRequest.getId(); InterfaceInfo oldInterfaceInfo = interfaceInfoService.getById(id); if (oldInterfaceInfo == null ) { throw new BusinessException (ErrorCode.NOT_FOUND_ERROR); } InterfaceInfo interfaceInfo = new InterfaceInfo (); interfaceInfo.setId(id); interfaceInfo.setStatus(InterfaceInfoStatusEnum.OFFLINE.getValue()); boolean isSuccessful = interfaceInfoService.updateById(interfaceInfo); return ResultUtils.success(isSuccessful); } }
权限控制
这里添加权限校验,这里用到@AuthCheck (mustRole =
“admin”)
1
2
3
4
5
6
7
8
9
10
11
12
13
14
15
16
17
18
19
20
21
22
23
24
25
26
27
28
29
30
31
32
package com.xuan.project.annotation;import java.lang.annotation.ElementType;import java.lang.annotation.Retention;import java.lang.annotation.RetentionPolicy;import java.lang.annotation.Target;@Target(ElementType.METHOD) @Retention(RetentionPolicy.RUNTIME) public @interface AuthCheck { String[] anyRole() default "" ; String mustRole () default "" ; }
aop/AuthInterceptor.java
1
2
3
4
5
6
7
8
9
10
11
12
13
14
15
16
17
18
19
20
21
22
23
24
25
26
27
28
29
30
31
32
33
34
35
36
37
38
39
40
41
42
43
44
45
46
47
48
49
50
51
52
53
54
55
56
57
58
59
60
61
62
63
64
65
66
67
68
69
70
71
package com.xuan.project.aop;import com.baomidou.mybatisplus.core.toolkit.CollectionUtils;import com.xuan.project.common.ErrorCode;import com.xuan.project.exception.BusinessException;import com.xuan.project.model.entity.User;import com.xuan.project.service.UserService;import com.xuan.project.annotation.AuthCheck;import org.apache.commons.lang3.StringUtils;import org.aspectj.lang.ProceedingJoinPoint;import org.aspectj.lang.annotation.Around;import org.aspectj.lang.annotation.Aspect;import org.springframework.stereotype.Component;import org.springframework.web.context.request.RequestAttributes;import org.springframework.web.context.request.RequestContextHolder;import org.springframework.web.context.request.ServletRequestAttributes;import javax.annotation.Resource;import javax.servlet.http.HttpServletRequest;import java.util.Arrays;import java.util.List;import java.util.stream.Collectors;@Aspect @Component public class AuthInterceptor { @Resource private UserService userService; @Around("@annotation(authCheck)") public Object doInterceptor (ProceedingJoinPoint joinPoint, AuthCheck authCheck) throws Throwable { List<String> anyRole = Arrays.stream(authCheck.anyRole()).filter(StringUtils::isNotBlank).collect(Collectors.toList()); String mustRole = authCheck.mustRole(); RequestAttributes requestAttributes = RequestContextHolder.currentRequestAttributes(); HttpServletRequest request = ((ServletRequestAttributes) requestAttributes).getRequest(); User user = userService.getLoginUser(request); if (CollectionUtils.isNotEmpty(anyRole)) { String userRole = user.getUserRole(); if (!anyRole.contains(userRole)) { throw new BusinessException (ErrorCode.NO_AUTH_ERROR); } } if (StringUtils.isNotBlank(mustRole)) { String userRole = user.getUserRole(); if (!mustRole.equals(userRole)) { throw new BusinessException (ErrorCode.NO_AUTH_ERROR); } } return joinPoint.proceed(); } }
userService.getLoginUser(request)
1 2 3 4 5 6 7 8 9 10 11 12 13 14 15 16 17 18 19 20 21 22 @Override public User getLoginUser (HttpServletRequest request) { Object userObj = request.getSession().getAttribute(USER_LOGIN_STATE); User currentUser = (User) userObj; if (currentUser == null || currentUser.getId() == null ) { throw new BusinessException (ErrorCode.NOT_LOGIN_ERROR); } long userId = currentUser.getId(); currentUser = this .getById(userId); if (currentUser == null ) { throw new BusinessException (ErrorCode.NOT_LOGIN_ERROR); } return currentUser; }
2、前端
1、添加发布按钮和下线按钮
查看了Ant Design Button的官方文档
发布/下线做成一个按钮。通过status来动态判断
1
2
3
4
5
6
7
8
9
10
11
12
13
14
15
16
17
18
19
20
21
22
23
24
25
26
27
28
29
30
31
32
33
34
35
36
37
38
39
40
41
42
43
44
45
46
47
48
49
{ title : '操作' , dataIndex : 'option' , valueType : 'option' , render : (_, record ) => [ <Button key ="config" type ={ "link "} onClick ={() => { handleUpdateModalOpen(true); setCurrentRow(record); }} > 编辑 </Button > , record.status === 0 ? ( <Button key ="online" type ={ 'link '} onClick ={() => { handleOnlineInterface(record); }} > 发布 </Button > ) : ( <Button key ="offline" type ={ 'text '} // danger ={true} onClick ={() => { handleOfflineInterface(record); }} > 下线 </Button > ), <Button key ="delete" type ={ 'text '} danger ={true} onClick ={() => { handleRemoveInterfaceInfo(record); }} > 删除 </Button > , ], },
效果如下
image-20230117142012585
2、编写发布/下线的方法
因为后端新增了代码,所以还是使用openapi自动生成前端方法
跟之前操作一样,去http://localhost:7529/api/v3/api-docs复制json到config/oneapi.json
然后运行openapi
image-20230117121821846
新增方法
1 2 3 4 5 6 7 8 9 10 11 12 13 14 15 16 17 18 19 20 21 22 23 24 25 26 27 28 29 30 31 32 33 34 35 36 37 38 39 40 41 42 43 44 45 46 47 const handleOnlineInterface = async (fields : API.IdRequest const hide = message.loading ('正在发布' ); try { let res = await onlineInterfaceInfoUsingPOST ({ ...fields }); if (res.data ) { hide (); message.success ('发布成功!' ); actionRef.current ?.reload (); return true ; } } catch (error : any ) { hide (); message.error ('发布失败!' + error.message ); return false ; } }; const handleOfflineInterface = async (fields : API.IdRequest const hide = message.loading ('正在下线' ); try { let res = await offlineInterfaceInfoUsingPOST ({ ...fields }); if (res.data ) { hide (); message.success ('下线成功!' ); actionRef.current ?.reload (); return true ; } } catch (error : any ) { hide (); message.error ('下线失败!' + error.message ); return false ; } };
网页进行测试没有问题~
七、用户主页
前端浏览接口,查看接口文档,申请签名(注册)
1、浏览接口
在src/pages目录下新建Index目录并把Welcome.tsx拖入其中改名为index.tsx
配置路由
image-20230118113613886
测试一下 主页能够正常访问,接下来再来编写页面
编写页面
这里参考了 Ant Design
List组件
1
2
3
4
5
6
7
8
9
10
11
12
13
14
15
16
17
18
19
20
21
22
23
24
25
26
27
28
29
30
31
32
33
34
35
36
37
38
39
40
41
42
43
44
45
46
47
48
49
50
51
52
53
54
55
56
57
58
59
60
61
62
63
import { PageContainer } from '@ant-design/pro-components' ;import { List , message } from 'antd' ;import React , { useEffect, useState } from 'react' ;import { listInterfaceInfoByPageUsingGET } from '@/services/api-platform-backend/interfaceInfoController' ;const Index : React .FC = () => { const [loading, setLoading] = useState (false ); const [list, setList] = useState<API .InterfaceInfo []>([]); const [total, setTotal] = useState<number >(0 ); const loadData = async (current = 1 , pageSize = 10 ) => { setLoading (true ); try { const res = await listInterfaceInfoByPageUsingGET ({ current, pageSize, }); setList (res?.data ?.records ?? []); setTotal (res?.data ?.total ?? 0 ); setLoading (false ); } catch (error : any ) { setLoading (false ); message.error ('请求失败,' + error.message ); } }; useEffect (() => { loadData (); }, []); return ( <PageContainer title ={ '主页 '}> <List className ="interfaceInfo-list" loading ={loading} itemLayout ="horizontal" dataSource ={list} pagination ={{ showSizeChanger: true , total: total , showTotal (total , range ) { return `${range [0 ]}- ${range [1 ]} / ${total }`; }, onChange (page , pageSize ) { loadData (page , pageSize ); }, }} renderItem ={(item) => ( <List.Item actions ={[ <a key ="list-more" > 查看详情</a > ]}> <List.Item.Meta title ={ <a href ="https://ant.design" > {item.name}</a > } description={item.description} /> <div > {item.method}</div > </List.Item > )} /> </PageContainer > ); }; export default Index ;
效果如下
image-20230118140557053
2、查看接口文档
新建文件
在pages下新建 InterfaceInfo/index.tsx
配置动态路由
这里需要查看 umi文档
1
2
3
4
5
6
7
8
{ path : '/interface_info/:id' , name : 'interface info' , component : './InterfaceInfo' , hideInMenu : true }
image-20230118152720709
修改跳转
点击页面即可查看详情
image-20230118152832702
主页代码片段修改
1
2
3
4
5
6
7
8
9
10
11
12
13
14
15
16
17
18
19
20
21
22
23
24
25
26
27
28
29
30
31
32
33
34
35
36
37
38
39
return ( <PageContainer title ={ '接口开放平台 '}> <List className ="interfaceInfo-list" loading ={loading} itemLayout ="horizontal" dataSource ={list} pagination ={{ showSizeChanger: true , total: total , showTotal (total , range ) { return `${range [0 ]}- ${range [1 ]} / ${total }`; }, onChange (page , pageSize ) { loadData (page , pageSize ); }, }} // 修改的地方 renderItem ={(item) => { const infoLink = `/interface_info/${item.id}`; return ( <List.Item actions ={[ <a key ="list-more" href ={infoLink} > 查看详情 </a > , ]} > <List.Item.Meta title ={ <a href ={infoLink} > {item.name}</a > } description={item.description} /> <div > {item.method}</div > </List.Item > ); }} /> </PageContainer > );
编写InterfaceInfo/index.tsx
这里需要查看Ant Design中的Card 和 Descriptions 组件
已经umi中动态路由如何获取路径中的id
image-20230118153556403
如官方文档所示,这里我们使用useParams()
1
2
3
4
5
6
7
8
9
10
11
12
13
14
15
16
17
18
19
20
21
22
23
24
25
26
27
28
29
30
31
32
33
34
35
36
37
38
39
40
41
42
43
44
45
46
47
48
49
50
51
52
53
54
55
56
57
58
59
60
61
62
63
64
import { PageContainer } from '@ant-design/pro-components' ;import { Badge , Card , Descriptions , message } from 'antd' ;import React , { useEffect, useState } from 'react' ;import { getInterfaceInfoByIdUsingGET } from '@/services/api-platform-backend/interfaceInfoController' ;import { useParams } from 'react-router' ;import moment from "moment" ;const InterfaceInfo : React .FC = () => { const [loading, setLoading] = useState (false ); const [data, setData] = useState<API .InterfaceInfo >(); const params = useParams (); const loadData = async ( if (!params.id ) { message.error ('无数据,请重试' ); } setLoading (true ); try { const res = await getInterfaceInfoByIdUsingGET ({ id : Number (params.id ), }); setData (res?.data ); setLoading (false ); } catch (error : any ) { setLoading (false ); message.error ('请求失败,' + error.message ); } }; useEffect (() => { loadData (); }, []); return ( <PageContainer title ={ '接口详情 '}> <Card loading ={loading} > {data ? ( <Descriptions title ={data.name} column ={2} layout ="vertical" bordered ={true} > <Descriptions.Item label ="描述" > {data.description}</Descriptions.Item > <Descriptions.Item label ="接口状态" > {data.status === 0 ? ( <Badge text ={ '关闭 '} status ={ 'default '} /> ) : ( <Badge text ={ '启用 '} status ={ 'processing '} /> )} </Descriptions.Item > <Descriptions.Item label ="请求地址" > {data.url}</Descriptions.Item > <Descriptions.Item label ="请求方法" > {data.method}</Descriptions.Item > <Descriptions.Item label ="请求头" > {data.requestHeader}</Descriptions.Item > <Descriptions.Item label ="响应头" > {data.responseHeader}</Descriptions.Item > <Descriptions.Item label ="创建时间" > {moment(data.createTime).format('yyyy-MM-DD HH:mm:ss')}</Descriptions.Item > <Descriptions.Item label ="更新时间" > {moment(data.updateTime).format('yyyy-MM-DD HH:mm:ss')}</Descriptions.Item > </Descriptions > ) : ( <> 接口不存在</> )} </Card > </PageContainer > ); }; export default InterfaceInfo ;
效果如下
点击后跳转详情
image-20230118153729873
3、申请签名
注册用户的时候就给他分配一个签名
先在User类和UserMapper.xml中加一下accessKey、secretKey的字段
更新注册方法
1
2
3
4
5
6
7
8
9
10
11
12
13
14
15
16
17
18
19
20
21
22
23
24
25
26
27
28
29
30
31
32
33
34
35
36
37
38
39
40
41
42
@Override public long userRegister (String userAccount, String userPassword, String checkPassword) { if (StringUtils.isAnyBlank(userAccount, userPassword, checkPassword)) { throw new BusinessException (ErrorCode.PARAMS_ERROR, "参数为空" ); } if (userAccount.length() < 4 ) { throw new BusinessException (ErrorCode.PARAMS_ERROR, "用户账号过短" ); } if (userPassword.length() < 8 || checkPassword.length() < 8 ) { throw new BusinessException (ErrorCode.PARAMS_ERROR, "用户密码过短" ); } if (!userPassword.equals(checkPassword)) { throw new BusinessException (ErrorCode.PARAMS_ERROR, "两次输入的密码不一致" ); } synchronized (userAccount.intern()) { LambdaQueryWrapper<User> lambdaQueryWrapper = new LambdaQueryWrapper <>(); lambdaQueryWrapper.eq(User::getUserAccount, userAccount); long count = userMapper.selectCount(lambdaQueryWrapper); if (count > 0 ) { throw new BusinessException (ErrorCode.PARAMS_ERROR, "账号重复" ); } String encryptPassword = DigestUtils.md5DigestAsHex((SALT + userPassword).getBytes()); String accessKey = "cli_" + DigestUtil.md5Hex(SALT + userAccount + RandomUtil.randomNumbers(4 )); String secretKey = DigestUtil.md5Hex(SALT + userAccount + RandomUtil.randomNumbers(8 )); User user = new User (); user.setUserAccount(userAccount); user.setUserPassword(encryptPassword); user.setAccessKey(accessKey); user.setSecretKey(secretKey); boolean saveResult = this .save(user); if (!saveResult) { throw new BusinessException (ErrorCode.SYSTEM_ERROR, "注册失败,数据库错误" ); } return user.getId(); } }
前往http://localhost:7529/api/doc.html注册。 分配成功~
image-20230118174821662
更换签名
扩展:用户可以申请更换签名
八、在线调用
发现少了一个「请求参数」字段…现在给补上
数据库、后端、前端都需要补上。 不做过多阐述
这里设计的其实不太完美,只是跑通了。后续做优化
1、前端简单样式
这里我拿了Ant Design官网例子改了一下
1 2 3 4 5 6 7 8 9 10 11 12 13 14 15 16 17 18 19 <Card title={'在线调用' }> <Form name ="basic" layout ={ 'vertical '} onFinish ={onFinish} > <Form.Item label ="请求参数" name ="requestParams" > <Input.TextArea /> </Form.Item > <Form.Item > <Button type ="primary" htmlType ="submit" > 调用 </Button > </Form.Item > </Form > </Card >
image-20230119102254234
2、修改后端
这里我们其实有两种方案
image-20230119102921966
这里用第一种流方案,更安全更规范。模拟接口的地址就不用暴露出来
大概流程如下
前端将用户输入的请求参数和要测试的接口 id发给平台后端
调用前校验
平台后端去调用模拟接口
新增DTO类
1
2
3
4
5
6
7
8
9
10
11
12
13
14
15
16
17
18
19
20
21
22
23
24
25
26
package com.xuan.project.model.dto.interfaceinfo;import lombok.Data;import java.io.Serializable;@Data public class InvokeInterfaceRequest implements Serializable { private Long id; private String requestParams; }
controller类新增方法
1 2 3 4 5 6 7 8 9 10 11 12 13 14 15 16 17 18 19 20 21 22 23 24 25 26 27 28 29 30 31 @PostMapping("/invoke") public BaseResponse<Object> invokeInterface (@RequestBody InvokeInterfaceRequest invokeInterfaceRequest, HttpServletRequest request) throws UnsupportedEncodingException { if (invokeInterfaceRequest == null || invokeInterfaceRequest.getId() < 0 ) { throw new BusinessException (ErrorCode.PARAMS_ERROR); } long id = invokeInterfaceRequest.getId(); InterfaceInfo interfaceInfo = interfaceInfoService.getById(id); if (interfaceInfo == null ) { throw new BusinessException (ErrorCode.NOT_FOUND_ERROR); } if (interfaceInfo.getStatus() != InterfaceInfoStatusEnum.ONLINE.getValue()) { throw new BusinessException (ErrorCode.SYSTEM_ERROR, "接口未上线" ); } User loginUser = userService.getLoginUser(request); String accessKey = loginUser.getAccessKey(); String secretKey = loginUser.getSecretKey(); XuanApiClient client = new XuanApiClient (accessKey, secretKey); String userRequestParams = invokeInterfaceRequest.getRequestParams(); com.xuan.model.User user = JSONUtil.toBean(userRequestParams, com.xuan.model.User.class); String result = client.getNameByPostWithJson(user); return ResultUtils.success(result); }
3、修改前端
Ant Design中 Form组件 onFinish: 提交表单且数据验证成功后回调事件
所以我们来编写onFinish方法
1
2
3
4
5
6
7
8
9
10
11
12
13
14
15
const onFinish = async (requestData : API.InvokeInterfaceRequest if (!params.id ) { message.error ('无数据,请重试' ); } try { const res = await invokeInterfaceUsingPOST ({ id : Number (params.id ), ...requestData, }); setResData (res.data ); message.success ('调用成功!' ); } catch (error : any ) { message.error ('请求失败,' + error.message ); } };
再修改一下样式
1
2
3
4
5
6
7
8
9
10
11
12
13
14
15
16
17
18
19
20
21
22
23
24
25
26
27
28
29
30
31
32
33
34
35
36
37
38
39
40
41
42
43
44
45
46
47
48
49
50
51
52
53
54
55
56
57
58
59
60
61
62
63
64
65
66
67
68
69
70
71
72
73
74
75
76
77
78
79
80
81
82
83
84
85
86
87
88
89
90
91
92
93
94
95
96
97
98
99
100
101
102
103
104
105
import { PageContainer } from '@ant-design/pro-components' ;import { Badge , Card , Descriptions , message, Form , Input , Button , Divider } from 'antd' ;import React , { useEffect, useState } from 'react' ;import { getInterfaceInfoByIdUsingGET, invokeInterfaceUsingPOST, } from '@/services/api-platform-backend/interfaceInfoController' ; import { useParams } from 'react-router' ;import moment from 'moment' ;const InterfaceInfo : React .FC = () => { const [loading, setLoading] = useState (false ); const [data, setData] = useState<API .InterfaceInfo >(); const [resData, setResData] = useState<any >(); const params = useParams (); const loadData = async ( if (!params.id ) { message.error ('无数据,请重试' ); } setLoading (true ); try { const res = await getInterfaceInfoByIdUsingGET ({ id : Number (params.id ), }); setData (res?.data ); setLoading (false ); } catch (error : any ) { setLoading (false ); message.error ('请求失败,' + error.message ); } }; useEffect (() => { loadData (); }, []); const onFinish = async (requestData : API.InvokeInterfaceRequest if (!params.id ) { message.error ('无数据,请重试' ); } try { const res = await invokeInterfaceUsingPOST ({ id : Number (params.id ), ...requestData, }); setResData (res.data ); message.success ('调用成功!' ); } catch (error : any ) { message.error ('请求失败,' + error.message ); } }; return ( <PageContainer title ={ '接口详情 '}> {data ? ( <> <Card loading ={loading} > <Descriptions title ={data.name} column ={2} layout ="vertical" bordered ={true} > <Descriptions.Item label ="描述" > {data.description}</Descriptions.Item > <Descriptions.Item label ="接口状态" > {data.status === 0 ? ( <Badge text ={ '关闭 '} status ={ 'default '} /> ) : ( <Badge text ={ '启用 '} status ={ 'processing '} /> )} </Descriptions.Item > <Descriptions.Item label ="请求地址" > {data.url}</Descriptions.Item > <Descriptions.Item label ="请求方法" > {data.method}</Descriptions.Item > <Descriptions.Item label ="请求头" > {data.requestHeader}</Descriptions.Item > <Descriptions.Item label ="请求参数" > {data.requestParams}</Descriptions.Item > <Descriptions.Item label ="响应头" > {data.responseHeader}</Descriptions.Item > <Descriptions.Item label ="创建时间" > {moment(data.createTime).format('yyyy-MM-DD HH:mm:ss')} </Descriptions.Item > <Descriptions.Item label ="更新时间" > {moment(data.updateTime).format('yyyy-MM-DD HH:mm:ss')} </Descriptions.Item > </Descriptions > </Card > <Divider /> <Card title ={ '在线调用 '}> <Form name ="basic" layout ={ 'vertical '} onFinish ={onFinish} > <Form.Item label ="请求参数" name ="requestParams" > <Input.TextArea /> </Form.Item > <Form.Item > <Button type ="primary" htmlType ="submit" > 调用 </Button > </Form.Item > </Form > </Card > {resData ? <Card title ={ '调用结果 '}> {resData}</Card > : null} </> ) : ( '接口不存在' )} </PageContainer > ); }; export default InterfaceInfo ;
测试如下
image-20230119113714929
4、TODO
判断该接口是否可以调用时由固定方法名改为根据测试地址来调用
用户测试接口固定方法名改为根据测试地址来调用
模拟接囗改为从数据库校验accessKey、secretKey
九、接口调用次数统计
需求
用户每次调用接口成功,次数+1
给用户分配或者用户自主申请调用次数
业务流程
用户调用接口(之前已完成)
修改数据库,调用次数+1
1、设计库表
哪个用户?哪个接口? 用户=>接口(多对多)
用户调用接口关系表
1
2
3
4
5
6
7
8
9
10
11
12
create table if not exists api_platform.`user_interface_info`( `id` bigint not null auto_increment comment '主键' primary key , `user_id` bigint not null comment '调用用户Id' , `interface_info_id` bigint not null comment '接口Id' , `total_num` int default 0 not null comment '总调用次数' , `left_num` int default 0 not null comment '剩余调用次数' , `status` int default 0 not null comment '0-正常 ,1-禁用' , `create_time` datetime default CURRENT_TIMESTAMP not null comment '创建时间' , `update_time` datetime default CURRENT_TIMESTAMP not null on update CURRENT_TIMESTAMP comment '更新时间' , `is_delete` tinyint default 0 not null comment '是否删除(0-未删, 1-已删)' ) comment '用户调用接口关系表' ;
执行sql语句
使用MybatisX插件
生成user_interface_info表的代码
在isDelete上增加@TableLogic 注释
代表逻辑删除
1 2 3 4 5 6 7 8 9 10 11 12 13 14 15 16 17 18 19 20 21 22 23 24 @TableName(value ="user_interface_info") @Data public class UserInterfaceInfo implements Serializable { @TableId(type = IdType.AUTO) private Long id; ... @TableLogic private Integer isDelete; @TableField(exist = false) private static final long serialVersionUID = 1L ; }
2、基础增删改查
先需要在dto中创建类
image-20230123172908757
再复制之前的controller改名替换
1
2
3
4
5
6
7
8
9
10
11
12
13
14
15
16
17
18
19
20
21
22
23
24
25
26
27
28
29
30
31
32
33
34
35
36
37
38
39
40
41
42
43
44
45
46
47
48
49
50
51
52
53
54
55
56
57
58
59
60
61
62
63
64
65
66
67
68
69
70
71
72
73
74
75
76
77
78
79
80
81
82
83
84
85
86
87
88
89
90
91
92
93
94
95
96
97
98
99
100
101
102
103
104
105
106
107
108
109
110
111
112
113
114
115
116
117
118
119
120
121
122
123
124
125
126
127
128
129
130
131
132
133
134
135
136
137
138
139
140
141
142
143
144
145
146
147
148
149
150
151
152
153
154
155
156
157
158
159
160
161
162
163
164
165
166
167
168
169
170
171
172
173
package com.xuan.project.controller;@RestController @RequestMapping("/userInterfaceInfo") @Slf4j public class UserInterfaceInfoController { @Resource private UserInterfaceInfoService userInterfaceInfoService; @Resource private UserService userService; @PostMapping("/add") @AuthCheck(mustRole = UserConstant.ADMIN_ROLE) public BaseResponse<Long> addUserInterfaceInfo (@RequestBody UserInterfaceInfoAddRequest userInterfaceInfoAddRequest, HttpServletRequest request) { if (userInterfaceInfoAddRequest == null ) { throw new BusinessException (ErrorCode.PARAMS_ERROR); } UserInterfaceInfo userInterfaceInfo = new UserInterfaceInfo (); BeanUtils.copyProperties(userInterfaceInfoAddRequest, userInterfaceInfo); userInterfaceInfoService.validUserInterfaceInfo(userInterfaceInfo, true ); User loginUser = userService.getLoginUser(request); userInterfaceInfo.setUserId(loginUser.getId()); boolean result = userInterfaceInfoService.save(userInterfaceInfo); if (!result) { throw new BusinessException (ErrorCode.OPERATION_ERROR); } long newUserInterfaceInfoId = userInterfaceInfo.getId(); return ResultUtils.success(newUserInterfaceInfoId); } @PostMapping("/delete") public BaseResponse<Boolean> deleteUserInterfaceInfo (@RequestBody DeleteRequest deleteRequest, HttpServletRequest request) { if (deleteRequest == null || deleteRequest.getId() <= 0 ) { throw new BusinessException (ErrorCode.PARAMS_ERROR); } User user = userService.getLoginUser(request); long id = deleteRequest.getId(); UserInterfaceInfo oldUserInterfaceInfo = userInterfaceInfoService.getById(id); if (oldUserInterfaceInfo == null ) { throw new BusinessException (ErrorCode.NOT_FOUND_ERROR); } if (!oldUserInterfaceInfo.getUserId().equals(user.getId()) && !userService.isAdmin(request)) { throw new BusinessException (ErrorCode.NO_AUTH_ERROR); } boolean b = userInterfaceInfoService.removeById(id); return ResultUtils.success(b); } @PostMapping("/update") public BaseResponse<Boolean> updateUserInterfaceInfo (@RequestBody UserInterfaceInfoUpdateRequest userInterfaceInfoUpdateRequest, HttpServletRequest request) { if (userInterfaceInfoUpdateRequest == null || userInterfaceInfoUpdateRequest.getId() <= 0 ) { throw new BusinessException (ErrorCode.PARAMS_ERROR); } UserInterfaceInfo userInterfaceInfo = new UserInterfaceInfo (); BeanUtils.copyProperties(userInterfaceInfoUpdateRequest, userInterfaceInfo); userInterfaceInfoService.validUserInterfaceInfo(userInterfaceInfo, false ); User user = userService.getLoginUser(request); System.out.println(user); long id = userInterfaceInfoUpdateRequest.getId(); UserInterfaceInfo oldUserInterfaceInfo = userInterfaceInfoService.getById(id); if (oldUserInterfaceInfo == null ) { throw new BusinessException (ErrorCode.NOT_FOUND_ERROR); } userService.isAdmin(request); if (!oldUserInterfaceInfo.getUserId().equals(user.getId()) && !userService.isAdmin(request)) { throw new BusinessException (ErrorCode.NO_AUTH_ERROR); } boolean result = userInterfaceInfoService.updateById(userInterfaceInfo); return ResultUtils.success(result); } @GetMapping("/get") public BaseResponse<UserInterfaceInfo> getUserInterfaceInfoById (long id) { if (id <= 0 ) { throw new BusinessException (ErrorCode.PARAMS_ERROR); } UserInterfaceInfo userInterfaceInfo = userInterfaceInfoService.getById(id); return ResultUtils.success(userInterfaceInfo); } @AuthCheck(mustRole = "admin") @GetMapping("/list") public BaseResponse<List<UserInterfaceInfo>> listUserInterfaceInfo (UserInterfaceInfoQueryRequest userInterfaceInfoQueryRequest) { UserInterfaceInfo userInterfaceInfoQuery = new UserInterfaceInfo (); if (userInterfaceInfoQueryRequest != null ) { BeanUtils.copyProperties(userInterfaceInfoQueryRequest, userInterfaceInfoQuery); } QueryWrapper<UserInterfaceInfo> queryWrapper = new QueryWrapper <>(userInterfaceInfoQuery); List<UserInterfaceInfo> userInterfaceInfoList = userInterfaceInfoService.list(queryWrapper); return ResultUtils.success(userInterfaceInfoList); } @GetMapping("/list/page") public BaseResponse<Page<UserInterfaceInfo>> listUserInterfaceInfoByPage (UserInterfaceInfoQueryRequest userInterfaceInfoQueryRequest, HttpServletRequest request) { if (userInterfaceInfoQueryRequest == null ) { throw new BusinessException (ErrorCode.PARAMS_ERROR); } UserInterfaceInfo userInterfaceInfoQuery = new UserInterfaceInfo (); BeanUtils.copyProperties(userInterfaceInfoQueryRequest, userInterfaceInfoQuery); long current = userInterfaceInfoQueryRequest.getCurrent(); long size = userInterfaceInfoQueryRequest.getPageSize(); String sortField = userInterfaceInfoQueryRequest.getSortField(); String sortOrder = userInterfaceInfoQueryRequest.getSortOrder(); if (size > 50 ) { throw new BusinessException (ErrorCode.PARAMS_ERROR); } QueryWrapper<UserInterfaceInfo> queryWrapper = new QueryWrapper <>(userInterfaceInfoQuery); queryWrapper.orderBy(StringUtils.isNotBlank(sortField), sortOrder.equals(CommonConstant.SORT_ORDER_ASC), sortField); Page<UserInterfaceInfo> userInterfaceInfoPage = userInterfaceInfoService.page(new Page <>(current, size), queryWrapper); return ResultUtils.success(userInterfaceInfoPage); } }
3、调用次数统计
用户每次调用接口成功,次数+1(service)
编写方法
在service 层的UserInterfaceInfoService 编写方法
这里只是过流程,实际应该多校验
1
2
3
4
5
6
7
8
9
10
11
12
13
14
@Override public boolean invokeInterfaceCount (long userId, long interfaceInfoId) { if (userId <= 0 || interfaceInfoId <= 0 ) { throw new BusinessException (ErrorCode.NOT_FOUND_ERROR); } LambdaUpdateWrapper<UserInterfaceInfo> updateWrapper = new LambdaUpdateWrapper <>(); updateWrapper.eq(UserInterfaceInfo::getUserId, userId) .eq(UserInterfaceInfo::getInterfaceInfoId, interfaceInfoId) .gt(UserInterfaceInfo::getLeftNum, 0 ) .setSql("left_num = left_num -1, total_num = total_num + 1" ); return update(updateWrapper); }
注意:其实这里应该添加事务,添加锁
接口测试成功
4、问题
如果每个接口的方法都写调用次数+1,是不是比较麻烦?
致命问题:接口开发者需要自己去添加统计代码
就想到可以使用AOP、网关
逻辑图
image-20230126112301389
AOP切面的优点 :独立于接口,在每个接口调用后统计次数+1
AOP切面的缺点 :只存在于单个项目中,如果每个团队都要开发自己的模拟接口,那么都要写一个切面
所以最终我们在这个项目选择使用网关
十、网关
什么是网关?理解成火车站的检票口,统一 检票
网关优点 : 统一进行操作,去处理一些问题
1、网关作用
路由
负载均衡
统一鉴权
统一处理跨域
统一业务处理(缓存)
访问控制
发布控制
流量染色
统一接口保护
限制请求
信息脱敏
降级(熔断)
限流 学习令牌桶算法,学习露桶算法,学习一下RedislimitHandler
超时时间
重试(业务保护)
统一日志
统一文档
2、具体作用
路由
起到转发的作用,比如有接口A和接口B,网关会记录这些信息,根据用户访问的地址和参数,转发请求到对应的接口(服务器/集群)
用户a调用接口A
/a => 接口A /b => 接口B
https://docs.spring.io/spring-cloud-gateway/docs/current/reference/html/#gateway-request-predicates-factories
负载均衡
在路由的基础上可以转发到某一个服务器
/c => 服务A/ 集群A(随机转发到其中的某一个机器)
uri从固定地址改成b:xx
统一鉴权
判断用户是否有权限进行操作,无论访问什么接口,我都统一去判断权限,不用重复写
统一处理跨域
网关统一处理跨域,不用在每个项目单独处理
https://docs.spring.io/spring-cloud-gateway/docs/current/reference/html/#cors-configuration
统一业务处理
把每个项目中都要做的通用逻辑放到上层(网关),统一处理,比如本项目的次数统计
访问控制
黑白名单,比如限制DDOS IP
发布控制
灰度发布,比如上线新接口,先给新接口分配 20%流量,老接口80%
,再慢慢调整比例
https://docs.spring.io/spring-cloud-gateway/docs/current/reference/html/#the-weight-route-predicate-factory
流量染色
区分用户来源
给请求(流量)添加一些标识,一般是设置请求头中,添加新的请求头 https://docs.spring.io/spring-cloud-gateway/docs/current/reference/html/#the-addrequestheader-gatewayfilter-factory
全局染色 :https://docs.spring.io/spring-cloud-gateway/docs/current/reference/html/#default-filters
接口保护
限制请求
https://docs.spring.io/spring-cloud-gateway/docs/current/reference/html/#requestheadersiz-gatewayfilter-factory
信息脱敏
https://docs.spring.io/spring-cloud-gateway/docs/current/reference/html/#the-removerequestheader-gatewayfilter-factory
降级(熔断) 进行兜底
https://docs.spring.io/spring-cloud-gateway/docs/current/reference/html/#fallback-headers
限流
https://docs.spring.io/spring-cloud-gateway/docs/current/reference/html/#the-requestratelimiter-gatewayfilter-factory
超时时间 超时就中断
https://docs.spring.io/spring-cloud-gateway/docs/current/reference/html/#http-timeouts-configuration
重试(业务保护):
https://docs.spring.io/spring-cloud-gateway/docs/current/reference/html/#the-retry-gatewayfilter-factory
统一日志
统一的请求,响应信息记录
统一文档
将下游项目的文档进行聚合,在一个页面统一查看
建议用:https://doc.xiaominfo.com/docs/middleware-sources/aggregation-introduction
网关的分类
全局网关(接入层网关) 作用是负载均衡、请求日志等,不和业务逻辑绑定业务网关(微服务网关) 会有一些业务逻辑,作用是将请求转发到不同的业务/项目/接口/服务
参考文章:https://blog.csdn.net/qq_21040559/article/details/122961395
实现
Nginx
(全局网关),Kong网关 (API网关),
编程成本相对较高 Spring Cloud Gateway (取代了Zuul)性能高
可以用java代码来写逻辑 适于学习
网关技术选型:https://zhuanlan.zhihu.com/p/500587132
十一、Spring Cloud Gateway
全部内容基本来自官网
官网:https://spring.io/projects/spring-cloud-gateway
官方文档:https://docs.spring.io/spring-cloud-gateway/docs/current/reference//html/
新建项目
在IDEA中新建项目 勾选Gateway、Lombok
参考官网get started中的实例代码
1
2
3
4
5
6
7
8
9
10
11
12
13
14
15
16
17
18
19
20
21
22
23
24
25
@SpringBootApplication public class DemogatewayApplication { @Bean public RouteLocator customRouteLocator (RouteLocatorBuilder builder) { return builder.routes() .route("path_route" , r -> r.path("/get" ) .uri("http://httpbin.org" )) .route("host_route" , r -> r.host("*.myhost.org" ) .uri("http://httpbin.org" )) .route("rewrite_route" , r -> r.host("*.rewrite.org" ) .filters(f -> f.rewritePath("/foo/(?<segment>.*)" , "/${segment}" )) .uri("http://httpbin.org" )) .route("hystrix_route" , r -> r.host("*.hystrix.org" ) .filters(f -> f.hystrix(c -> c.setName("slowcmd" ))) .uri("http://httpbin.org" )) .route("hystrix_fallback_route" , r -> r.host("*.hystrixfallback.org" ) .filters(f -> f.hystrix(c -> c.setName("slowcmd" ).setFallbackUri("forward:/hystrixfallback" ))) .uri("http://httpbin.org" )) .route("limit_route" , r -> r .host("*.limited.org" ).and().path("/anything/**" ) .filters(f -> f.requestRateLimiter(c -> c.setRateLimiter(redisRateLimiter()))) .uri("http://httpbin.org" )) .build(); } }
编写代码:
1
2
3
4
5
6
7
8
9
10
11
12
13
14
15
16
17
18
19
20
21
22
23
24
package com.xuan;import org.springframework.boot.SpringApplication;import org.springframework.boot.autoconfigure.SpringBootApplication;import org.springframework.cloud.gateway.route.RouteLocator;import org.springframework.cloud.gateway.route.builder.RouteLocatorBuilder;import org.springframework.context.annotation.Bean;@SpringBootApplication public class XuanapiGatewayApplication { public static void main (String[] args) { SpringApplication.run(XuanapiGatewayApplication.class, args); } @Bean public RouteLocator customRouteLocator (RouteLocatorBuilder builder) { return builder.routes() .route("to_baidu" , r -> r.path("/baidu" ) .uri("http://www.baidu.com/" )) .build(); } }
测试百度成功
1、核心概念
官方文档如下
Route : The basic building block of the gateway. It
is defined by an ID, a destination URI, a collection of predicates, and
a collection of filters. A route is matched if the aggregate predicate
is true.Predicate : This is a Java
8 Function Predicate . The input type is a Spring
Framework ServerWebExchange . This lets you match on
anything from the HTTP request, such as headers or parameters.Filter : These are instances of GatewayFilter
路由(根据什么条件,转发到哪里)
断言(一组规则,条件,用来确定如何转发路由)
过滤器:对请求进行一系列的处理,比如添加请求头,添加请求参数
2、请求流程
客户端发起请求
Handler Mapping :根据断言,去将请求转发到对应的路由
Web Handler:处理请求(一层层经过过滤器)
实际调用服务
image-20230131144724778
2、两种配置方式
配置式 (方便,规范)能用就用
简化版
1
2
3
4
5
6
7
8
spring: cloud: gateway: routes: - id: after_route uri: https://example.org predicates: - Cookie=mycookie,mycookievalue
全称
1
2
3
4
5
6
7
8
9
10
11
spring: cloud: gateway: routes: - id: after_route uri: https://example.org predicates: - name: Cookie args: name: mycookie regexp: mycookievalue
编程式 (灵活,相对麻烦)
3、路由的各种断言
官网地址:https://docs.spring.io/spring-cloud-gateway/docs/current/reference/html/#gateway-request-predicates-factories
目录
After 在xx时间之后
Before 在xx时间之前
Between 在xx时间之间
请求类别
请求头(包含Cookie)
查涧参数
客户端地址
权重
The After Route Predicate Factory
当前时间在这个时间之后 ,就会访问当前这个路由
1
2
3
4
5
6
7
8
spring: cloud: gateway: routes: - id: after_route uri: https://example.org predicates: - After=2017-01-20T17:42:47.789-07:00[America/Denver]
The Before Route Predicate Factory
当前时间在这个时间之前 ,就会访问当前这个路由
1
2
3
4
5
6
7
8
spring: cloud: gateway: routes: - id: before_route uri: https://example.org predicates: - Before=2017-01-20T17:42:47.789-07:00[America/Denver]
The Between Route Predicate Factory
当前时间在这个时间之间 ,就会访问当前这个路由
1
2
3
4
5
6
7
8
spring: cloud: gateway: routes: - id: between_route uri: https://example.org predicates: - Between=2017-01-20T17:42:47.789-07:00[America/Denver], 2017-01-21T17:42:47.789-07:00 [America/Denver ]
The Cookie Route Predicate Factory
如果你的请求头cookie 的是chocolate ,它的值是ch.p ,就会访问当前这个路由
1
2
3
4
5
6
7
8
spring: cloud: gateway: routes: - id: cookie_route uri: https://example.org predicates: - Cookie=chocolate, ch.p
The Header Route Predicate Factory
如果你的请求头 包含X-Request-Id 这样一个请求头,并且,它的值符合正则表达式的规则 ,就会访问当前这个路由
1
2
3
4
5
6
7
8
spring: cloud: gateway: routes: - id: header_route uri: https://example.org predicates: - Header=X-Request-Id, \d+
The Host Route Predicate Factory
如果你的访问 的是这个.somehost.org, .anotherhost.org ,域名 ,就会访问当前这个路由
1
2
3
4
5
6
7
8
spring: cloud: gateway: routes: - id: host_route uri: https://example.org predicates: - Host=**.somehost.org,**.anotherhost.org
The Method Route Predicate Factory
如果你的请求类别 是这个GET 、POST ,就会访问当前这个路由
1
2
3
4
5
6
7
8
9
spring: cloud: gateway: routes: - id: method_route uri: https://example.org predicates: - Method=GET,POST
The Path Route Predicate Factory
如果你的访问的地址 是以这些/red/{segment},/blue/{segment} 路径作为前缀,就会访问当前这个路由
1
2
3
4
5
6
7
8
spring: cloud: gateway: routes: - id: path_route uri: https://example.org predicates: - Path=/red/{segment},/blue/{segment}
The Query Route Predicate Factory
根据查询条件 ,比如red greet
green,就会访问当前这个路由
1
2
3
4
5
6
7
8
spring: cloud: gateway: routes: - id: query_route uri: https://example.org predicates: - Query=red, gree.
The RemoteAddr Route Predicate Factory
根据远程地址 ,比如你的用户的ip地址是192.168.1.1/24,就会访问当前这个路由
1
2
3
4
5
6
7
8
spring: cloud: gateway: routes: - id: remoteaddr_route uri: https://example.org predicates: - RemoteAddr=192.168.1.1/24
The Weight Route Predicate Factory
根据你设置的权重 ,给你把同一个访问的地址,重定到不同的服务,轻松实现发布控制
1
2
3
4
5
6
7
8
9
10
11
12
spring: cloud: gateway: routes: - id: weight_high uri: https://weighthigh.org predicates: - Weight=group1, 8 - id: weight_low uri: https://weightlow.org predicates: - Weight=group1, 2
The XForwarded Remote Addr Route Predicate
Factory
从请求头中如果拿到XForwarded这个请求头的地址 192.168.1.1/24
就会访问当前这个路由
1
2
3
4
5
6
7
8
spring: cloud: gateway: routes: - id: xforwarded_remoteaddr_route uri: https://example.org predicates: - XForwardedRemoteAddr=192.168.1.1/24
4、过滤器
官网文档 :https://docs.spring.io/spring-cloud-gateway/docs/current/reference/html/#gatewayfilter-factories
基本功能 :对请求头、请求参数、响应头的增删改查
1.添加清求头 2.添加请求参数 3.添加响应头 4.降级 5.限流 6.重试
The AddRequestHeader GatewayFilter
Factory
增加请求头 (可以用作流量染色)
1
2
3
4
5
6
7
8
spring: cloud: gateway: routes: - id: add_request_header_route uri: https://example.org filters: - AddRequestHeader=X-Request-red, blue
使用xuan-api做测试
1
2
3
4
5
6
7
8
9
10
11
12
13
14
server: port: 8090 spring: cloud: gateway: routes: - id: name_api_route uri: http://localhost:8123 predicates: - Path=/api/** filters: - AddRequestHeader=color, blue - AddRequestParameter=name, mars
在地址栏访问:http://localhost:8090/api/name/xuan
得到结果如下
image-20230131162105385
The AddRequestParameter
GatewayFilter Factory
增加请求参数
1
2
3
4
5
6
7
8
spring: cloud: gateway: routes: - id: add_request_parameter_route uri: https://example.org filters: - AddRequestParameter=red, blue
The AddResponseHeader GatewayFilter
Factory
添加响应头
1
2
3
4
5
6
7
8
spring: cloud: gateway: routes: - id: add_response_header_route uri: https://example.org filters: - AddResponseHeader=X-Response-Red, Blue
The DedupeResponseHeader
GatewayFilter Factory
如果响应头中有重复的,去重
1
2
3
4
5
6
7
8
spring: cloud: gateway: routes: - id: dedupe_response_header_route uri: https://example.org filters: - DedupeResponseHeader=Access-Control-Allow-Credentials Access-Control-Allow-Origin
保留策略,第一,最后,随机
The DedupeResponseHeader filter also accepts an optional
strategy parameter. The accepted values are
RETAIN_FIRST (default), RETAIN_LAST, and
RETAIN_UNIQUE.
Spring Cloud CircuitBreaker GatewayFilter
Factory
降级
需要引入spring-cloud-starter-circuitbreaker-reactor-resilience4j 包
1 2 3 4 <dependency > <groupId > org.springframework.cloud</groupId > <artifactId > spring-cloud-starter-circuitbreaker-reactor-resilience4j</artifactId > </dependency >
1
2
3
4
5
6
7
8
9
10
11
12
13
14
spring: cloud: gateway: routes: - id: circuitbreaker_route uri: lb://backing-service:8088 predicates: - Path=/consumingServiceEndpoint filters: - name: CircuitBreaker args: name: myCircuitBreaker fallbackUri: forward:/inCaseOfFailureUseThis - RewritePath=/consumingServiceEndpoint, /backingServiceEndpoint
The FallbackHeaders GatewayFilter
Factory
降级处理器,写一下降级规则
1
2
3
4
5
6
7
8
9
10
11
12
13
14
15
16
17
18
19
20
21
spring: cloud: gateway: routes: - id: ingredients uri: lb://ingredients predicates: - Path=//ingredients/** filters: - name: CircuitBreaker args: name: fetchIngredients fallbackUri: forward:/fallback - id: ingredients-fallback uri: http://localhost:9994 predicates: - Path=/fallback filters: - name: FallbackHeaders args: executionExceptionTypeHeaderName: Test-Header
The MapRequestHeader GatewayFilter
Factory
如果你的请求头 里面有Blue ,会把Blue 的值给X-Request-Red ,相当于做了映射
1
2
3
4
5
6
7
8
spring: cloud: gateway: routes: - id: map_request_header_route uri: https://example.org filters: - MapRequestHeader=Blue, X-Request-Red
The PrefixPath GatewayFilter
Factory
前缀处理器
1
2
3
4
5
6
7
8
spring: cloud: gateway: routes: - id: prefixpath_route uri: https://example.org filters: - PrefixPath=/mypath
这会将/mypath作为所有匹配请求的路径的前缀。因此,对/hello的请求将发送到/mypath/hello。
The PreserveHostHeader
GatewayFilter Factoryatewayfilter-factory)
请求头转发的时候,有时候host值 会变,这个可以保证不变
1
2
3
4
5
6
7
8
spring: cloud: gateway: routes: - id: preserve_host_route uri: https://example.org filters: - PreserveHostHeader
The RequestRateLimiter
GatewayFilter Factory
限流
image-20230131175738299
一般会使用redis+令牌桶算法
1
2
3
4
5
6
7
8
9
10
11
12
spring: cloud: gateway: routes: - id: requestratelimiter_route uri: https://example.org filters: - name: RequestRateLimiter args: redis-rate-limiter.replenishRate: 10 redis-rate-limiter.burstCapacity: 20 redis-rate-limiter.requestedTokens: 1
RequestHeaderSize GatewayFilter
Factory
限制请求头大小 请求保护
1
2
3
4
5
6
7
8
spring: cloud: gateway: routes: - id: requestheadersize_route uri: https://example.org filters: - RequestHeaderSize=1000B
The RemoveRequestHeader Gateway Filter Factory
移除请求头 (脱敏)
1
2
3
4
5
6
7
8
spring: cloud: gateway: routes: - id: removerequestheader_route uri: https://example.org filters: - RemoveRequestHeader=X-Request-Foo
This removes the X-Request-Foo header before it is sent
downstream.
The RewritePath GatewayFilter
Factory
改写特殊的请求参数
1
2
3
4
5
6
7
8
9
10
spring: cloud: gateway: routes: - id: rewritepath_route uri: https://example.org predicates: - Path=/red/** filters: - RewritePath=/red/?(?<segment>.*), /$\{segment}
The Retry GatewayFilter Factory
自动帮你重试接口,降级重试
1
2
3
4
5
6
7
8
9
10
11
12
13
14
15
16
17
18
19
spring: cloud: gateway: routes: - id: retry_test uri: http://localhost:8080/flakey predicates: - Host=*.retry.com filters: - name: Retry args: retries: 3 statuses: BAD_GATEWAY methods: GET,POST backoff: firstBackoff: 10ms maxBackoff: 50ms factor: 2 basedOnPreviousValue: false
Default Filters
默认过滤器 可以用作全局染色
1 2 3 4 5 6 spring: cloud: gateway: default-filters: - AddResponseHeader=X-Response-Default-Red, Default-Blue - PrefixPath=/httpbin
5、其他配置
1、全局过滤器
Global Filters
定义过滤器
1 2 3 4 5 6 7 8 9 10 11 12 13 14 15 16 17 18 19 20 @Bean public GlobalFilter customFilter () { return new CustomGlobalFilter (); } public class CustomGlobalFilter implements GlobalFilter , Ordered { @Override public Mono<Void> filter (ServerWebExchange exchange, GatewayFilterChain chain) { log.info("custom global filter" ); return chain.filter(exchange); } @Override public int getOrder () { return -1 ; } }
2、Http timeouts configuration
Global timeouts
配置http超时
1 2 3 4 5 6 7 spring: cloud: gateway: httpclient: connect-timeout: 1000 response-timeout: 5s
3、CORS Configuration
跨域配置
1 2 3 4 5 6 7 8 9 spring: cloud: gateway: globalcors: cors-configurations: '[/**]' : allowedOrigins: "https://docs.spring.io" allowedMethods: - GET
小作业:
通过阅读源码:https://spring.io/projects/spring-cloud-gateway/#samples
来了解gateway编程式开发
十二、项目整合网关
实现统一的用户鉴权
,统一的接口调用次数统计(把API网关用到项目中)
完善功能
会用到的特性
路由(转发请求到模拟接口项目)
负载均衡(需要用到注册中心)统一鉴权(accessKey,secretKey)
统一处理跨域
统一业务处理(每次请求接口后,接口调用次数+1)
访问控制(黑白名单)
发布控制流量染色(记录请求是否为网关来的)
统一接口保护
限制请求
信息脱敏
降级(熔断)
限流 学习令牌桶算法,学习露桶算法,学习一下RedislimitHandler
超时时间
重试(业务保护)
统一日志(记录每次的请求和响应)
统一文档
业务逻辑
用户发送请求到API网关
请求日志
黑白名单
用户鉴权(判断ak,sk是否合法)
请求的模拟接口是否存在?
请求转发,调用模拟接口 响应日志
调用成功,接口调用次数+1
调用失败,返回规范错误码
1、请求转发
使用Path匹配断言
所有前缀为:/api/ 的请求进行转发,转发到http://localhost:8123/api
比如请求网关:http://localhost:8090/api/name/?name=archer转发到 http://localhost:8123/api/name/?name=archer
1 2 3 4 5 6 7 8 9 10 11 server: port: 8090 spring: cloud: gateway: routes: - id: api_route uri: http://localhost:8123 predicates: - Path=/api/**
测试没有问题
image-20230201201022011
2、Global Filter
使用了Global Filters,全局请求拦截处理(类似aop)
查看官网 ,使用模板代码为基础进行编写程序
1 2 3 4 5 6 7 8 9 10 11 12 13 14 15 16 17 18 19 20 21 22 23 24 25 package com.xuan.filter;@Slf4j @Component public class CustomGlobalFilter implements GlobalFilter , Ordered { @Override public Mono<Void> filter (ServerWebExchange exchange, GatewayFilterChain chain) { log.info("custom global filter" ); return chain.filter(exchange); } @Override public int getOrder () { return -1 ; } }
1、请求日志
我们参考之前的AOP的写法,从exchange这个路由交换机里面拿到我们所有的请求的信息
1 2 3 4 5 6 7 8 9 10 11 12 @Override public Mono<Void> filter (ServerWebExchange exchange, GatewayFilterChain chain) { ServerHttpRequest request = exchange.getRequest(); log.info("请求id: {}" , request.getId()); log.info("请求路径: {}" , request.getPath()); log.info("请求方法: {}" , request.getMethod()); log.info("请求参数: {}" , request.getQueryParams()); log.info("请求头: {}" , request.getHeaders()); log.info("请求地址: {}" , request.getRemoteAddress()); return chain.filter(exchange); }
image-20230201204627949
2、添加黑白名单
建议用白名单,更安全些
如果这个来源地址不是白名单里面的,我们就直接设个状态码(这里设置403),然后拦截掉response.setComplete()
可以理解为设置响应完成
1 2 3 4 5 6 7 8 9 10 11 12 13 14 15 16 private static final List<String> IP_WHITE_LIST = Arrays.asList("127.0.0.1" , "127.0.0.2" ); @Override public Mono<Void> filter (ServerWebExchange exchange, GatewayFilterChain chain) { ServerHttpRequest request = exchange.getRequest(); String remoteAddress = request.getRemoteAddress().getHostString(); log.info("请求地址: {}" , remoteAddress); if (!IP_WHITE_LIST.contains(remoteAddress)){ ServerHttpResponse response = exchange.getResponse(); response.setStatusCode(HttpStatus.FORBIDDEN); return response.setComplete(); } return chain.filter(exchange); }
将IP_WHITE_LIST设置为黑名单 测试被拒
image-20230201205411510
3、用户鉴权
找到之前用户鉴权的代码 复制过来 修改一下
需要倒入我之前做的starter
1 2 3 4 5 <dependency > <groupId > com.xuan</groupId > <artifactId > xuanapi-client-sdk</artifactId > <version > 0.0.1</version > </dependency >
1 2 3 4 5 6 7 8 9 10 11 12 13 14 15 16 17 18 19 20 21 22 23 24 25 26 27 28 29 30 31 32 33 34 35 36 37 38 39 40 41 42 43 44 45 46 47 48 49 50 51 52 53 54 55 56 57 58 59 60 61 62 63 64 65 66 67 68 @Override public Mono<Void> filter (ServerWebExchange exchange, GatewayFilterChain chain) { ServerHttpRequest request = exchange.getRequest(); log.info("请求id: {}" , request.getId()); log.info("请求路径: {}" , request.getPath()); log.info("请求方法: {}" , request.getMethod()); log.info("请求参数: {}" , request.getQueryParams()); log.info("请求头: {}" , request.getHeaders()); String remoteAddress = request.getRemoteAddress().getHostString(); log.info("请求地址: {}" , remoteAddress); if (!IP_WHITE_LIST.contains(remoteAddress)) { return handleNoAuth(exchange.getResponse()); } HttpHeaders headers = request.getHeaders(); String accessKey = headers.getFirst("accessKey" ); String body = null ; try { body = URLDecoder.decode(headers.getFirst("body" ), StandardCharsets.UTF_8.name()); } catch (UnsupportedEncodingException e) { throw new RuntimeException (e); } String sign = headers.getFirst("sign" ); String nonce = headers.getFirst("nonce" ); String timestamp = headers.getFirst("timestamp" ); boolean hasBlank = StrUtil.hasBlank(accessKey, body, sign, nonce, timestamp); if (hasBlank) { return handleInvokeError(exchange.getResponse()); } String secretKey = "abc" ; String sign1 = SignUtil.getSign(body, secretKey); if (!StrUtil.equals(sign, sign1)) { return handleInvokeError(exchange.getResponse()); } if (!NumberUtil.isNumber(timestamp)) { return handleInvokeError(exchange.getResponse()); } if (System.currentTimeMillis() - Long.parseLong(timestamp) > FIVE_MINUTES) { return handleInvokeError(exchange.getResponse()); } return chain.filter(exchange); } private Mono<Void> handleNoAuth (ServerHttpResponse response) { response.setStatusCode(HttpStatus.FORBIDDEN); return response.setComplete(); } private Mono<Void> handleInvokeError (ServerHttpResponse response) { response.setStatusCode(HttpStatus.INTERNAL_SERVER_ERROR); return response.setComplete(); }
4、判读请求的接口是否存在
我们可以从数据库 中查询模拟接口是否存在,以及请求方法是否匹配(还可以校验请求参数)
因为网关项目没引入MyBatis等操作数据库的类库,如果该孩操作较为复杂,可以由backend增删改查项目提供接口,我们直接调用,不用再重复写逻辑了。
HTTP请求(用HTTPClient、.用RestTemplate、Feign)
RPC(Dubbo)
5、请求转发 调用模拟接口
1 2 3 4 5 6 7 8 9 10 11 Mono<Void> filter = chain.filter(exchange); log.info("响应状态码:{}" , response.getStatusCode()); if (response.getStatusCode() == HttpStatus.OK) { } else { return handleInvokeError(response); } return filter;
接下来需要修改客户端的地址,让它经过网关
找到SDK修改地址
image-20230202162858649
6、异步返回问题
又出现一个问题,我们的接口调用,是在过滤器完成之后进行的,是个异步操作
image-20230202163045626
预期是等模拟接口调用完成,才记录响应日志、统计调用次数。 但现实是
chain.fitter 方法立刻返回了,直到 filter 过滤器 return
后才调用了模拟接口。 原因是:chain.filter 是个异步操作,理解为前端的
promise
解決方案:利用response 装饰者,增强原有 response 的处理能力
参考博客:https://blog.csdn.net/qq_19636353/article/details/126759522(以这个为主)
其他参考: • https://blog.csdn.net/mo_67595943/article/details/124667975
• https://blog.csdn.net/weixin_43933728/article/details/121359727
• https://blog.csdn.net/zx156955/article/details/121670681
• https://blog.csdn.net/qq_39529562/article/details/108911983
这些代码不用记忆 搜「Spring Cloud Gateway 响应日志」就有了
复制https://blog.csdn.net/qq_19636353/article/details/126759522
中的Response log代码。并改写
1 2 3 4 5 6 7 8 9 10 11 12 13 14 15 16 17 18 19 20 21 22 23 24 25 26 27 28 29 30 31 32 33 34 35 36 37 38 39 40 41 42 43 44 45 46 47 48 49 50 51 52 53 54 55 56 57 58 59 60 61 private Mono<Void> handleResponse (ServerWebExchange exchange, GatewayFilterChain chain) { try { ServerHttpResponse originalResponse = exchange.getResponse(); DataBufferFactory bufferFactory = originalResponse.bufferFactory(); HttpStatus statusCode = originalResponse.getStatusCode(); if (statusCode == HttpStatus.OK) { ServerHttpResponseDecorator decoratedResponse = new ServerHttpResponseDecorator (originalResponse) { @Override public Mono<Void> writeWith (Publisher<? extends DataBuffer> body) { log.info("body instanceof Flux: {}" , (body instanceof Flux)); if (body instanceof Flux) { Flux<? extends DataBuffer > fluxBody = Flux.from(body); return super .writeWith(fluxBody.map(dataBuffer -> { byte [] content = new byte [dataBuffer.readableByteCount()]; dataBuffer.read(content); DataBufferUtils.release(dataBuffer); List<Object> rspArgs = new ArrayList <>(); rspArgs.add(originalResponse.getStatusCode()); String data = new String (content, StandardCharsets.UTF_8); rspArgs.add(data); log.info("<--- status:{} data:{}" , rspArgs.toArray()); return bufferFactory.wrap(content); })); } else { log.error("<--- {} 响应code异常" , getStatusCode()); } return super .writeWith(body); } }; return chain.filter(exchange.mutate().response(decoratedResponse).build()); } return chain.filter(exchange); } catch (Exception e) { log.error("gateway log exception.\n" + e); return chain.filter(exchange); } }
十二、RPC
RPC(Remote Procedure Call)远程过程调用
网关业务逻辑
问题:
网关项目比较存粹,没有操作数据库的包,并且还要调用我们之前写过的代码?复制粘贴维护麻烦
理想:直接请求到其他项目的方法
怎么调用其他项目的方法?
复制代码和依赖,环境
HTTP请求(提供接口,供其他项目调用)
RPC
把公共的代码打个jar包,其他项目去引用
HTTP请求怎么调用
提供方提供一个接口(地址,请求方法,参数,返回值)
调用方使用HTTP Client之类的代码包去发送HTTP请求
RPC作用
像调用本地方法一样去调用远程方法
RPC优点
对开发者更透明,减少很多的沟通成本
RPC向远程服务器发送请求时,未必使用HTTP协议,比如还可以使用TCP/IP,性能更高。(内部服务更实适用)
image-20230203144005014
注意: 这里注册中心只提供信息,并不会帮助调用
1、Dubbo框架(RPC实现)
官网:https://cn.dubbo.apache.org/zh/
常见框架还有GRPC、TRPC
最好的学习方式:阅读官方文档
1、两种使用方式
Spring
Boot代码(注解+编程式):写Java接口,服务提供者和消费者都去引用这个接口
偏程导
DL(接口调用语言):创建一个公共的接口定义文件,服务提供者和消费者读取这个文件。优点是跨语言,所有的框架都认识
底层是Triple协议: https://dubbo.incubator.apache.org/zh/docs3-v2/java-sdk/concepts-and-architecture/triple/
2、快速使用 (Spring Boot)
按照官网步骤来
下载源码
1 git clone -b master https://github.com/apache/dubbo-samples.git
在IDEA中打开
image-20230203160423574
看一下结构
image-20230203165252141
consumer和provider的配置都如下
1 2 3 4 5 6 7 8 9 10 11 12 13 14 dubbo: application: name: dubbo-springboot-demo-provider protocol: name: dubbo port: -1 registry: id: zk-registry address: zookeeper://127.0.0.1:2181 config-center: address: zookeeper://127.0.0.1:2181 metadata-report: address: zookeeper://127.0.0.1:2181
EmbeddedZooKeeper 提个一个内置的ZooKeeper作为注册中心
启动项目
先后启动 注册中心(provider内置)、provider、consumer 测试跑通。
十三、项目整合Dubbo、Nacos
backend项目作为服务提供者 ,提供3个方法:
实际情况应该是去数据库中查是否已分配给用户
从数据库中查询模拟接口是否存在,以及请求方法是否匹配(还可以校验请求参数)
调用成功,接口调用次数+1 invokeCount
gateway项日作为服务调用者 ,调用这3个方法
1、安装启动Nacos
整合Nacos注册中:Nacos
| Apache Dubbo Nacos下载地址:Nacos
快速开始
启动命令(standalone代表着单机模式运行,非集群模式)
1 sh startup.sh -m standalone
image-20230206110644915
用户名、密码都是nacos
image-20230206110747933
2、项目跑通
添加依赖
在api-platform-backend、api-platform-gateway中添加如下依赖
1 2 3 4 5 6 7 8 9 10 11 <dependency > <groupId > org.apache.dubbo</groupId > <artifactId > dubbo</artifactId > <version > 3.1.5</version > </dependency > <dependency > <groupId > com.alibaba.nacos</groupId > <artifactId > nacos-client</artifactId > <version > 2.2.0</version > </dependency >
这里的nacos是我下载的版本
添加配置
1 2 3 4 5 6 7 8 9 dubbo: application: name: dubbo-api-platform-backend-provider protocol: name: dubbo port: -1 registry: id: nacos-registry address: nacos://localhost:8848
注意:
服务接口类必须要在同一个包下,建议是抽象出一个公共项日(放接口、实体类等)
置注解(比如启动类的EnableDubbo、接口实现类和Bean引用的注解:@DubboService 、@DubboReference )
添加配置
服务调用项目和提供者项目尽量引入相同的依赖和配置
在主包下添加rpc包(com.xuan.project.rpc)
image-20230206120727992
RpcDemoServer.java
1 2 3 public interface RpcDemoService { String sayHello (String name) ; }
RpcDemoServerImpl.java
1 2 3 4 5 6 7 8 @DubboService public class RpcDemoServiceImpl implements RpcDemoService { @Override public String sayHello (String name) { System.out.println("Hello " + name + ", request from consumer: " + RpcContext.getContext().getRemoteAddress()); return "Hello " + name; } }
Application主类新增@EnableDubbo注解
1 2 3 4 5 6 7 8 9 10 11 @SpringBootApplication @EnableDubbo @MapperScan("com.xuan.project.mapper") public class MyApplication { public static void main (String[] args) { SpringApplication.run(MyApplication.class, args); } }
启动主类查看Nacos 注册成功
image-20230206121543673
在和backend一样的路径下新建rpc包 (com.xuan.project.rpc) 新增接口类
代码复制过来即可
image-20230206121742038
前往测试类做测试
1 2 3 4 5 6 7 8 9 10 11 12 13 @SpringBootTest class ApiPlatformGatewayApplicationTests { @DubboReference private RpcDemoService rpcDemoService; @Test void testRpc () { System.out.println(rpcDemoService.sayHello("world" )); } }
测试成功~
image-20230206121833955
3、抽象公共服务
项目名:api-platform-common
目的是让方法、实体类在多个项目间复用,减少重复编写
1、抽取的服务
数据库中查是否已分配给用户秘钥(根据 accessKey
拿到用户信息,返回用户信息,为空表示不存在)
从数据库中查询模拟接口是否存在(请求路径、请求方法、请求参数,返回接口信息,为空表示不存在)
接口调用次数+ 1 invokeCount
(accessKey、secretKey(标识用户),请求接口路径)
2、具体操作
新建maven项目
取名为api-platform-common
依赖才api-platform-backend里复制后摘出我需要的
1 2 3 4 5 6 7 8 9 10 11 12 13 14 15 16 17 18 19 20 21 22 23 24 25 26 27 28 29 30 31 32 33 34 35 36 37 38 39 40 41 42 43 44 45 46 47 48 49 50 51 52 53 54 55 56 57 58 59 60 61 62 63 64 65 66 67 68 69 70 71 72 73 74 75 76 77 <?xml version="1.0" encoding="UTF-8" ?> <project xmlns ="http://maven.apache.org/POM/4.0.0" xmlns:xsi ="http://www.w3.org/2001/XMLSchema-instance" xsi:schemaLocation ="http://maven.apache.org/POM/4.0.0 http://maven.apache.org/xsd/maven-4.0.0.xsd" > <modelVersion > 4.0.0</modelVersion > <parent > <groupId > org.springframework.boot</groupId > <artifactId > spring-boot-starter-parent</artifactId > <version > 2.7.0</version > <relativePath /> </parent > <groupId > com.xuan</groupId > <artifactId > api-platform-common</artifactId > <version > 0.0.1</version > <properties > <maven.compiler.source > 8</maven.compiler.source > <maven.compiler.target > 8</maven.compiler.target > <project.build.sourceEncoding > UTF-8</project.build.sourceEncoding > </properties > <dependencies > <dependency > <groupId > org.mybatis.spring.boot</groupId > <artifactId > mybatis-spring-boot-starter</artifactId > <version > 2.2.2</version > </dependency > <dependency > <groupId > com.baomidou</groupId > <artifactId > mybatis-plus-boot-starter</artifactId > <version > 3.5.1</version > </dependency > <dependency > <groupId > com.google.code.gson</groupId > <artifactId > gson</artifactId > <version > 2.9.0</version > </dependency > <dependency > <groupId > org.apache.commons</groupId > <artifactId > commons-lang3</artifactId > <version > 3.12.0</version > </dependency > <dependency > <groupId > mysql</groupId > <artifactId > mysql-connector-java</artifactId > <scope > runtime</scope > </dependency > <dependency > <groupId > org.projectlombok</groupId > <artifactId > lombok</artifactId > <optional > true</optional > </dependency > <dependency > <groupId > org.springframework.boot</groupId > <artifactId > spring-boot-starter-test</artifactId > <scope > test</scope > </dependency > <dependency > <groupId > junit</groupId > <artifactId > junit</artifactId > <version > 4.13.2</version > <scope > test</scope > </dependency > </dependencies > </project >
复制之前的model包下的实体类
在common包下新建service层
image-20230207113847350
1 2 3 4 5 6 7 8 9 10 11 12 13 14 15 16 17 18 19 20 21 22 23 24 25 26 27 28 29 30 31 32 33 34 35 36 37 38 39 40 41 42 43 44 45 46 public interface InnerInterfaceInfoService { InterfaceInfo getInvokeInterfaceInfo (String path, String method) ; } public interface InnerUserService { User getInvokeUser (String accessKey) ; } public interface InnerUserInterfaceInfoService { boolean hasInvokeNum (long userId, long interfaceInfoId) ; boolean invokeInterfaceCount (long userId, long interfaceInfoId) ; }
打包
使用maven install打包
api-platform-backend引入依赖
1 2 3 4 5 <dependency > <groupId > com.xuan</groupId > <artifactId > api-platform-common</artifactId > <version > 0.0.1</version > </dependency >
编写impl进行测试
1 2 3 4 5 6 7 8 9 10 11 12 13 14 15 16 17 18 19 20 21 22 23 24 25 26 27 28 29 30 31 32 33 34 35 36 37 38 39 40 41 42 43 44 45 @DubboService public class InnerUserInterfaceInfoServiceImpl implements InnerUserInterfaceInfoService { @Resource private UserInterfaceInfoMapper userInterfaceInfoMapper; @Override public boolean hasInvokeNum (long userId, long interfaceInfoId) { if (userId <= 0 || interfaceInfoId <= 0 ) { throw new BusinessException (ErrorCode.NOT_FOUND_ERROR); } LambdaQueryWrapper<UserInterfaceInfo> queryWrapper = new LambdaQueryWrapper <>(); queryWrapper.eq(UserInterfaceInfo::getUserId, userId) .eq(UserInterfaceInfo::getInterfaceInfoId, interfaceInfoId) .gt(UserInterfaceInfo::getLeftNum, 0 ); UserInterfaceInfo userInterfaceInfo = userInterfaceInfoMapper.selectOne(queryWrapper); return userInterfaceInfo != null ; } @Override public boolean invokeInterfaceCount (long userId, long interfaceInfoId) { if (userId <= 0 || interfaceInfoId <= 0 ) { throw new BusinessException (ErrorCode.NOT_FOUND_ERROR); } LambdaUpdateWrapper<UserInterfaceInfo> updateWrapper = new LambdaUpdateWrapper <>(); updateWrapper.eq(UserInterfaceInfo::getUserId, userId) .eq(UserInterfaceInfo::getInterfaceInfoId, interfaceInfoId) .gt(UserInterfaceInfo::getLeftNum, 0 ) .setSql("left_num = left_num -1, total_num = total_num + 1" ); int updateCount = userInterfaceInfoMapper.update(null , updateWrapper); return updateCount > 0 ; } }
gateway启动报错
1 2 3 4 5 6 7 8 9 10 11 12 Description: Failed to configure a DataSource: 'url' attribute is not specified and no embedded datasource could be configured. Reason: Failed to determine a suitable driver class Action :Consider the following: If you want an embedded database (H2, HSQL or Derby) , please put it on the classpath. If you have database settings to be loaded from a particular profile you may need to activate it (no profiles are currently active) .
image-20230207151142622
经分析我们需要在主类上排除数据库的类加载(google
springboot忽略数据库启动得到)
1 2 3 4 5 6 7 8 9 10 11 12 13 14 15 16 17 18 19 20 21 package com.xuan.project;import org.apache.dubbo.config.spring.context.annotation.EnableDubbo;import org.springframework.boot.SpringApplication;import org.springframework.boot.autoconfigure.SpringBootApplication;import org.springframework.boot.autoconfigure.jdbc.DataSourceAutoConfiguration;import org.springframework.boot.autoconfigure.jdbc.DataSourceTransactionManagerAutoConfiguration;import org.springframework.boot.autoconfigure.orm.jpa.HibernateJpaAutoConfiguration;@EnableDubbo @SpringBootApplication(exclude = {DataSourceAutoConfiguration.class, DataSourceTransactionManagerAutoConfiguration.class, HibernateJpaAutoConfiguration.class}) public class ApiPlatformGatewayApplication { public static void main (String[] args) { SpringApplication.run(ApiPlatformGatewayApplication.class, args); } }
再次启动网关成功~
测试跑通
image-20230206180958642
3、impl具体实现
在backend新建 service/impl/inner包
image-20230207114407493
1 2 3 4 5 6 7 8 9 10 11 12 13 14 15 16 17 18 19 20 21 22 23 24 @DubboService public class InnerInterfaceInfoServiceImpl implements InnerInterfaceInfoService { @Resource private InterfaceInfoMapper interfaceInfoMapper; @Override public InterfaceInfo getInvokeInterfaceInfo (String url, String method) { if (StrUtil.hasBlank(url, method)) { throw new BusinessException (ErrorCode.PARAMS_ERROR); } LambdaQueryWrapper<InterfaceInfo> lambdaQueryWrapper = new LambdaQueryWrapper <>(); lambdaQueryWrapper.eq(InterfaceInfo::getUrl, url).eq(InterfaceInfo::getMethod, method); return interfaceInfoMapper.selectOne(lambdaQueryWrapper); } }
1 2 3 4 5 6 7 8 9 10 11 12 13 14 15 16 17 18 19 20 21 22 23 @DubboService public class InnerUserServiceImpl implements InnerUserService { @Resource private UserMapper userMapper; @Override public User getInvokeUser (String accessKey) { if (StrUtil.isBlank(accessKey)) { throw new BusinessException (ErrorCode.PARAMS_ERROR); } LambdaQueryWrapper<User> lambdaQueryWrapper = new LambdaQueryWrapper <>(); lambdaQueryWrapper.eq(User::getAccessKey, accessKey); return userMapper.selectOne(lambdaQueryWrapper); } }
4、优化网关Global Filter
1 2 3 4 5 6 7 8 9 10 11 12 13 14 15 16 17 18 19 20 21 22 23 24 25 26 27 28 29 30 31 32 33 34 35 36 37 38 39 40 41 42 43 44 45 46 47 48 49 50 51 52 53 54 55 56 57 58 59 60 61 62 63 64 65 66 67 68 69 70 71 72 73 74 75 76 77 78 79 80 81 82 83 84 85 86 87 88 89 90 91 92 93 94 95 96 97 98 99 100 101 102 103 104 105 106 107 108 109 110 111 112 113 114 115 116 117 118 119 120 121 122 123 124 125 126 127 128 129 130 131 132 133 134 135 136 137 138 139 140 141 142 143 144 145 146 147 148 149 150 151 152 153 154 155 156 157 158 159 160 161 162 163 164 165 166 167 168 169 170 171 172 173 174 175 176 177 178 179 180 181 182 183 184 185 186 187 188 189 190 191 192 193 @Slf4j @Component public class CustomGlobalFilter implements GlobalFilter , Ordered { @DubboReference private InnerUserService innerUserService; @DubboReference private InnerInterfaceInfoService innerInterfaceInfoService; @DubboReference private InnerUserInterfaceInfoService innerUserInterfaceInfoService; private static final List<String> IP_WHITE_LIST = Arrays.asList("127.0.0.1" , "127.0.0.2" ); private static final long FIVE_MINUTES = 5 * 60 * 1000L ; private static final String INTERFACE_HOST = "http://localhost:8090" ; @Override public Mono<Void> filter (ServerWebExchange exchange, GatewayFilterChain chain) { ServerHttpRequest request = exchange.getRequest(); String path = INTERFACE_HOST + request.getPath().value(); String method = Objects.requireNonNull(request.getMethod()).toString(); log.info("请求id: {}" , request.getId()); log.info("请求路径: {}" , path); log.info("请求方法: {}" , method); log.info("请求参数: {}" , request.getQueryParams()); log.info("请求头: {}" , request.getHeaders()); String remoteAddress = Objects.requireNonNull(request.getRemoteAddress()).getHostString(); log.info("请求地址: {}" , remoteAddress); ServerHttpResponse response = exchange.getResponse(); if (!IP_WHITE_LIST.contains(remoteAddress)) { return handleNoAuth(response); } HttpHeaders headers = request.getHeaders(); String accessKey = headers.getFirst("accessKey" ); String body = null ; try { body = URLDecoder.decode(headers.getFirst("body" ), StandardCharsets.UTF_8.name()); } catch (UnsupportedEncodingException e) { throw new RuntimeException (e); } String sign = headers.getFirst("sign" ); String nonce = headers.getFirst("nonce" ); String timestamp = headers.getFirst("timestamp" ); boolean hasBlank = StrUtil.hasBlank(accessKey, body, sign, nonce, timestamp); if (hasBlank) { return handleInvokeError(response); } User invokeUser = null ; try { invokeUser = innerUserService.getInvokeUser(accessKey); } catch (Exception e) { log.error("getInvokeUser error" , e); } if (invokeUser == null ) { return handleInvokeError(response); } String secretKey = invokeUser.getSecretKey(); String sign1 = SignUtil.getSign(body, secretKey); if (!StrUtil.equals(sign, sign1)) { return handleInvokeError(response); } if (!NumberUtil.isNumber(timestamp)) { return handleInvokeError(response); } if (System.currentTimeMillis() - Long.parseLong(timestamp) > FIVE_MINUTES) { return handleInvokeError(response); } InterfaceInfo invokeInterfaceInfo = null ; try { invokeInterfaceInfo = innerInterfaceInfoService.getInvokeInterfaceInfo(path, method); } catch (Exception e) { log.error("getInvokeInterfaceInfo error" , e); } if (invokeInterfaceInfo == null ) { return handleInvokeError(response); } if (!innerUserInterfaceInfoService.hasInvokeNum(invokeUser.getId(), invokeInterfaceInfo.getId())) { return handleInvokeError(response); } return handleResponse(exchange, chain, invokeUser.getId(), invokeInterfaceInfo.getId()); } @Override public int getOrder () { return -1 ; } private Mono<Void> handleResponse (ServerWebExchange exchange, GatewayFilterChain chain, long userId, long interfaceInfoId) { try { ServerHttpResponse originalResponse = exchange.getResponse(); DataBufferFactory bufferFactory = originalResponse.bufferFactory(); HttpStatus statusCode = originalResponse.getStatusCode(); if (statusCode == HttpStatus.OK) { ServerHttpResponseDecorator decoratedResponse = new ServerHttpResponseDecorator (originalResponse) { @Override public Mono<Void> writeWith (Publisher<? extends DataBuffer> body) { log.info("body instanceof Flux: {}" , (body instanceof Flux)); if (body instanceof Flux) { Flux<? extends DataBuffer > fluxBody = Flux.from(body); return super .writeWith(fluxBody.map(dataBuffer -> { try { innerUserInterfaceInfoService.invokeInterfaceCount(userId, interfaceInfoId); } catch (Exception e) { log.error("invokeInterfaceCount error" , e); } byte [] content = new byte [dataBuffer.readableByteCount()]; dataBuffer.read(content); DataBufferUtils.release(dataBuffer); List<Object> rspArgs = new ArrayList <>(); rspArgs.add(originalResponse.getStatusCode()); String data = new String (content, StandardCharsets.UTF_8); rspArgs.add(data); log.info("<--- status:{} data:{}" , rspArgs.toArray()); return bufferFactory.wrap(content); })); } else { log.error("<--- {} 响应code异常" , getStatusCode()); } return super .writeWith(body); } }; return chain.filter(exchange.mutate().response(decoratedResponse).build()); } return chain.filter(exchange); } catch (Exception e) { log.error("gateway log exception.\n" + e); return chain.filter(exchange); } } private Mono<Void> handleNoAuth (ServerHttpResponse response) { response.setStatusCode(HttpStatus.FORBIDDEN); return response.setComplete(); } private Mono<Void> handleInvokeError (ServerHttpResponse response) { response.setStatusCode(HttpStatus.INTERNAL_SERVER_ERROR); return response.setComplete(); } }
十四、统计分析
需求
各接口的总调用次数占比(饼图)取调用最多的前
3个接口,从而分析出哪些接口没有人用(降低资源、或者下线),高频接口(增加资源、提高收费)。用饼图展示。
1、后端
1、编写SQL
1 2 3 4 5 6 7 8 9 10 SELECT interface_info_id, SUM ( total_num ) AS invoke_num FROM user_interface_info GROUP BY interface_info_id ORDER BY invoke_num DESC LIMIT 3
image-20230207154946647
SQL语句确认没问题后 再在代码里编写
2、编写接口
新增VO、Mapper、Service、Controller
VO
1 2 3 4 5 6 7 8 9 10 11 12 @EqualsAndHashCode(callSuper = true) @Data public class InvokeInterfaceInfoVO extends InterfaceInfo { private Integer invokeNum; private static final long serialVersionUID = 1L ; }
Mapper
1 2 3 4 5 public interface UserInterfaceInfoMapper extends BaseMapper <UserInterfaceInfo> { List<InvokeInterfaceInfoVO> listTopInvokeInterfaceInfo (int limit) ; }
1 2 3 4 5 6 7 8 9 10 11 12 13 14 15 16 <?xml version="1.0" encoding="UTF-8" ?> <!DOCTYPE mapper PUBLIC "-//mybatis.org//DTD Mapper 3.0//EN" "http://mybatis.org/dtd/mybatis-3-mapper.dtd" > <mapper namespace ="com.xuan.project.mapper.UserInterfaceInfoMapper" > <select id ="listTopInvokeInterfaceInfo" resultType ="com.xuan.project.model.vo.InvokeInterfaceInfoVO" > SELECT interface_info_id AS id, SUM(total_num) AS invoke_num FROM user_interface_info GROUP BY interface_info_id ORDER BY invoke_num DESC LIMIT #{limit} </select > </mapper >
注意 :SELECT interface_info_id AS id,
这里一定要AS id 因为VO类继承的InterfaceInfo类。这里面只有id字段
Service
1 2 3 4 5 6 7 8 9 10 11 12 13 14 15 16 17 18 19 20 21 22 23 24 25 26 27 28 29 30 31 32 33 34 35 36 37 38 39 @Service public class ChartServiceImpl implements ChartService { @Resource private UserInterfaceInfoMapper userInterfaceInfoMapper; @Resource private InterfaceInfoService interfaceInfoService; @Override public List<InvokeInterfaceInfoVO> listTopInvokeInterfaceInfo (int limit) { List<InvokeInterfaceInfoVO> vos = userInterfaceInfoMapper.listTopInvokeInterfaceInfo(limit); if (vos == null || vos.size() == 0 ) { throw new BusinessException (ErrorCode.SYSTEM_ERROR); } LinkedHashMap<Long, InvokeInterfaceInfoVO> voHashMap = new LinkedHashMap <>(vos.size()); for (InvokeInterfaceInfoVO vo : vos) { voHashMap.put(vo.getId(), vo); } LambdaQueryWrapper<InterfaceInfo> queryWrapper = new LambdaQueryWrapper <>(); queryWrapper.in(InterfaceInfo::getId, voHashMap.keySet()); List<InterfaceInfo> infoList = interfaceInfoService.list(queryWrapper); for (InterfaceInfo interfaceInfo : infoList) { voHashMap.get(interfaceInfo.getId()).setName(interfaceInfo.getName()); } return new ArrayList <>(voHashMap.values()); } }
也可以使用stream流来实现
Controller
1 2 3 4 5 6 7 8 9 10 11 12 13 14 15 16 17 18 19 20 21 22 23 24 @Slf4j @RestController @RequestMapping("/chart") public class ChartController { @Resource private ChartService chartService; @GetMapping("/top/interface/invoke") BaseResponse<List<InvokeInterfaceInfoVO>> listTopInvokeInterfaceInfo () { List<InvokeInterfaceInfoVO> listTopInvokeInterfaceInfo = chartService.listTopInvokeInterfaceInfo(3 ); return ResultUtils.success(listTopInvokeInterfaceInfo); } }
2、前端
图表强烈推荐用现成的库!!! 比如:
使用步骤都大同小异
看官网
找到快速入门、按文档去引入库
进入示例页面
找到你要的图
在线调试
复制代码
改为真实数据
这里选择使用了Echars再加上使用的是react 所以用这个库:https://github.com/hustcc/echarts-for-react
config/routes.ts下新增路由
src/pages/Admin中使用上面步骤写了一个简单页面
1 2 3 4 5 6 7 8 9 10 11 12 13 14 15 16 17 18 19 20 21 22 23 24 25 26 27 28 29 30 31 32 33 34 35 36 37 38 39 40 41 42 43 44 45 46 47 48 49 50 51 52 53 54 55 56 57 58 59 60 61 62 63 64 65 66 67 68 69 70 71 72 73 74 import { PageContainer } from '@ant-design/pro-components' ;import ReactECharts from 'echarts-for-react' ;import React , { useEffect, useState } from 'react' ;import { listTopInvokeInterfaceInfoUsingGET } from '@/services/api-platform-backend/chartController' ;const InterfaceChart : React .FC = () => { const [data, setData] = useState<API .InvokeInterfaceInfoVO []>([]); const [loading, setLoading] = useState (true ); useEffect (() => { listTopInvokeInterfaceInfoUsingGET ().then ((res ) => { if (res.data ) { setData (res.data ); setLoading (false ); } }); }, []); const chartInterface = data.map ((item ) => { return { value : item.invokeNum , name : item.name , }; }); const option = { tooltip : { trigger : 'item' , }, legend : { top : '5%' , left : 'center' , }, series : [ { name : 'Access From' , type : 'pie' , radius : ['40%' , '70%' ], avoidLabelOverlap : false , itemStyle : { borderRadius : 10 , borderColor : '#fff' , borderWidth : 2 , }, label : { show : false , position : 'center' , }, emphasis : { label : { show : true , fontSize : 20 , fontWeight : 'bold' , }, }, labelLine : { show : false , }, data : chartInterface, }, ], }; return ( <PageContainer title ={ '接口调用情况 '}> <ReactECharts showLoading ={loading} option ={option} /> </PageContainer > ); }; export default InterfaceChart ;
效果如下
image-20230207184004186
十五、拓展点
用户可以申请更换签名
怎么让其他用户也上传接口? 需要提供一个机制
(界面),让用户输入自己的接口host
(服务器地址)、接口信息,将接口信息写入数据库。 可以在 interfacelnto
表里加个 host 字段,区分服务器地址,让接口提供者更灵活地接入系统。
将接口信息写入数据库之前,要对接口进行校验(比如检查他的地址是否遵循规则,测试调用),保证他是正常的。
将接口信息写入数据库之前遵循咱们的要求(井且使用咱们的
sdk),在接入时,平台需要测试调用这个接口,保证他是正常的。
网关校验是否还有调用次数 需要考虑井发问题,防止瞬间调用超额。
网关优化 比如增加限流 /降级保护,提高性能等。还可以考虑搭配 Nginx
网关使用。
功能增强
可以针对不同的请求头或者接口类型来设计前端界面和表单,便于用户调用,获得更好的体验。
可以参考 swagger、postman、knife4j 的页面。
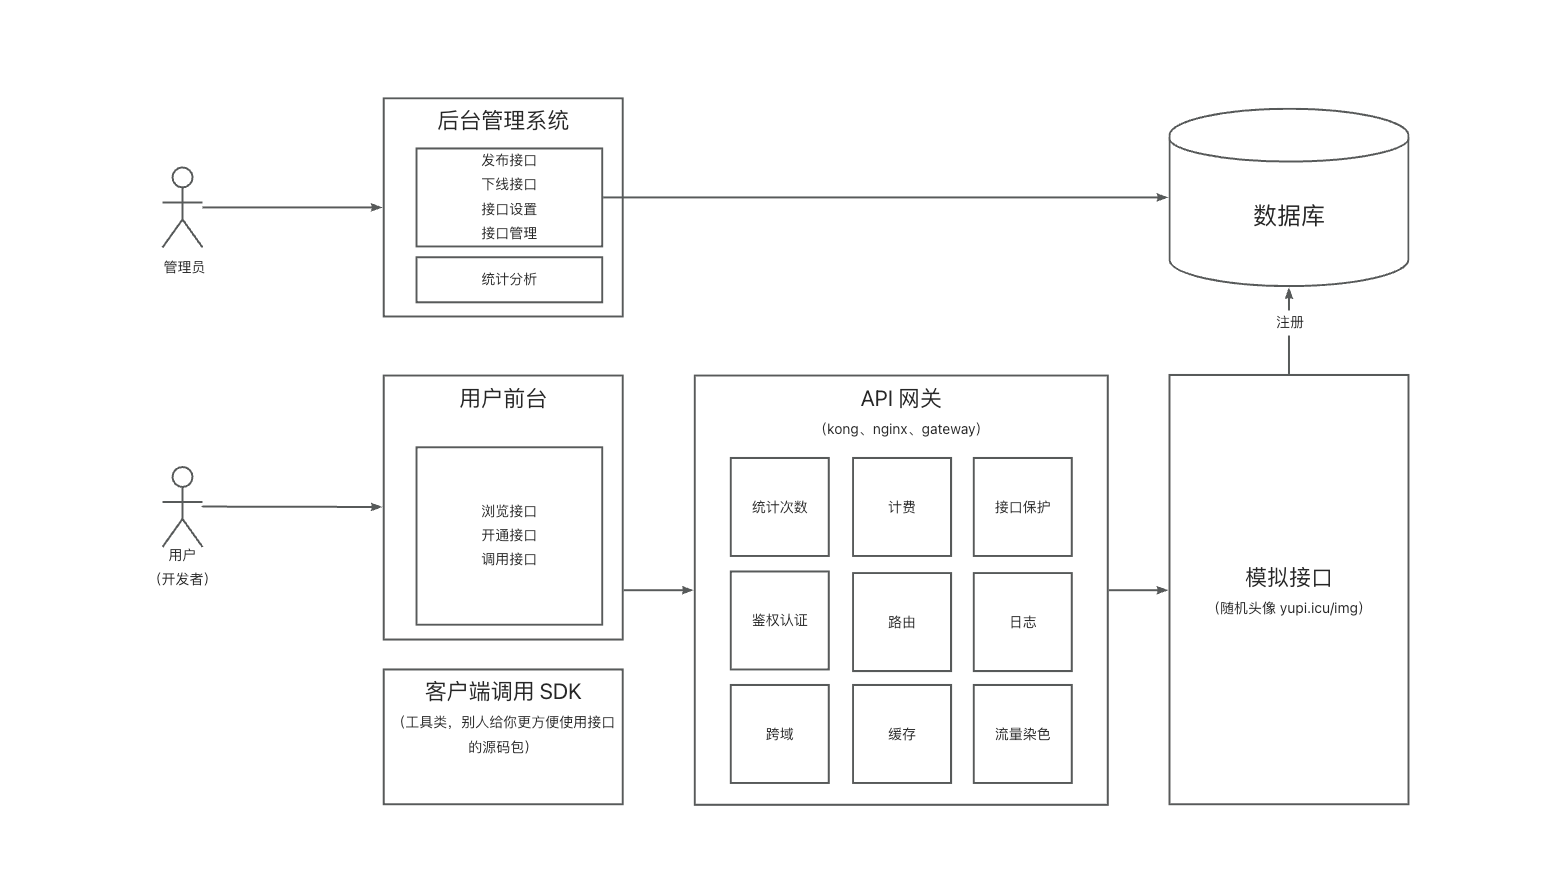
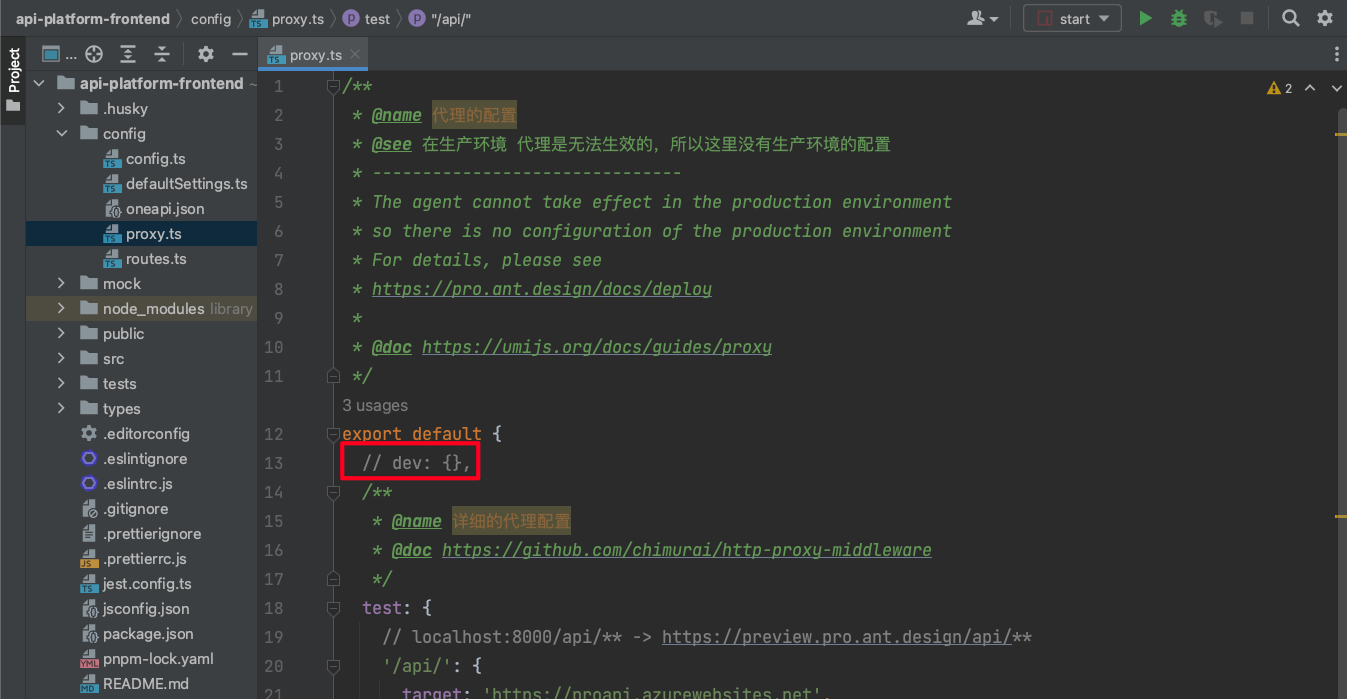
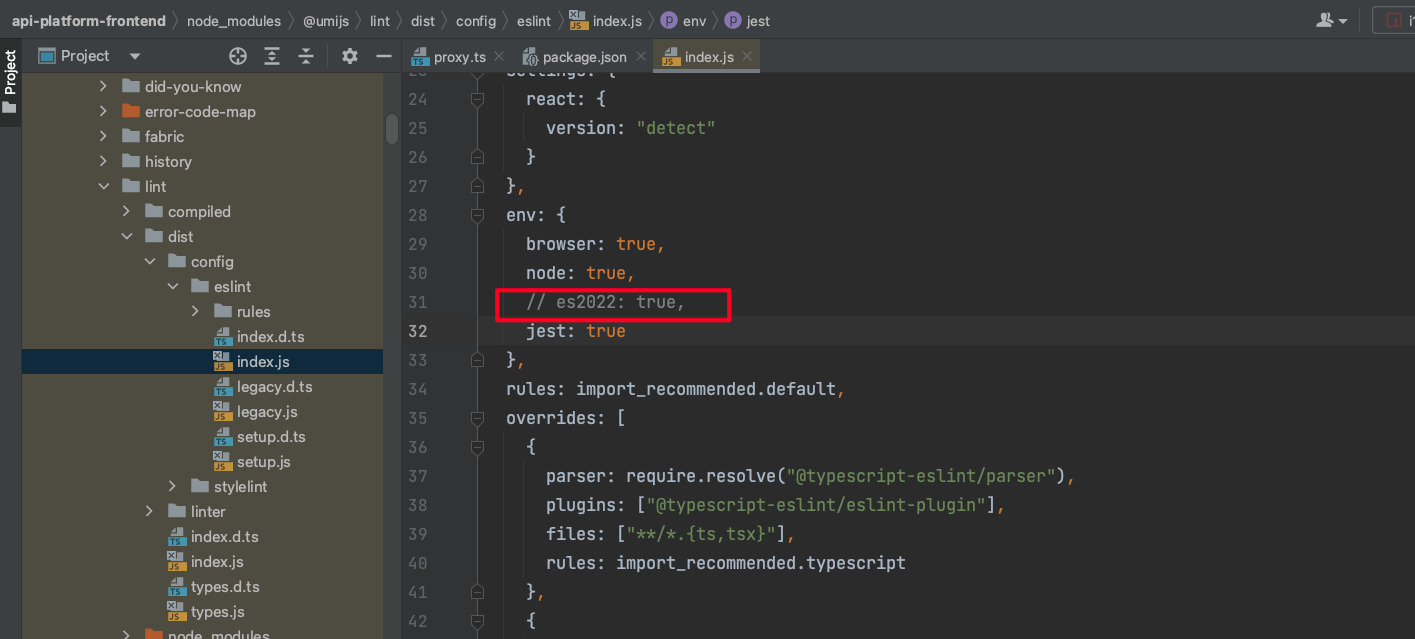

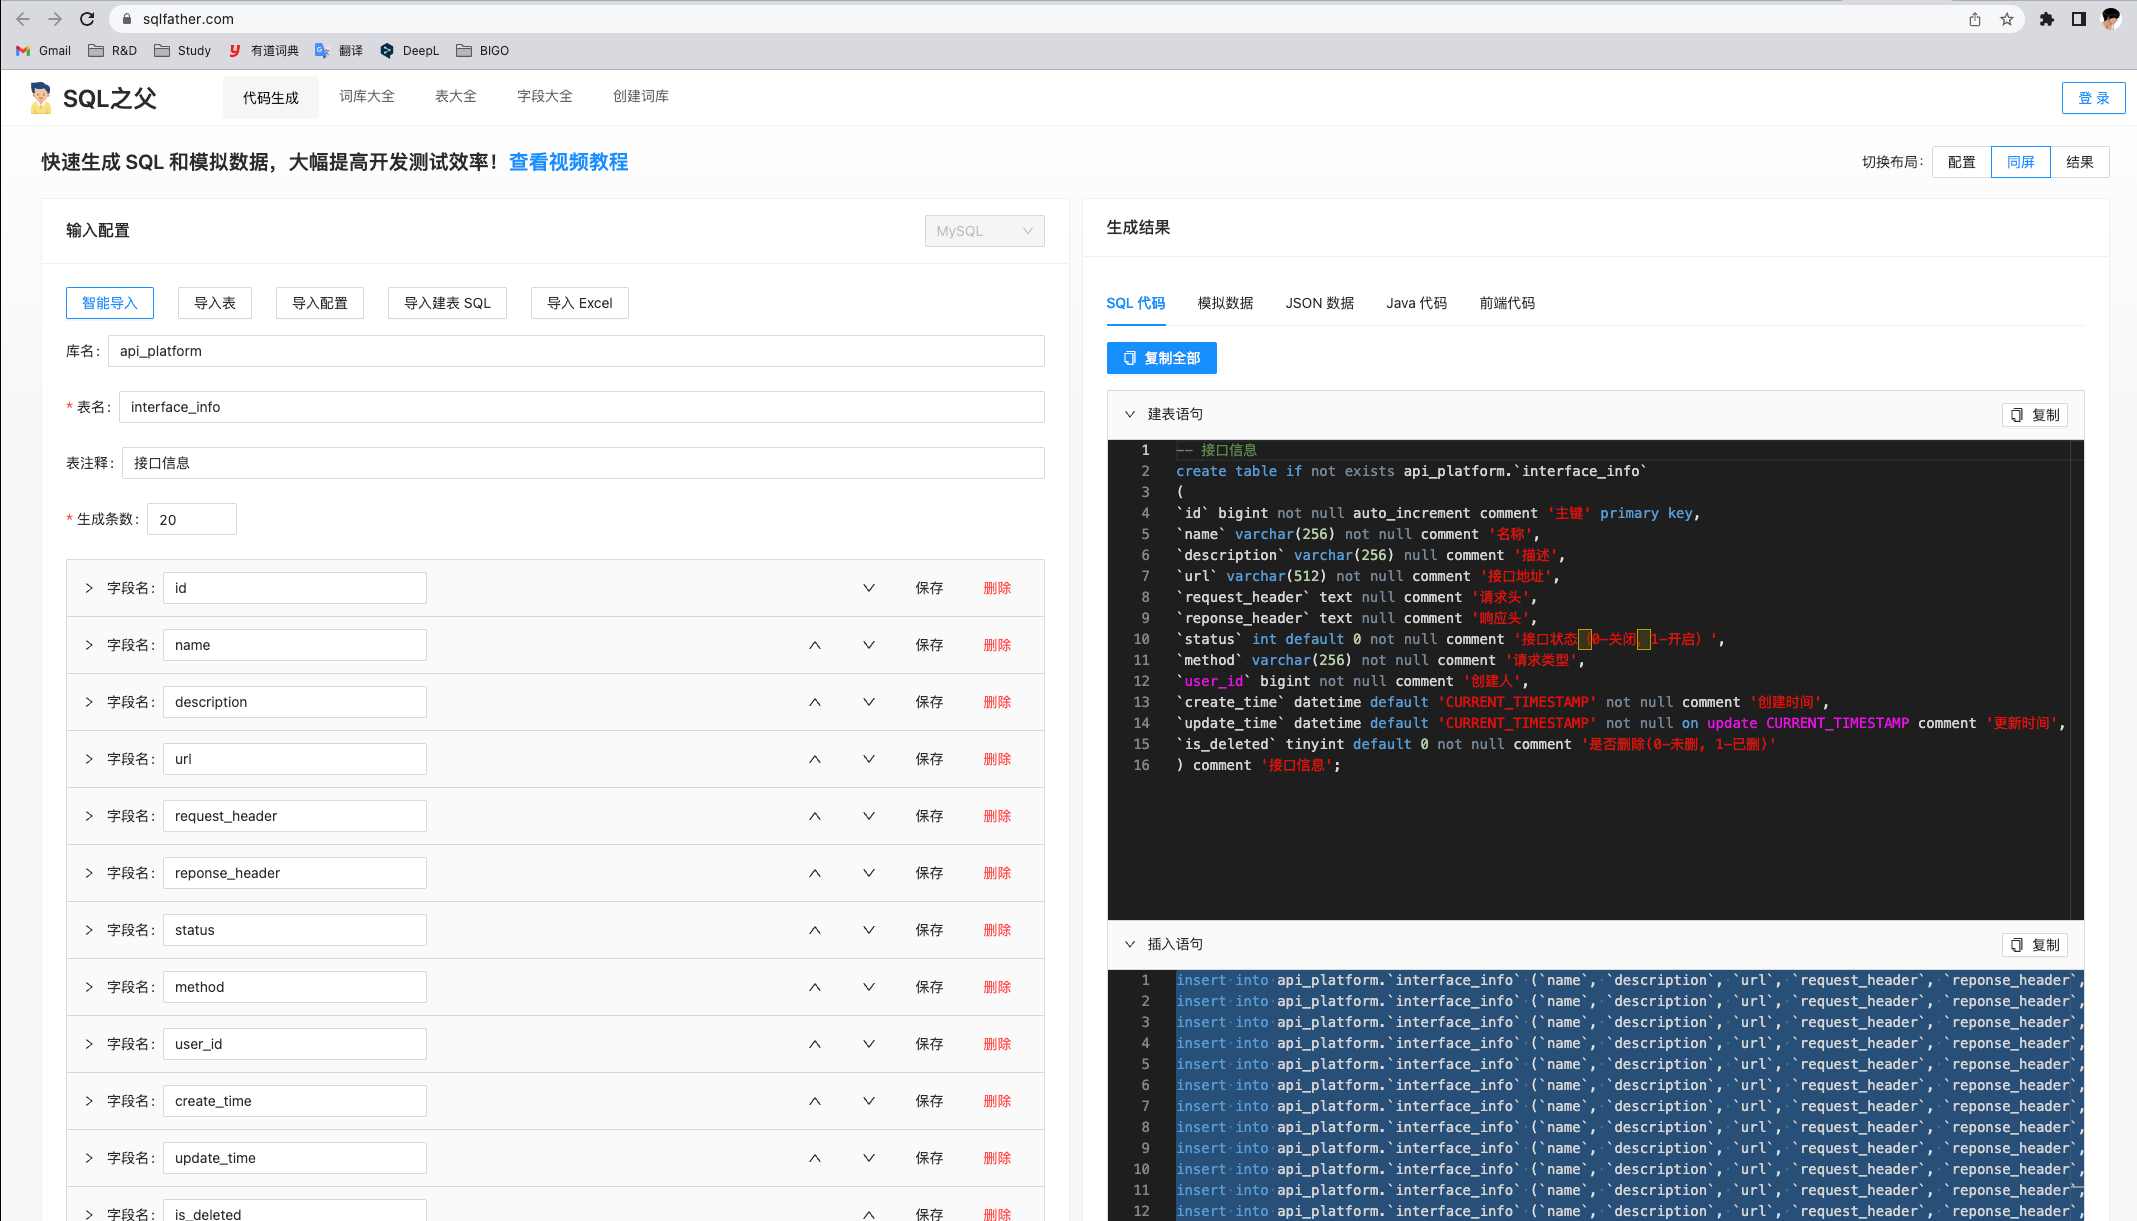

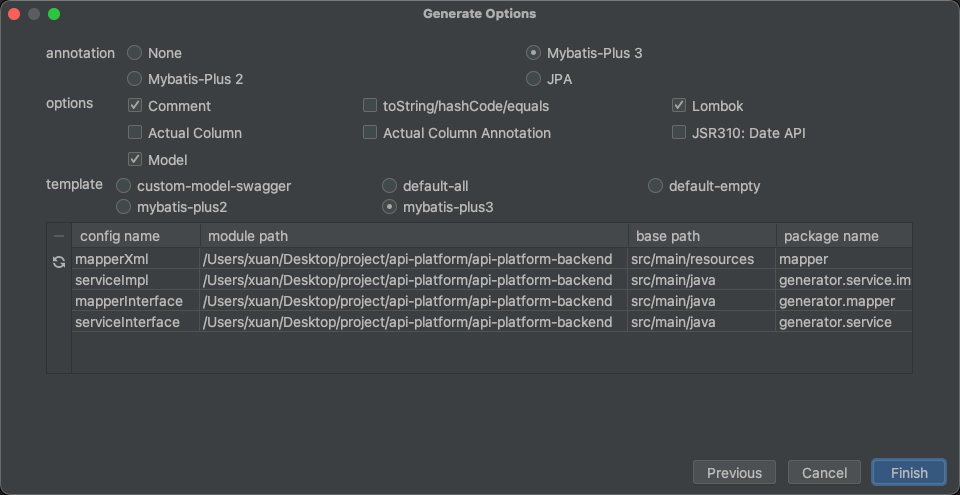
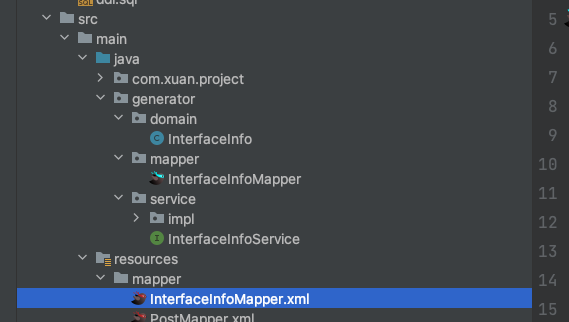
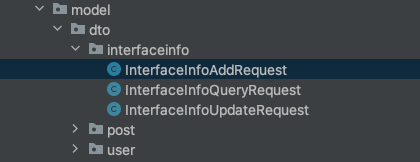
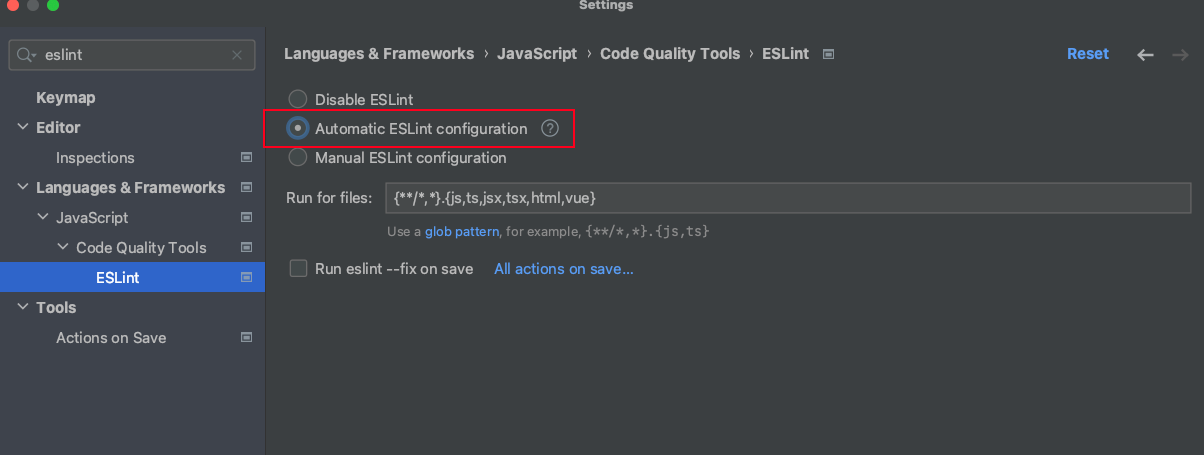
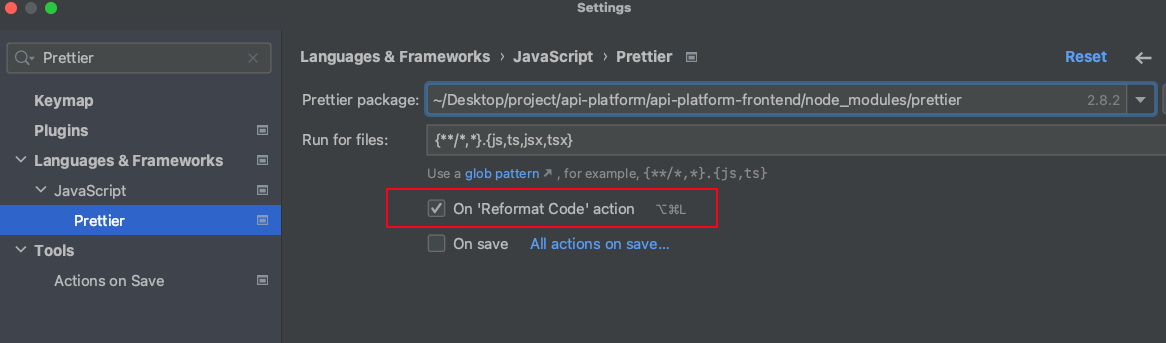
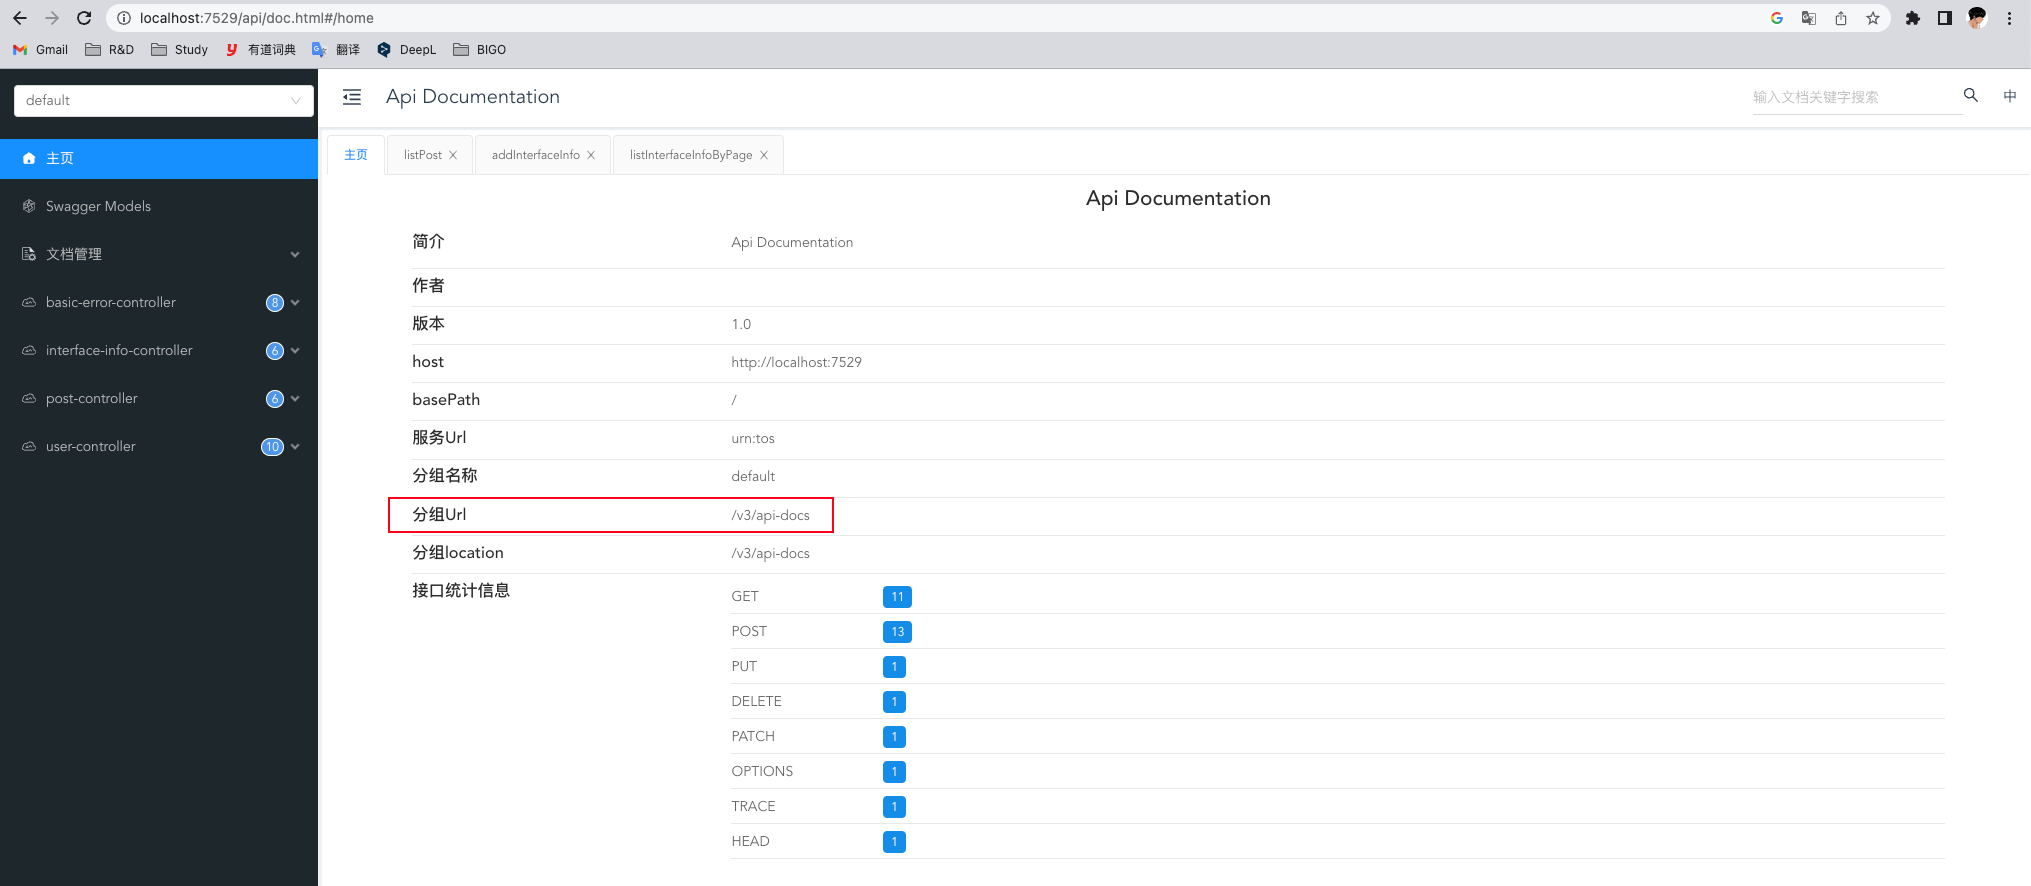
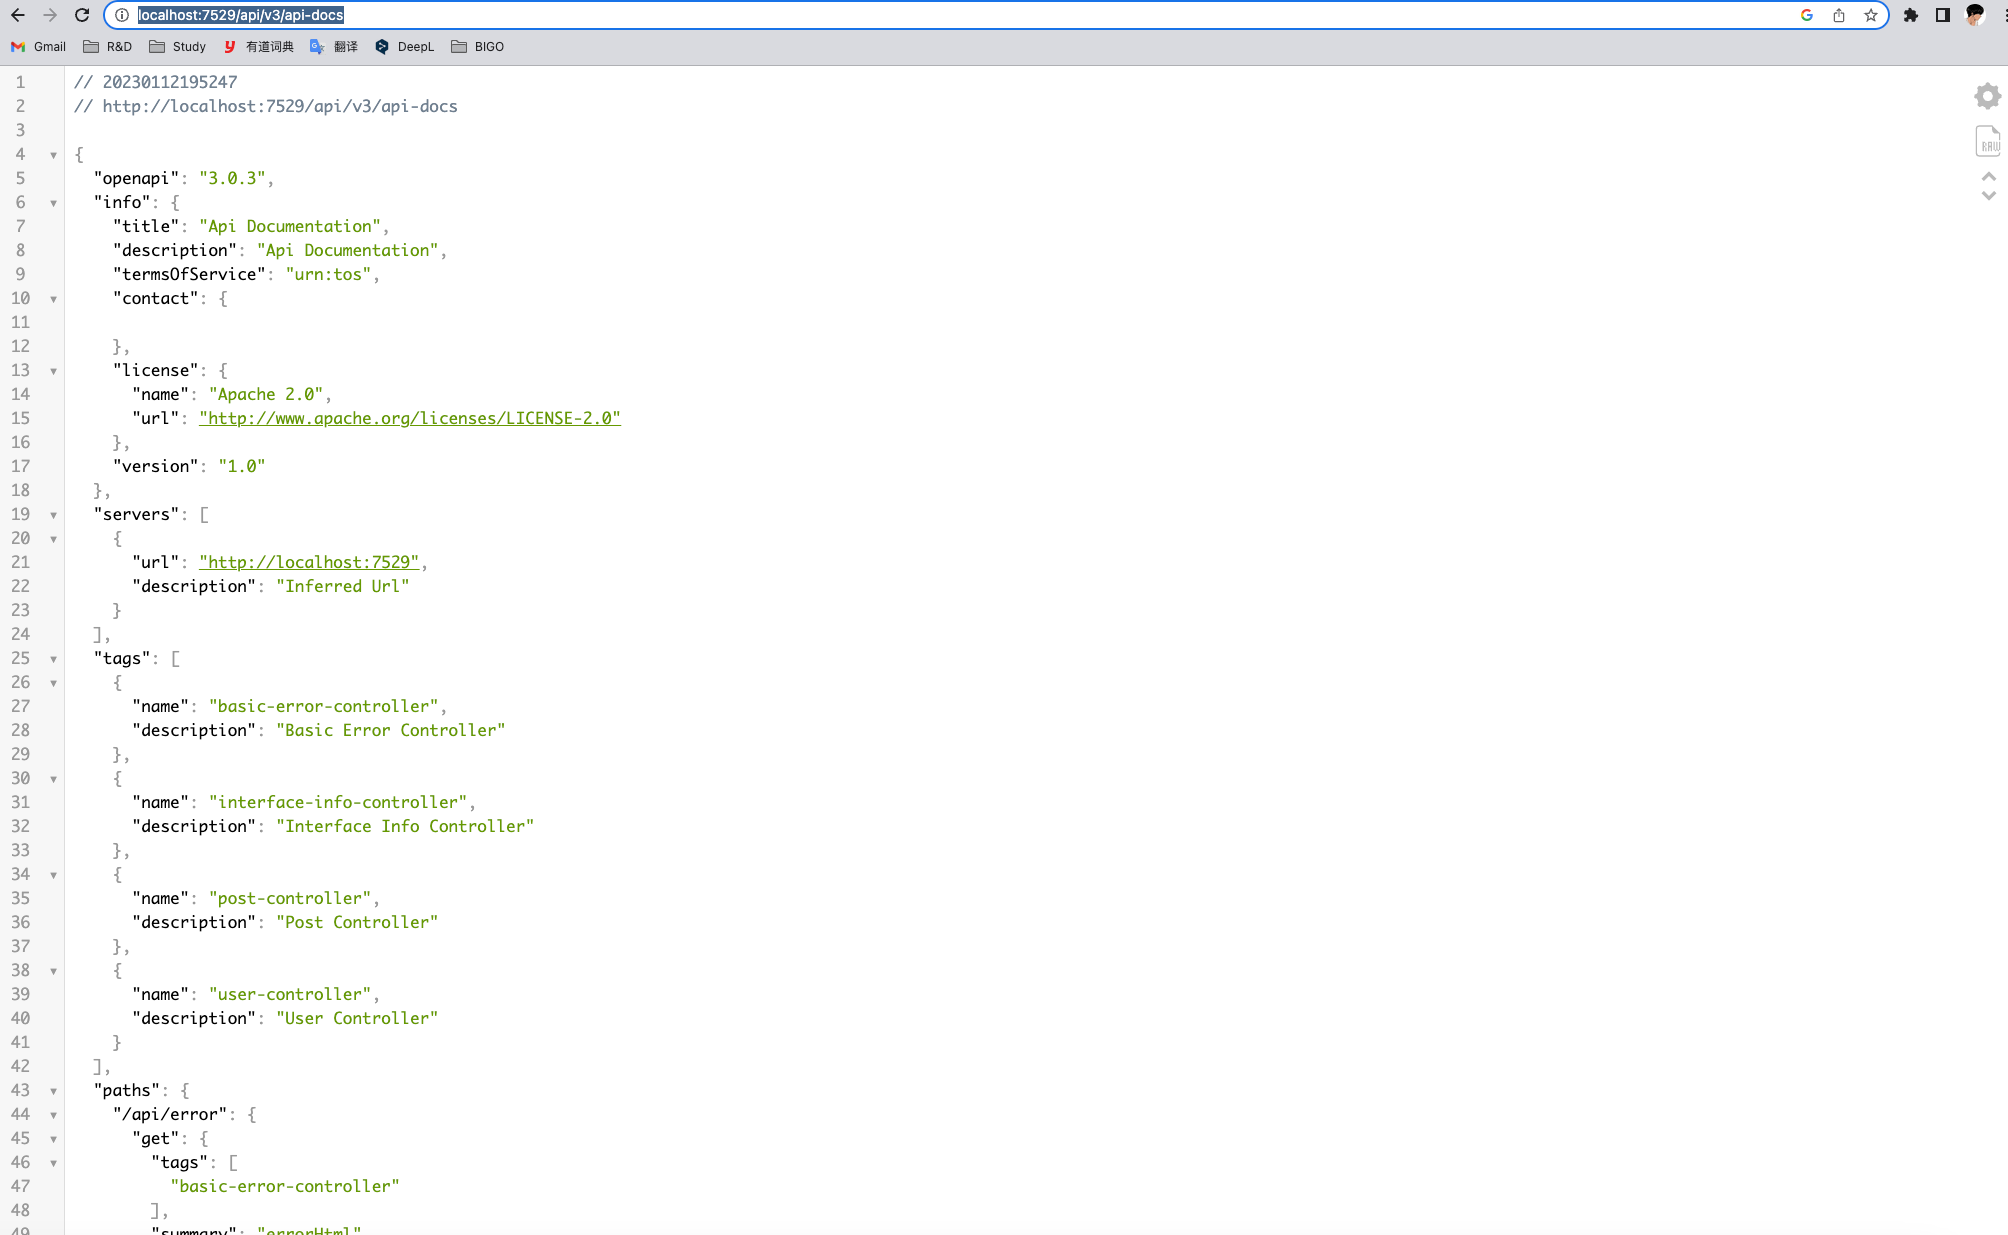
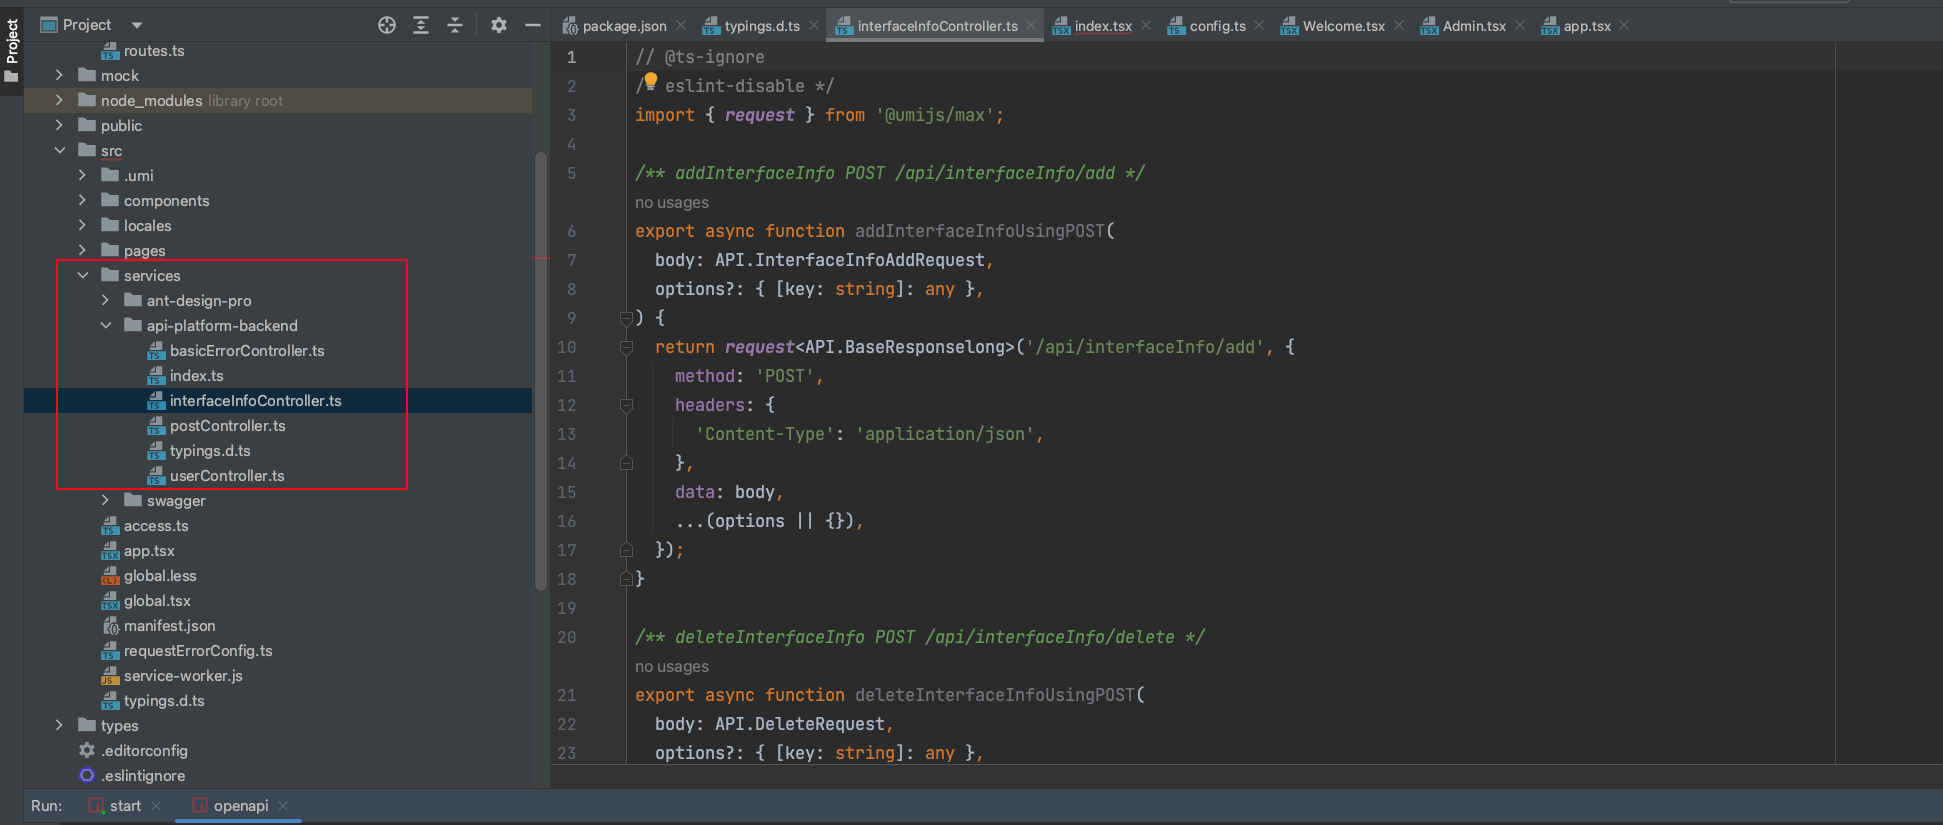
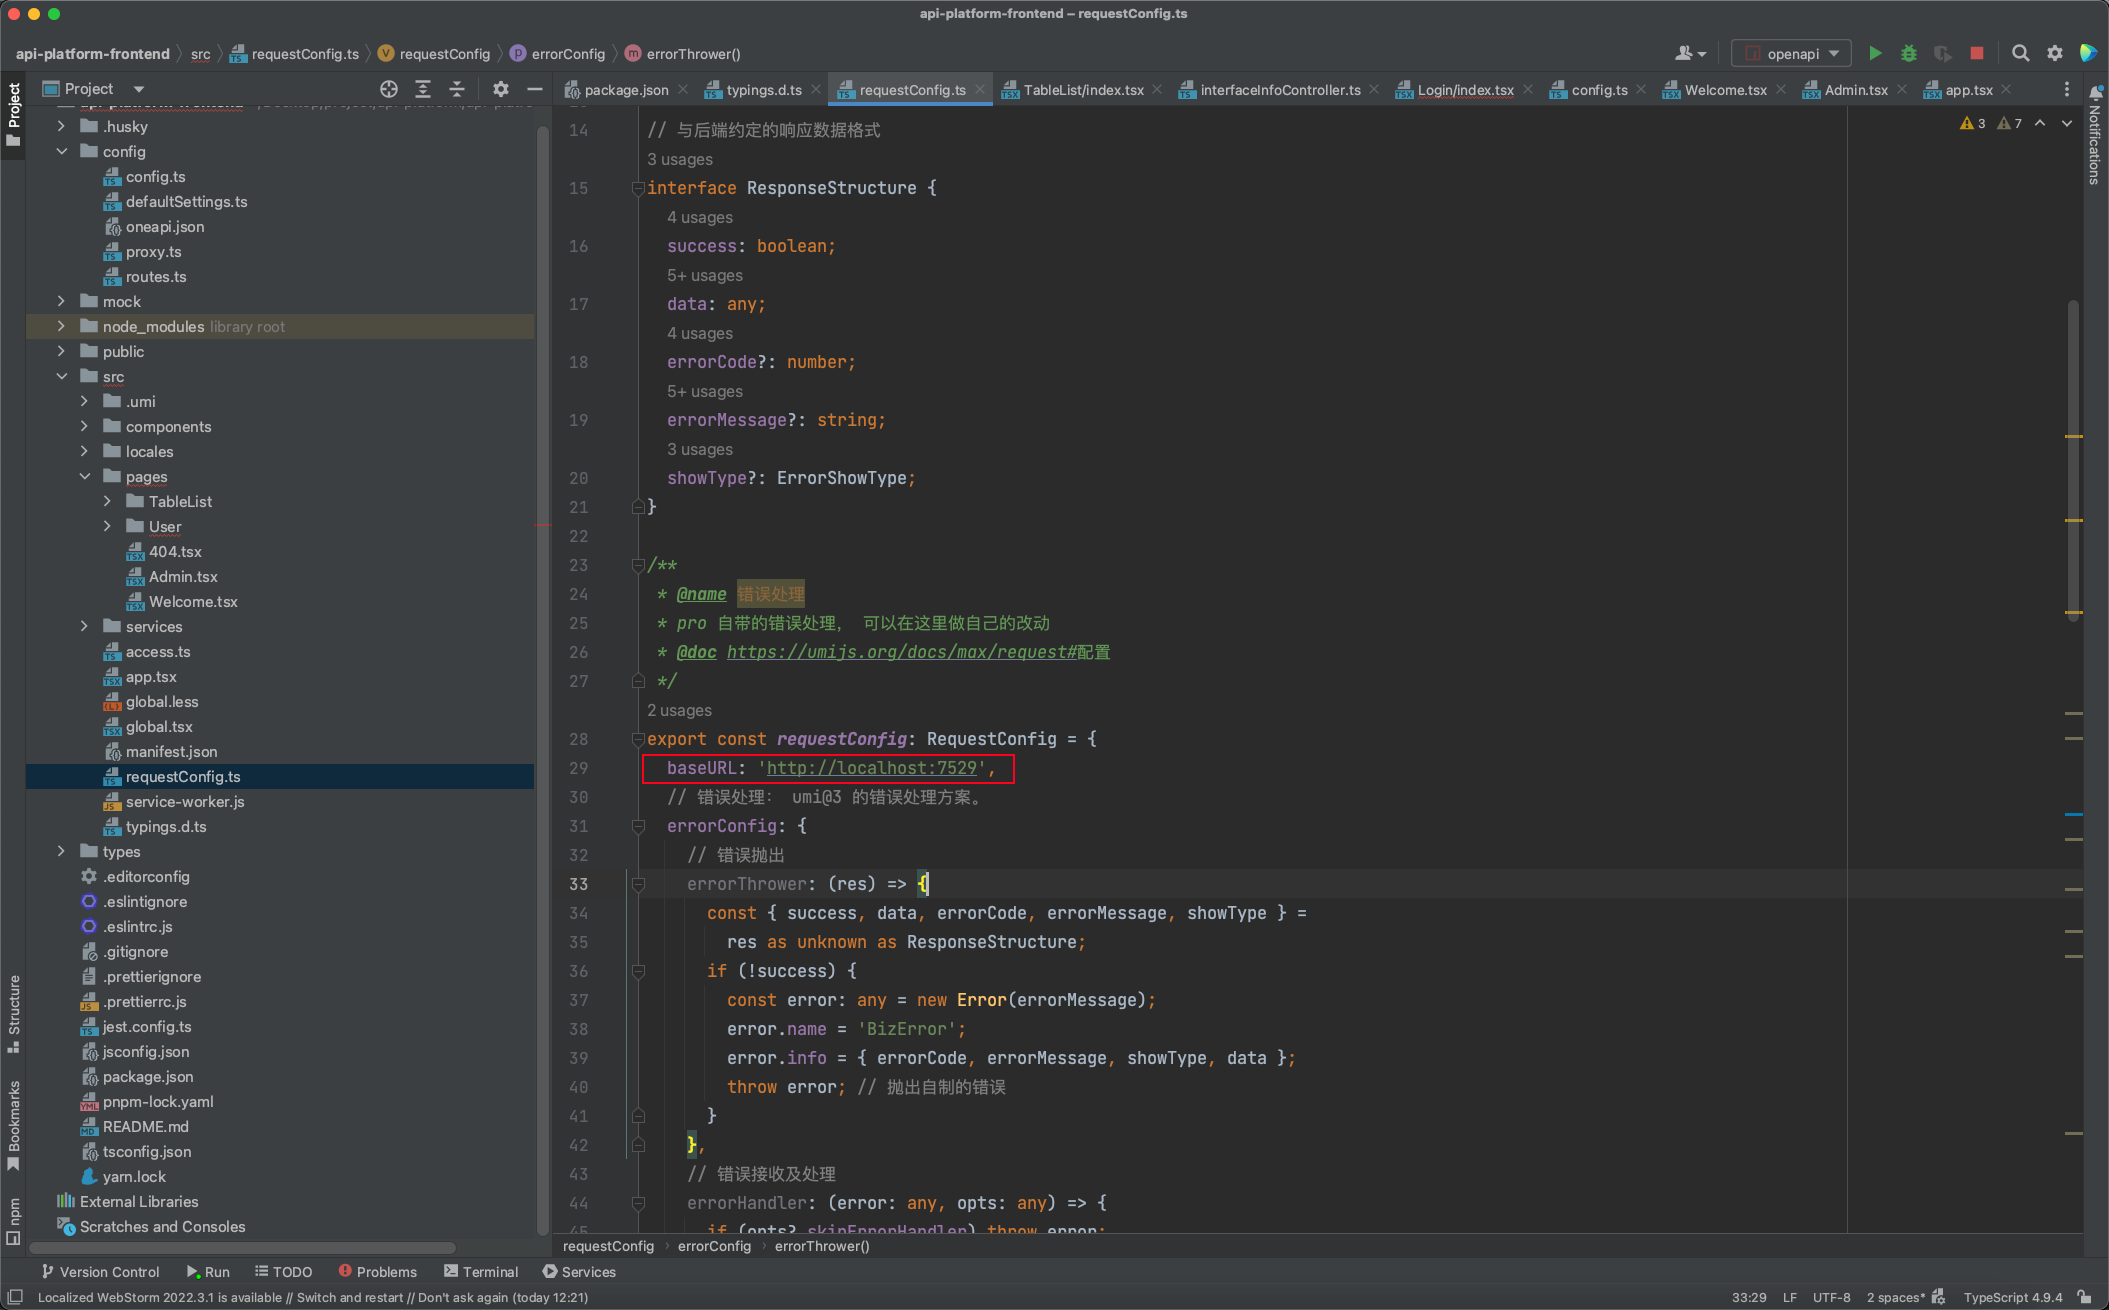
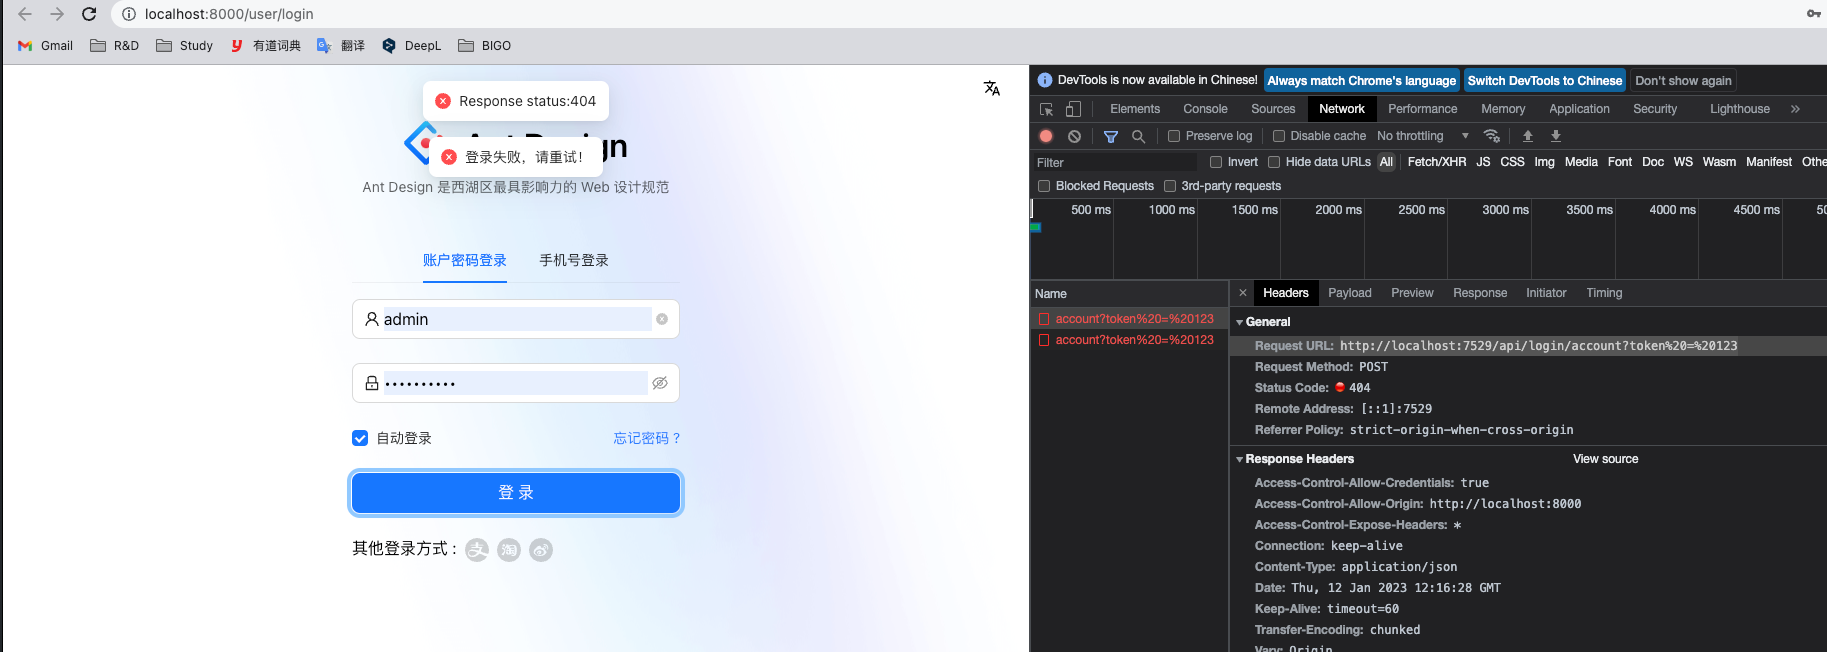

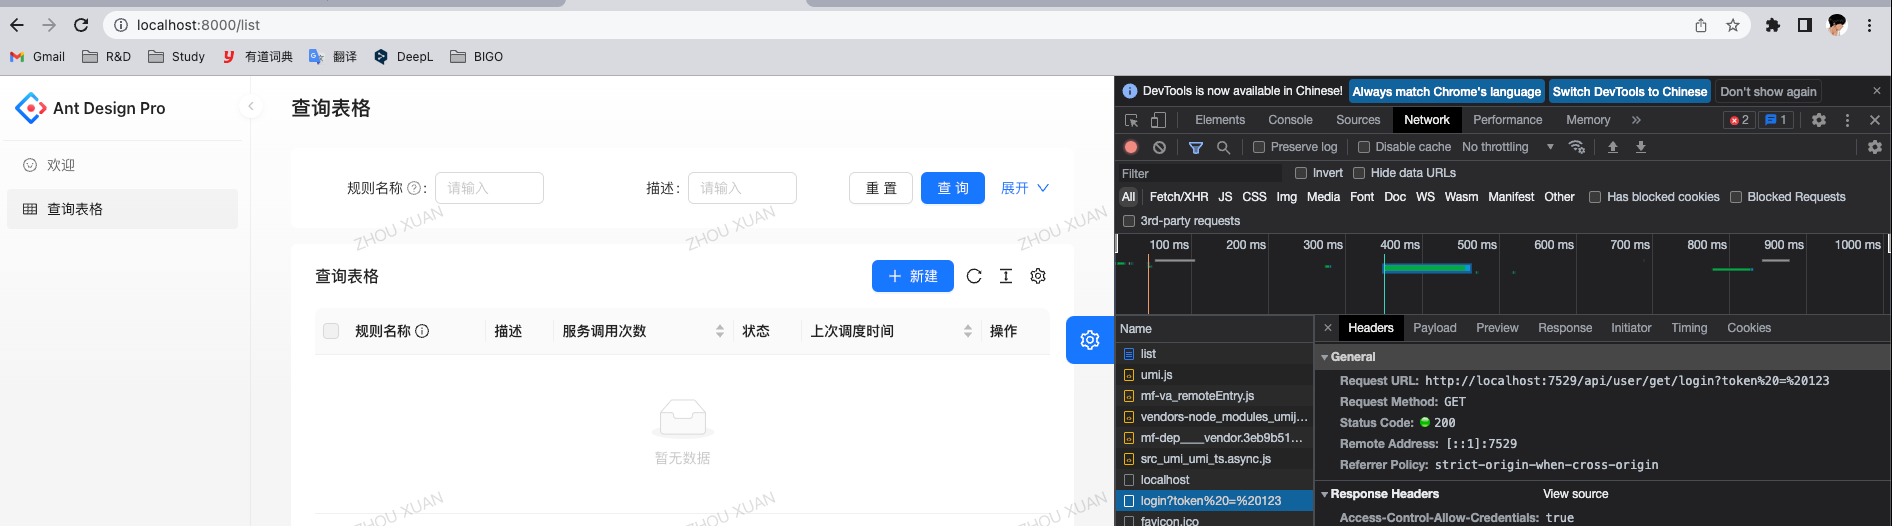
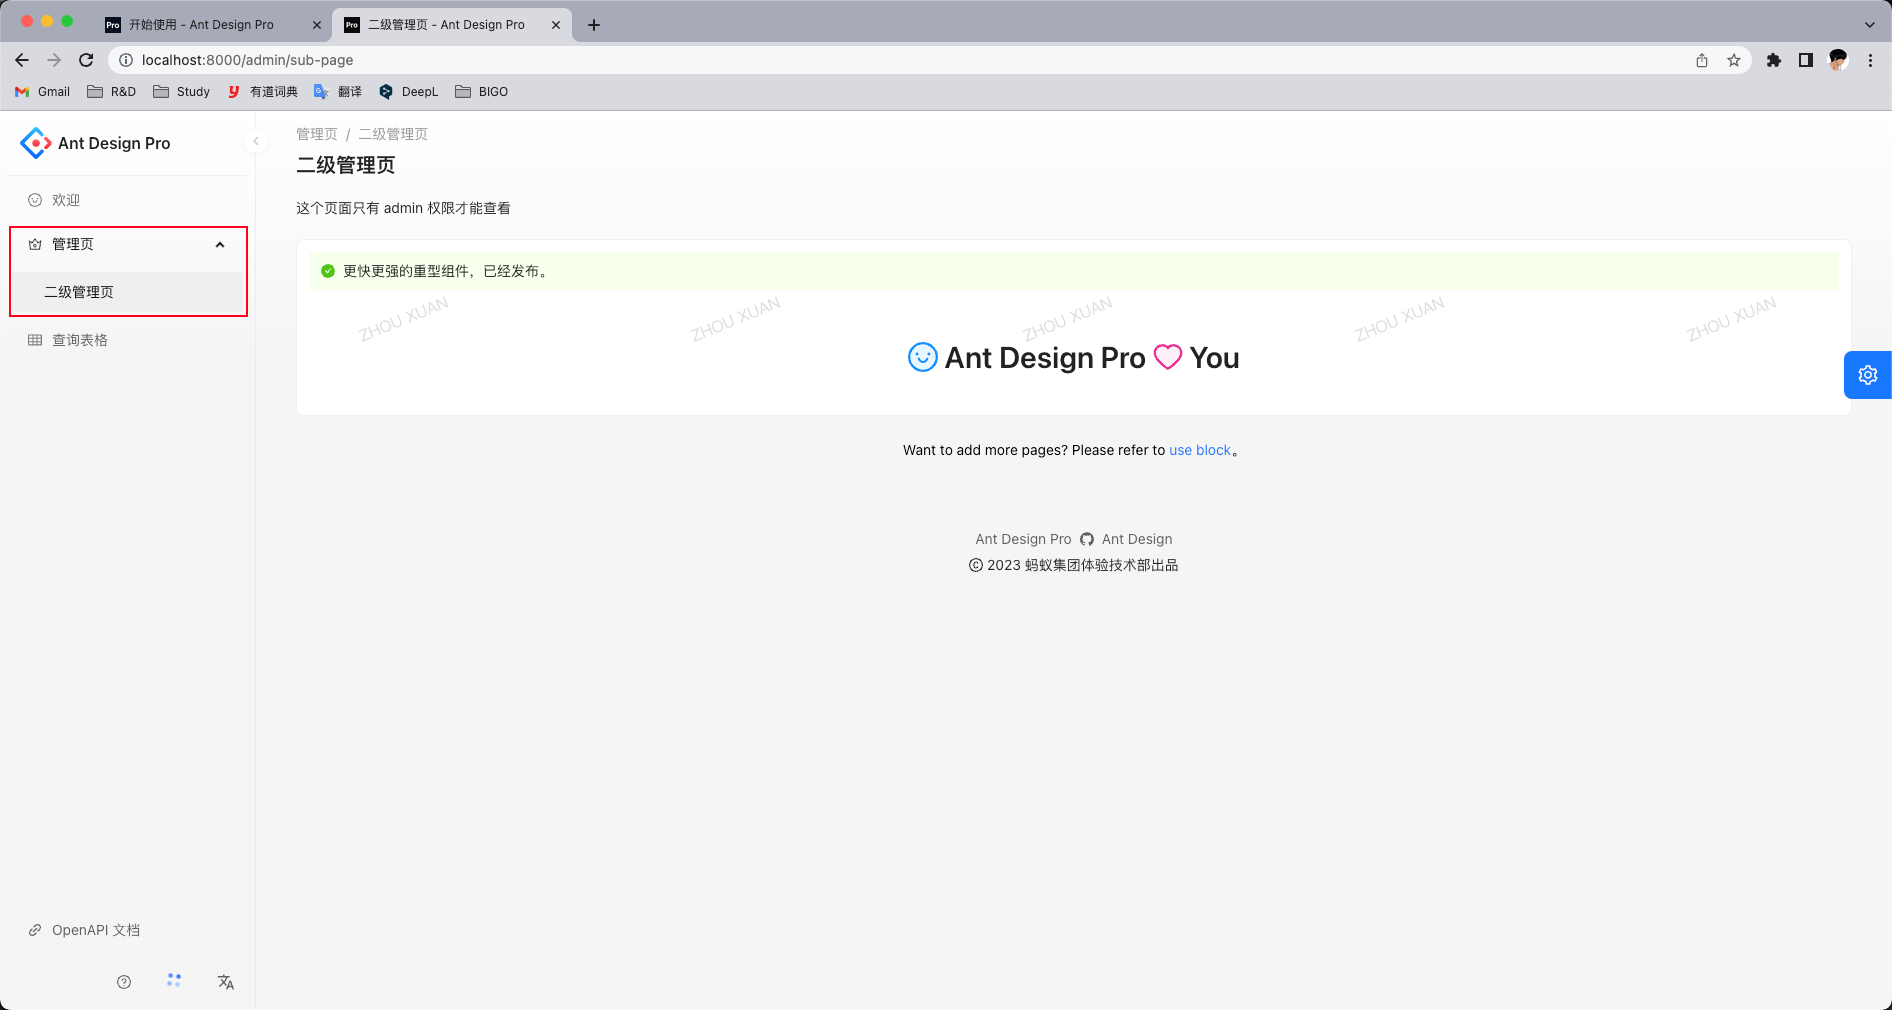
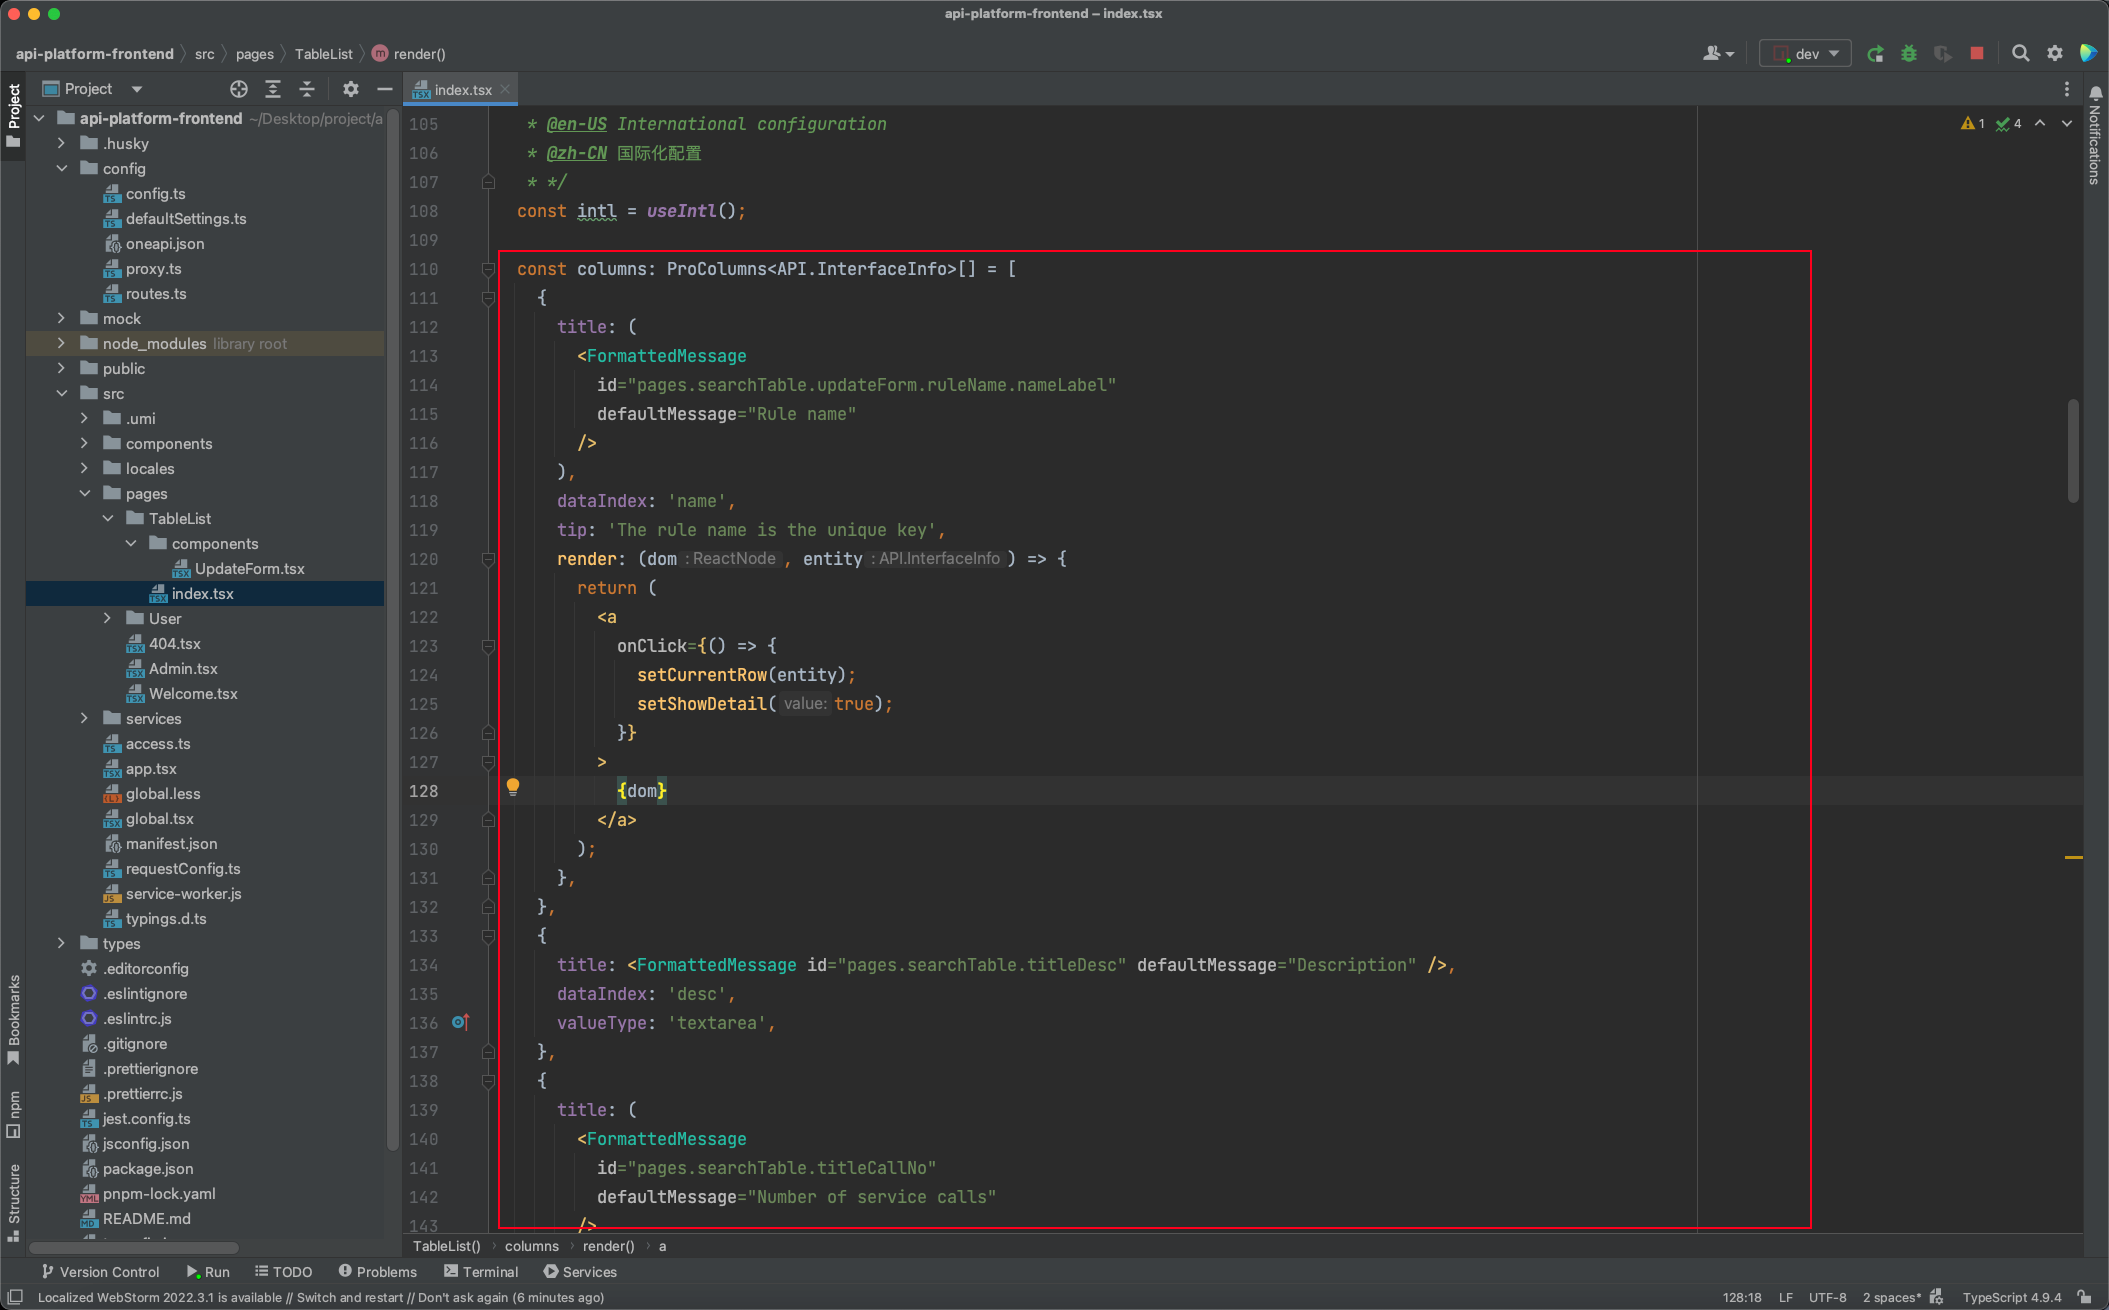
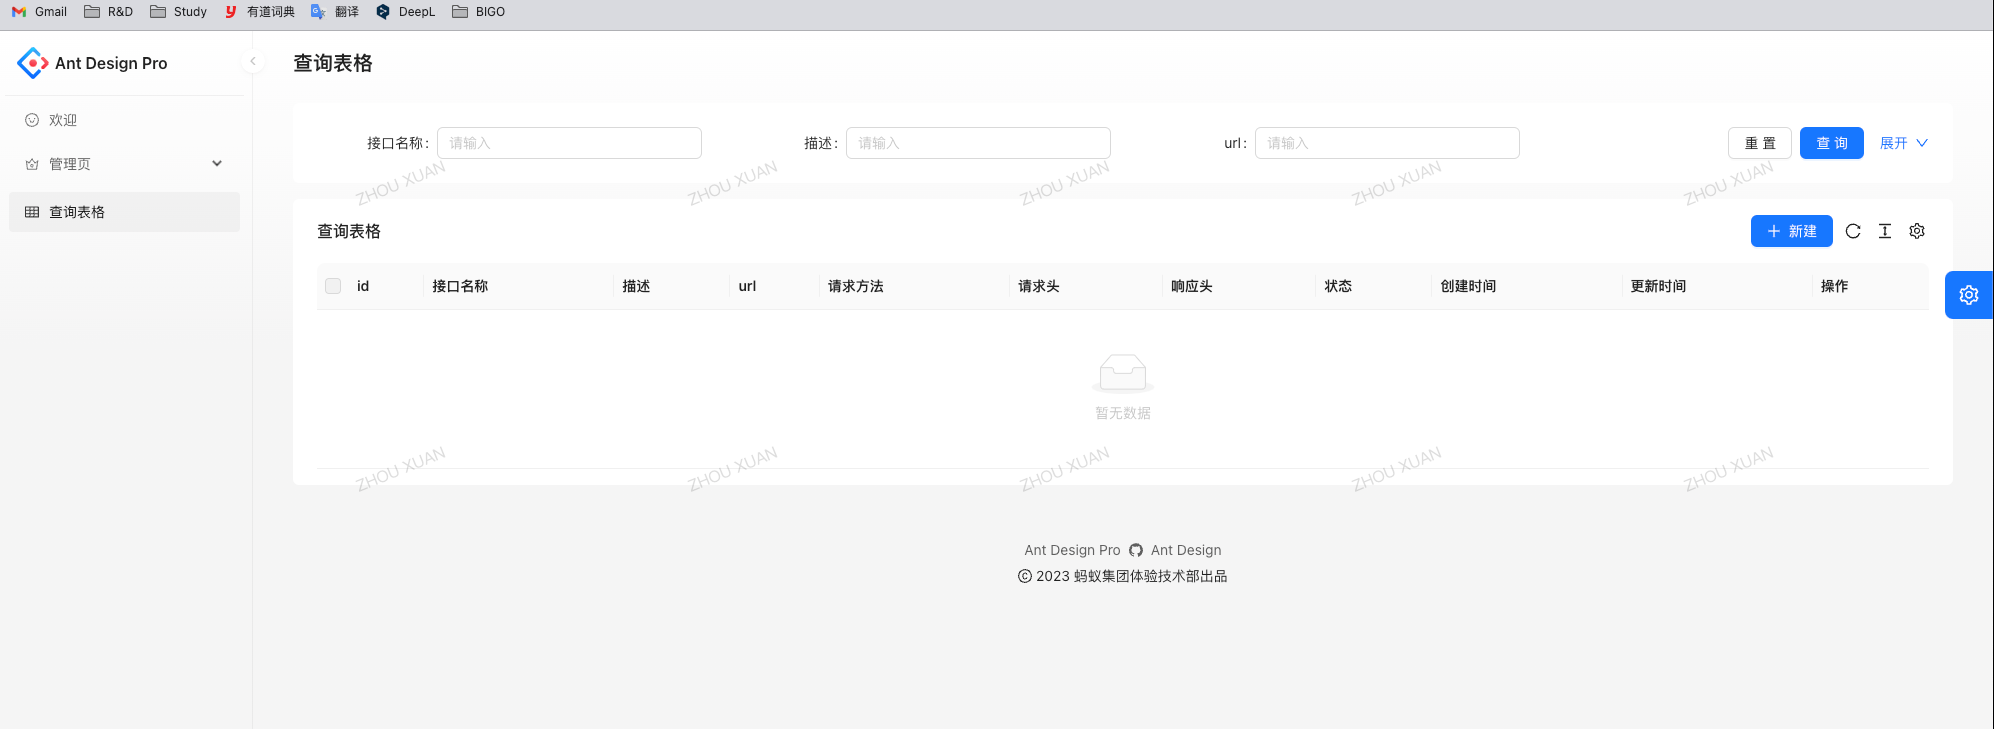

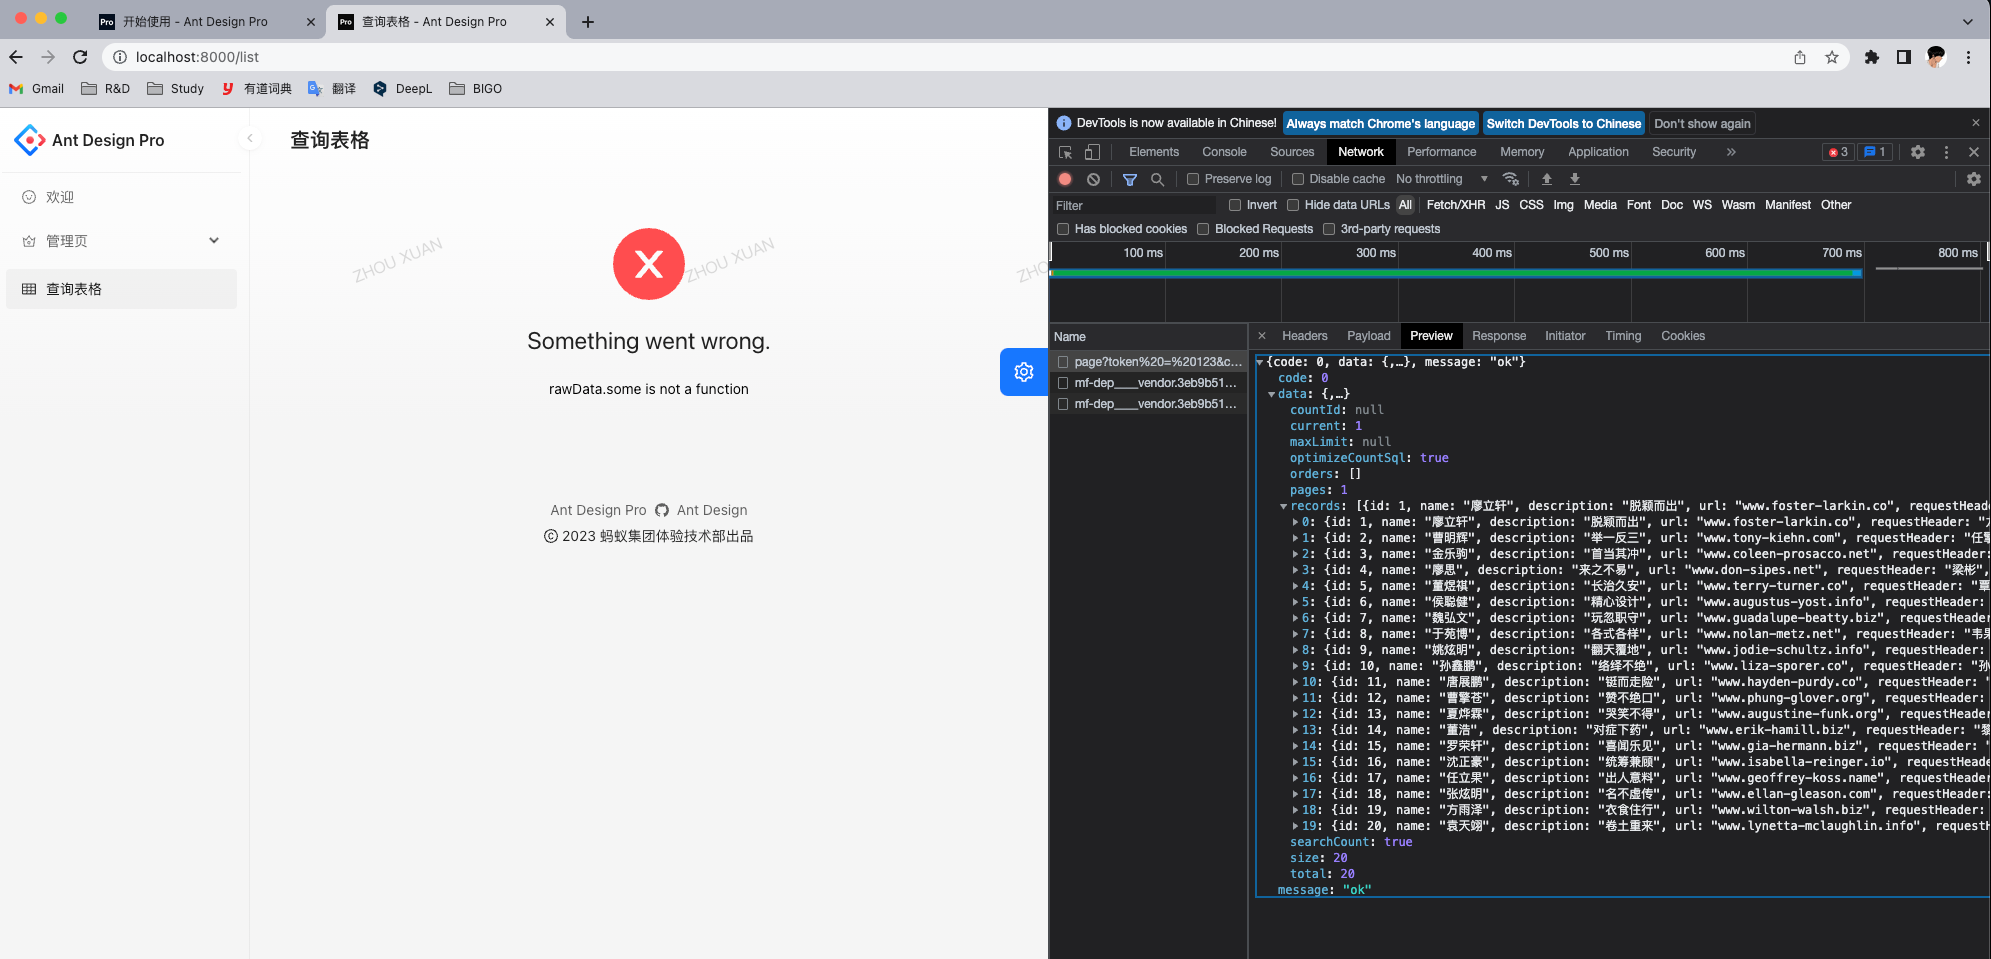

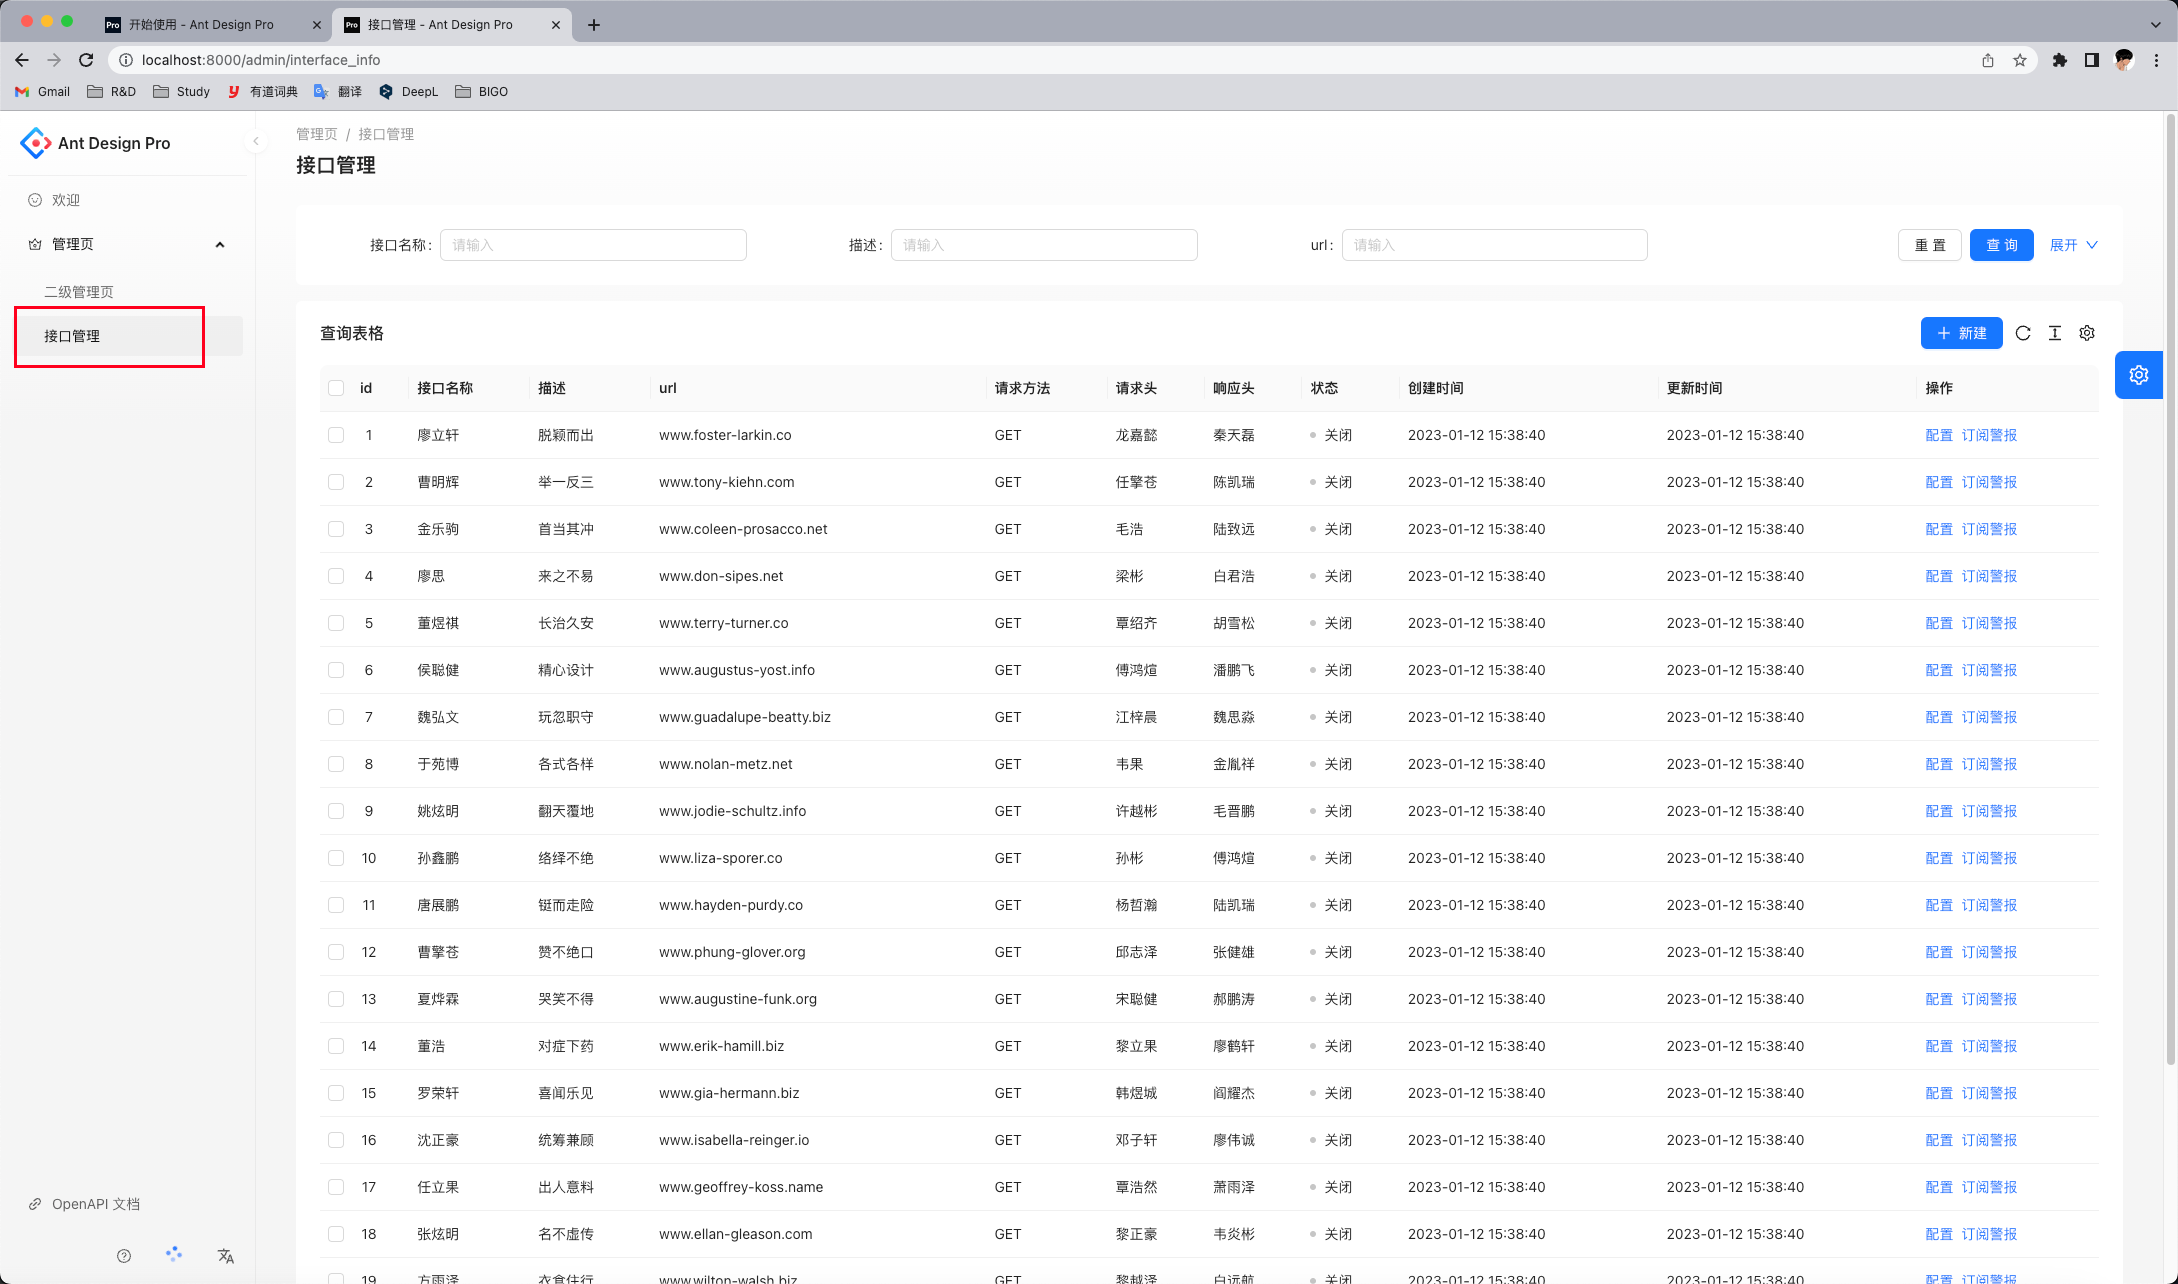

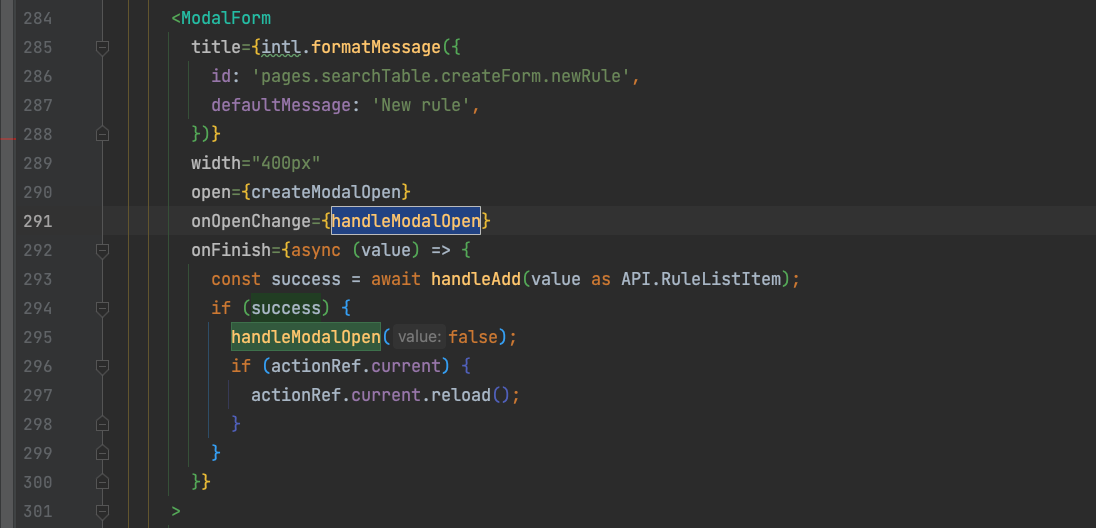
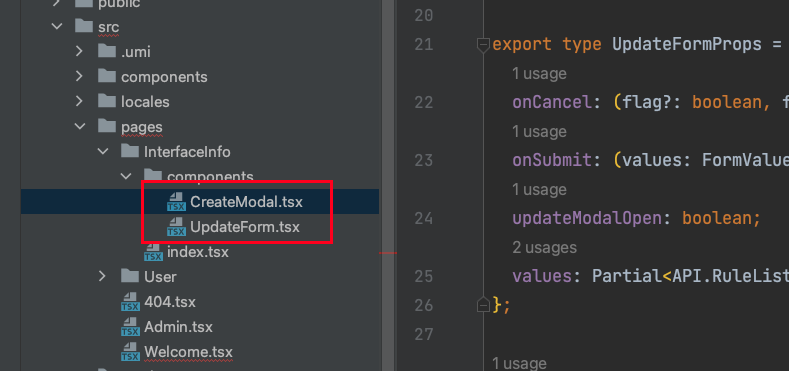
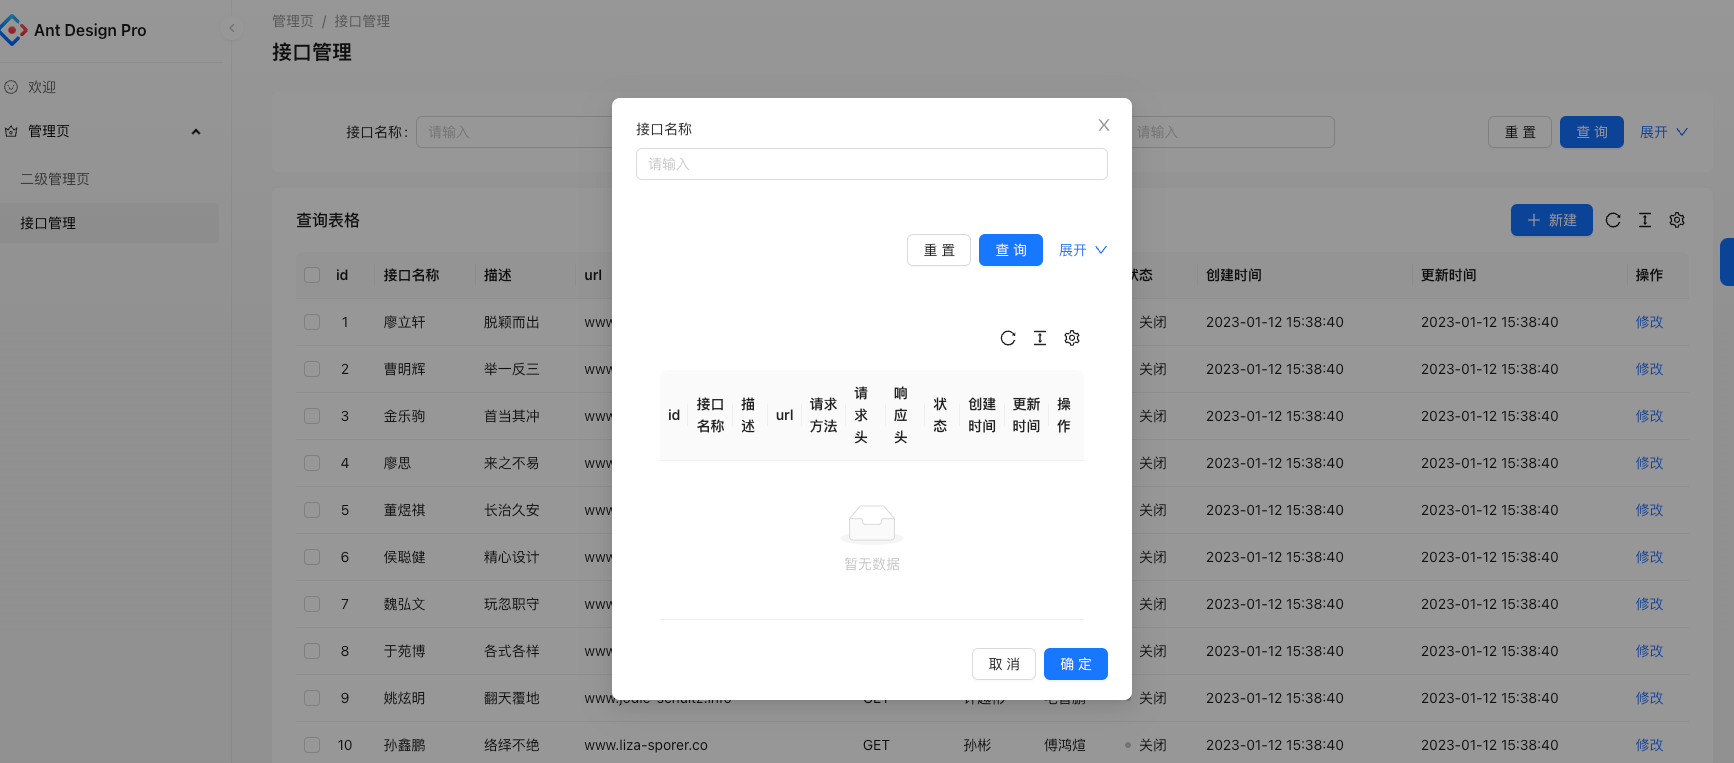
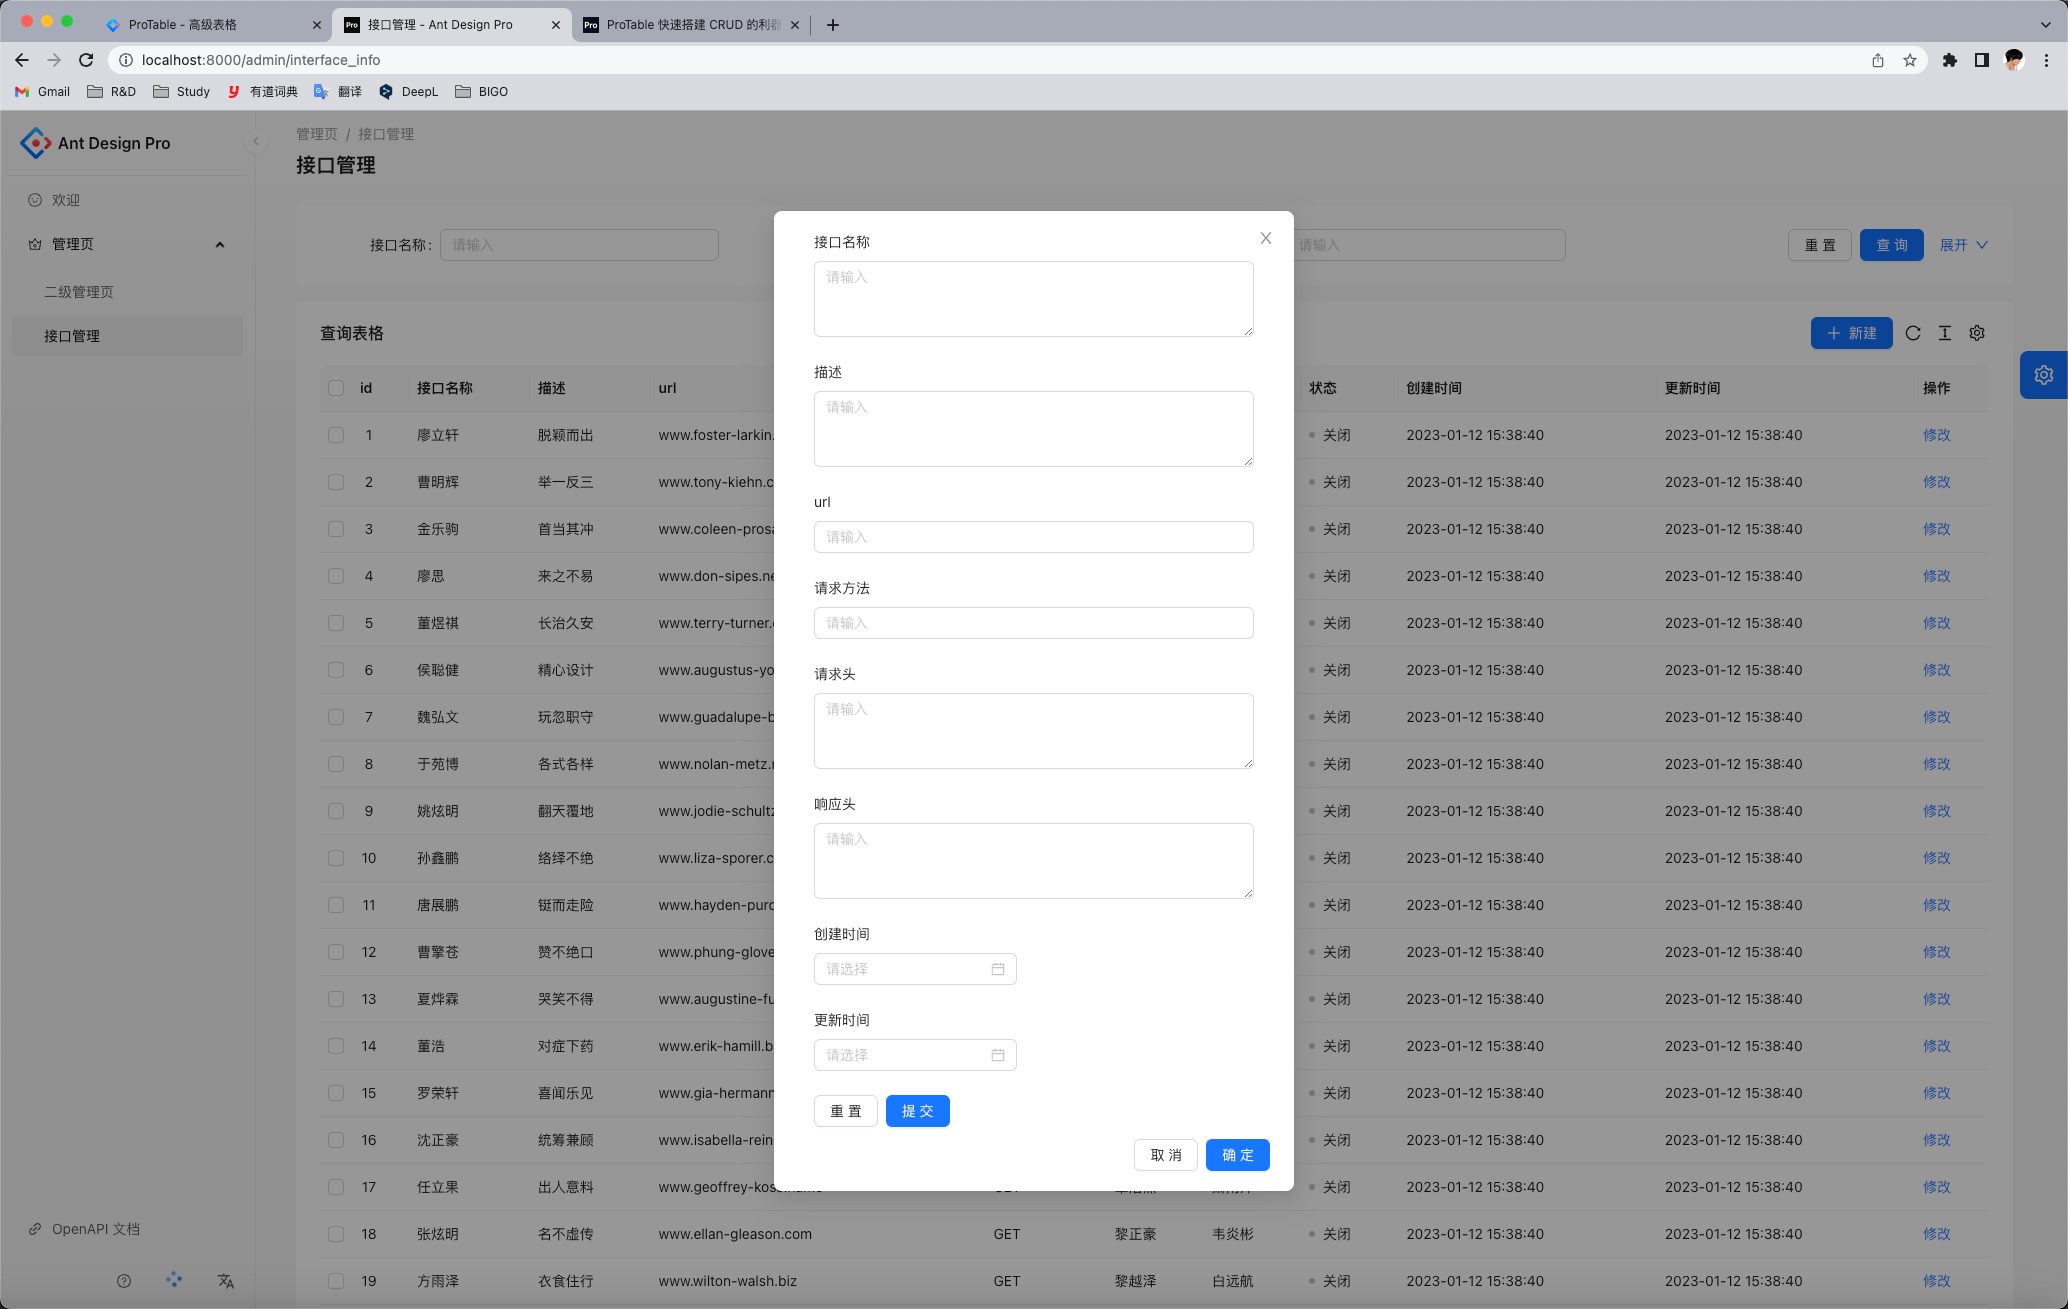
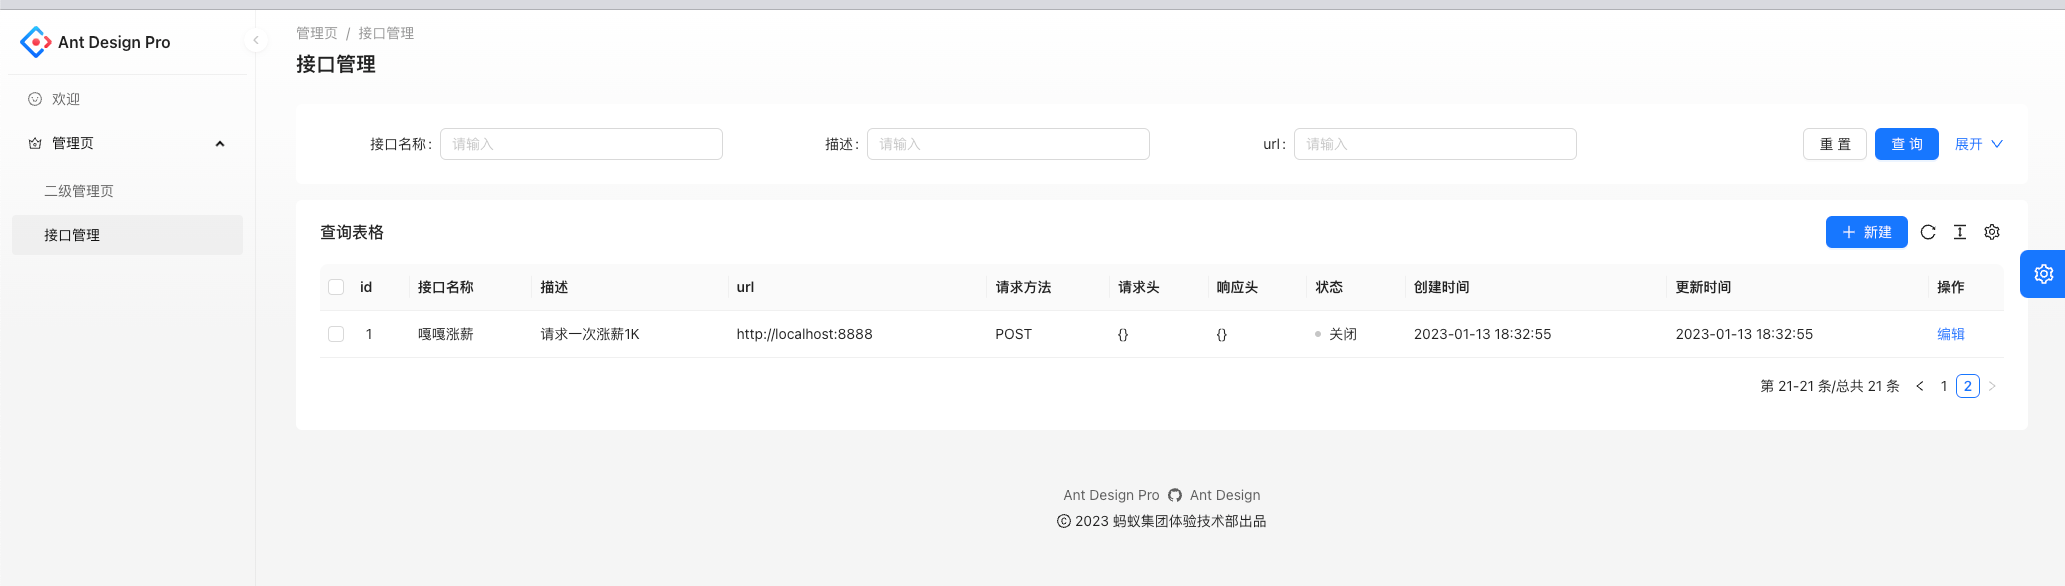
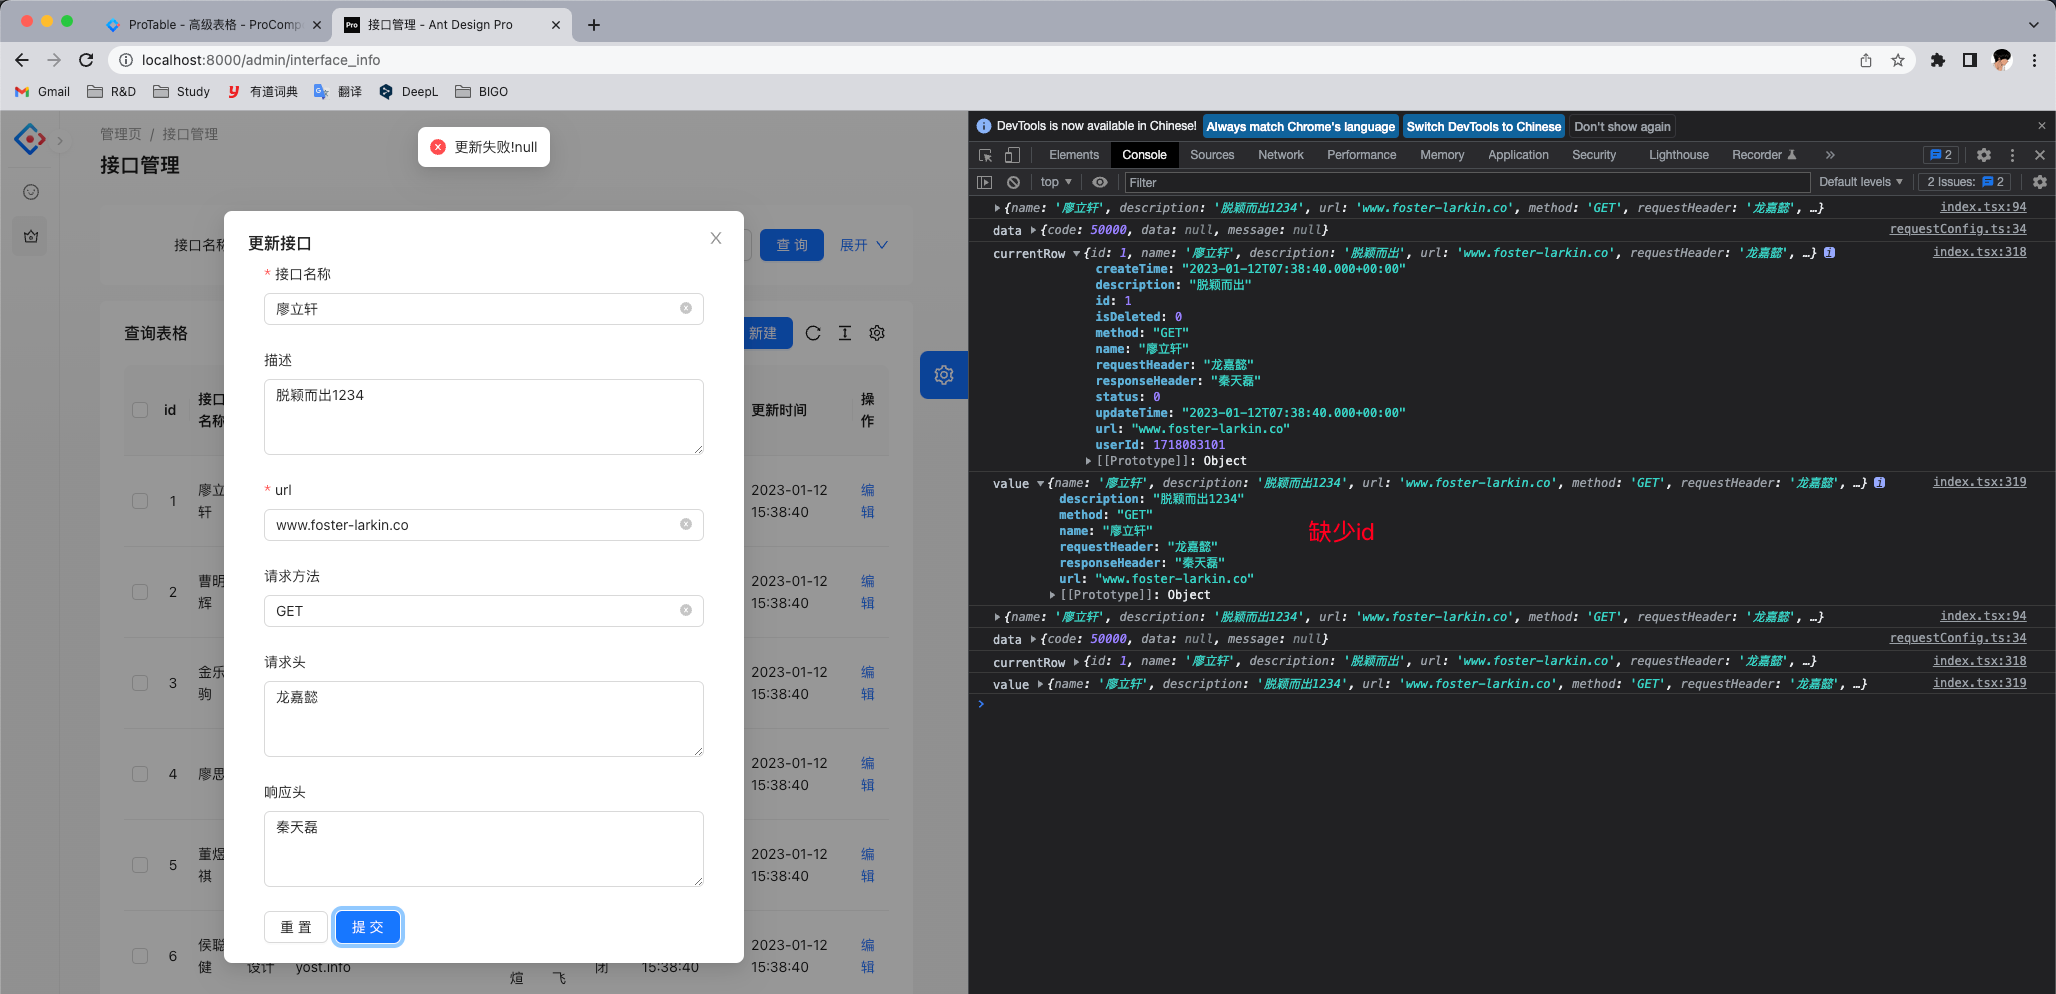
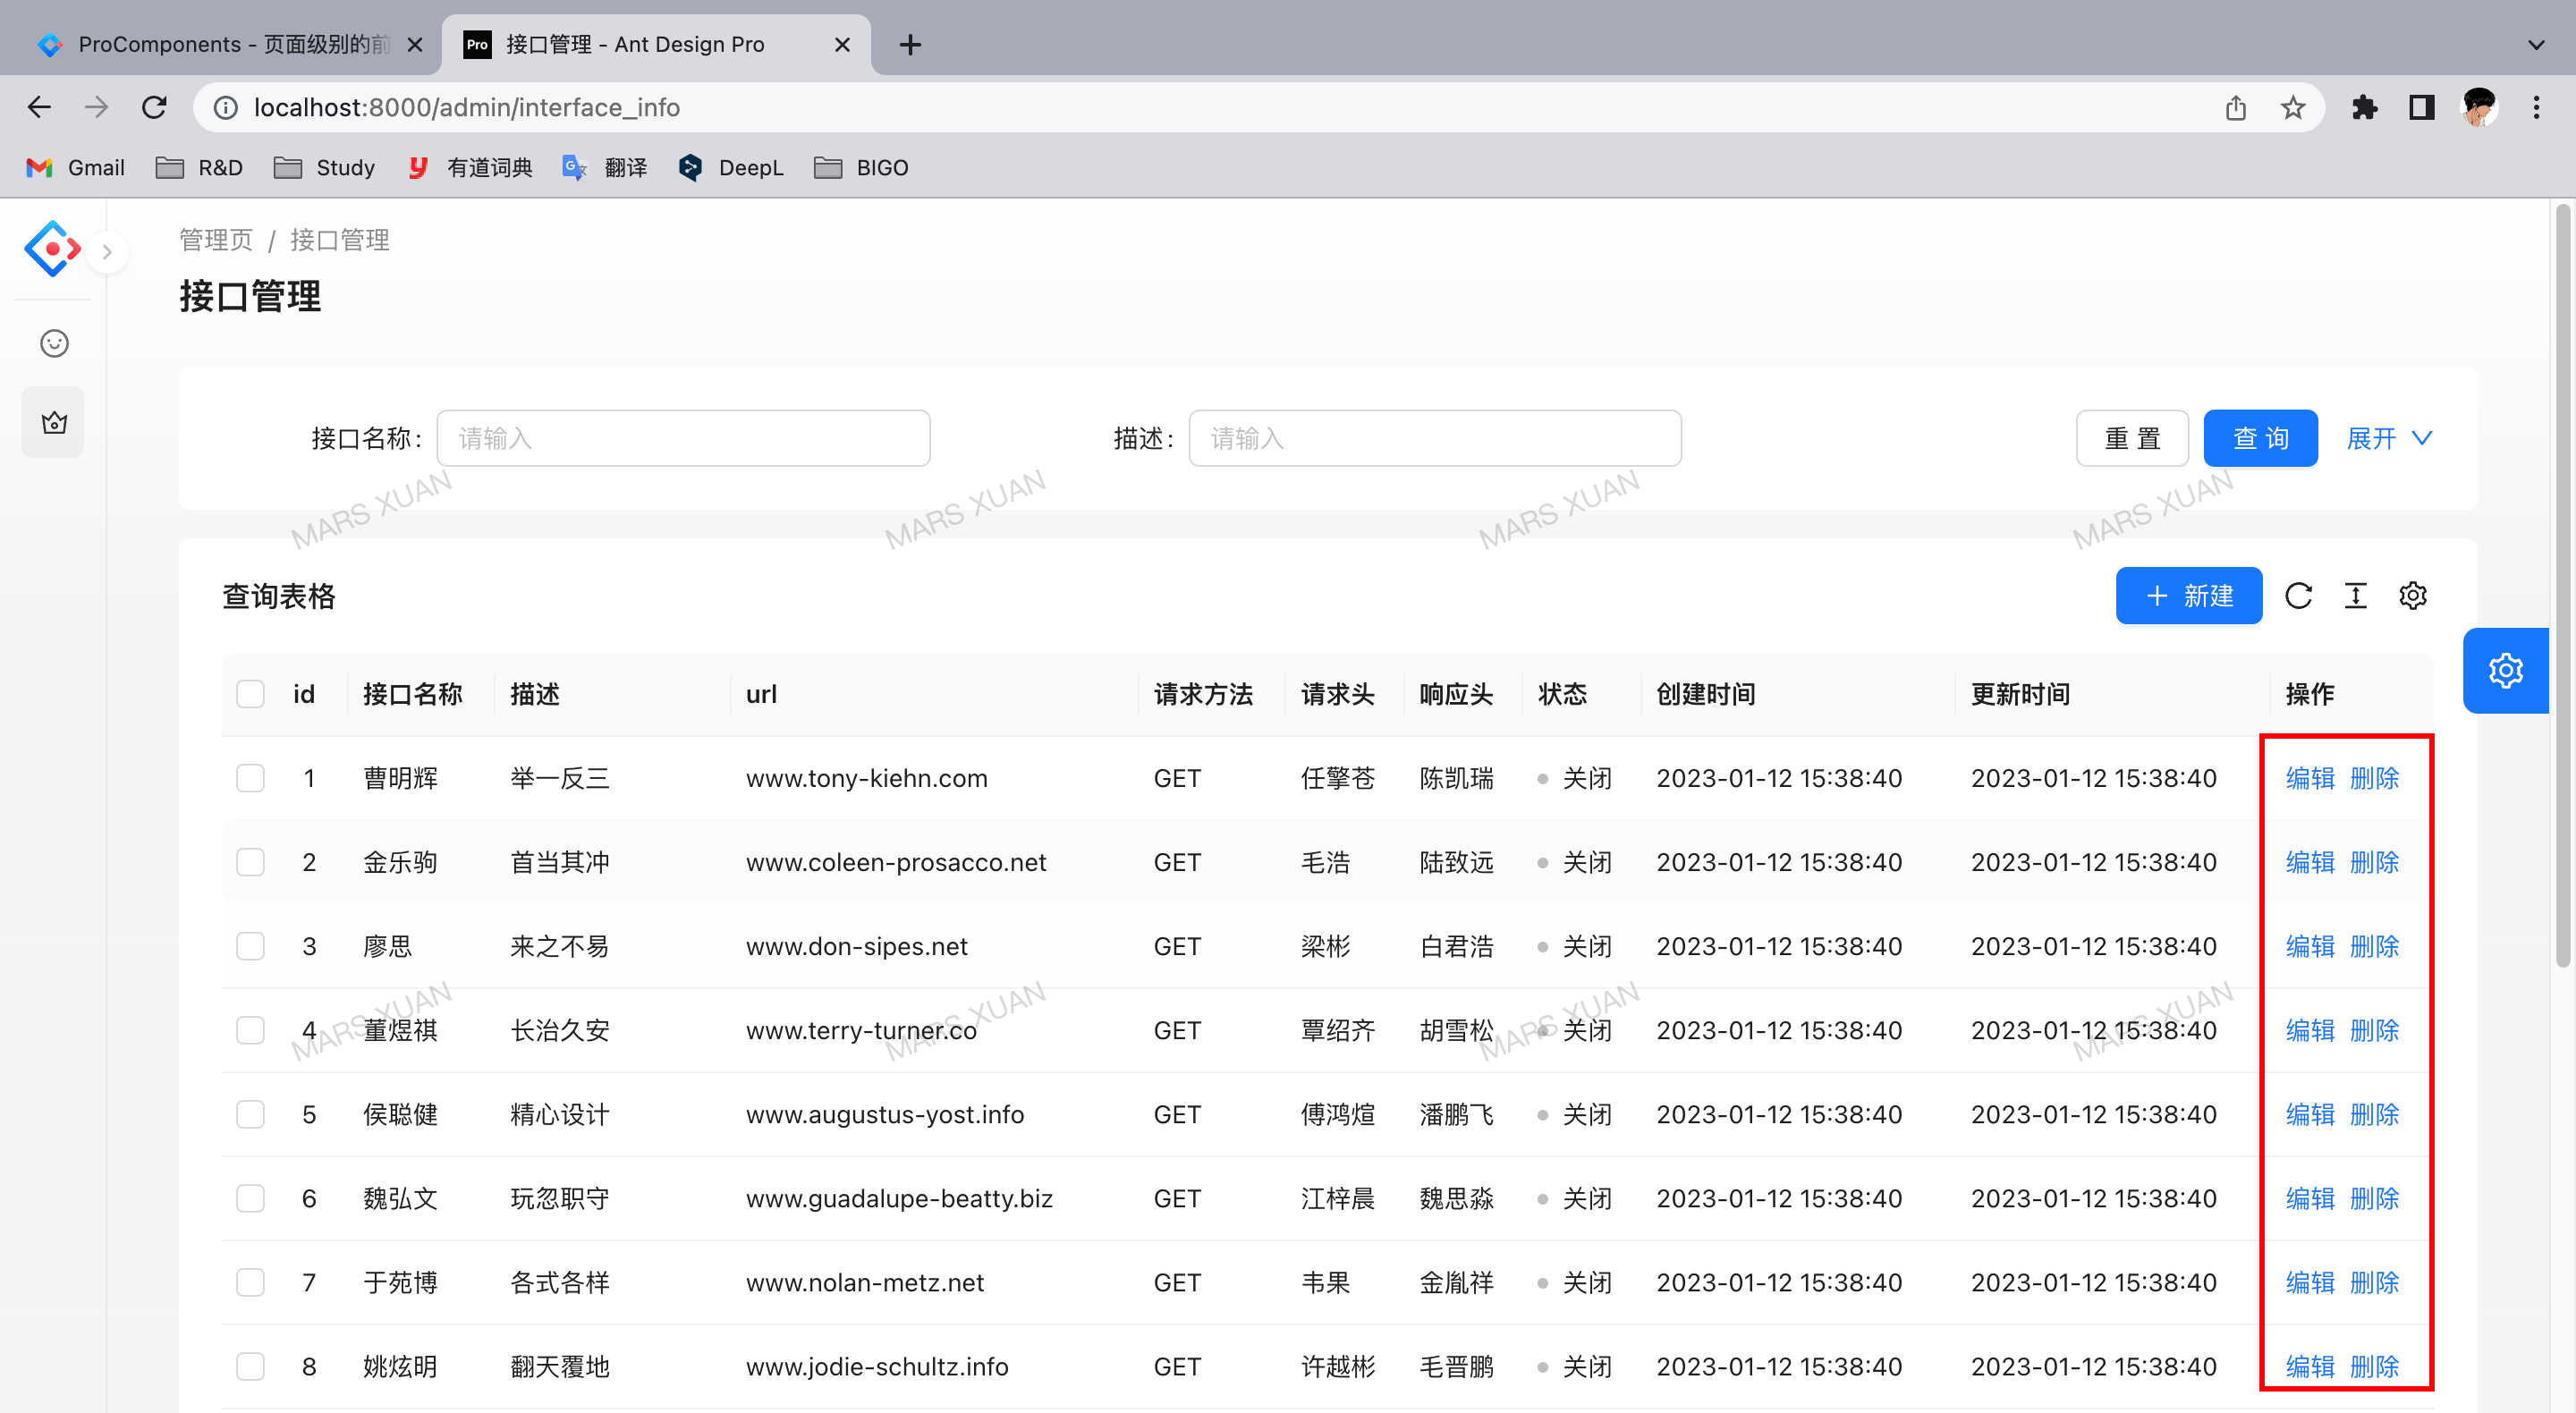
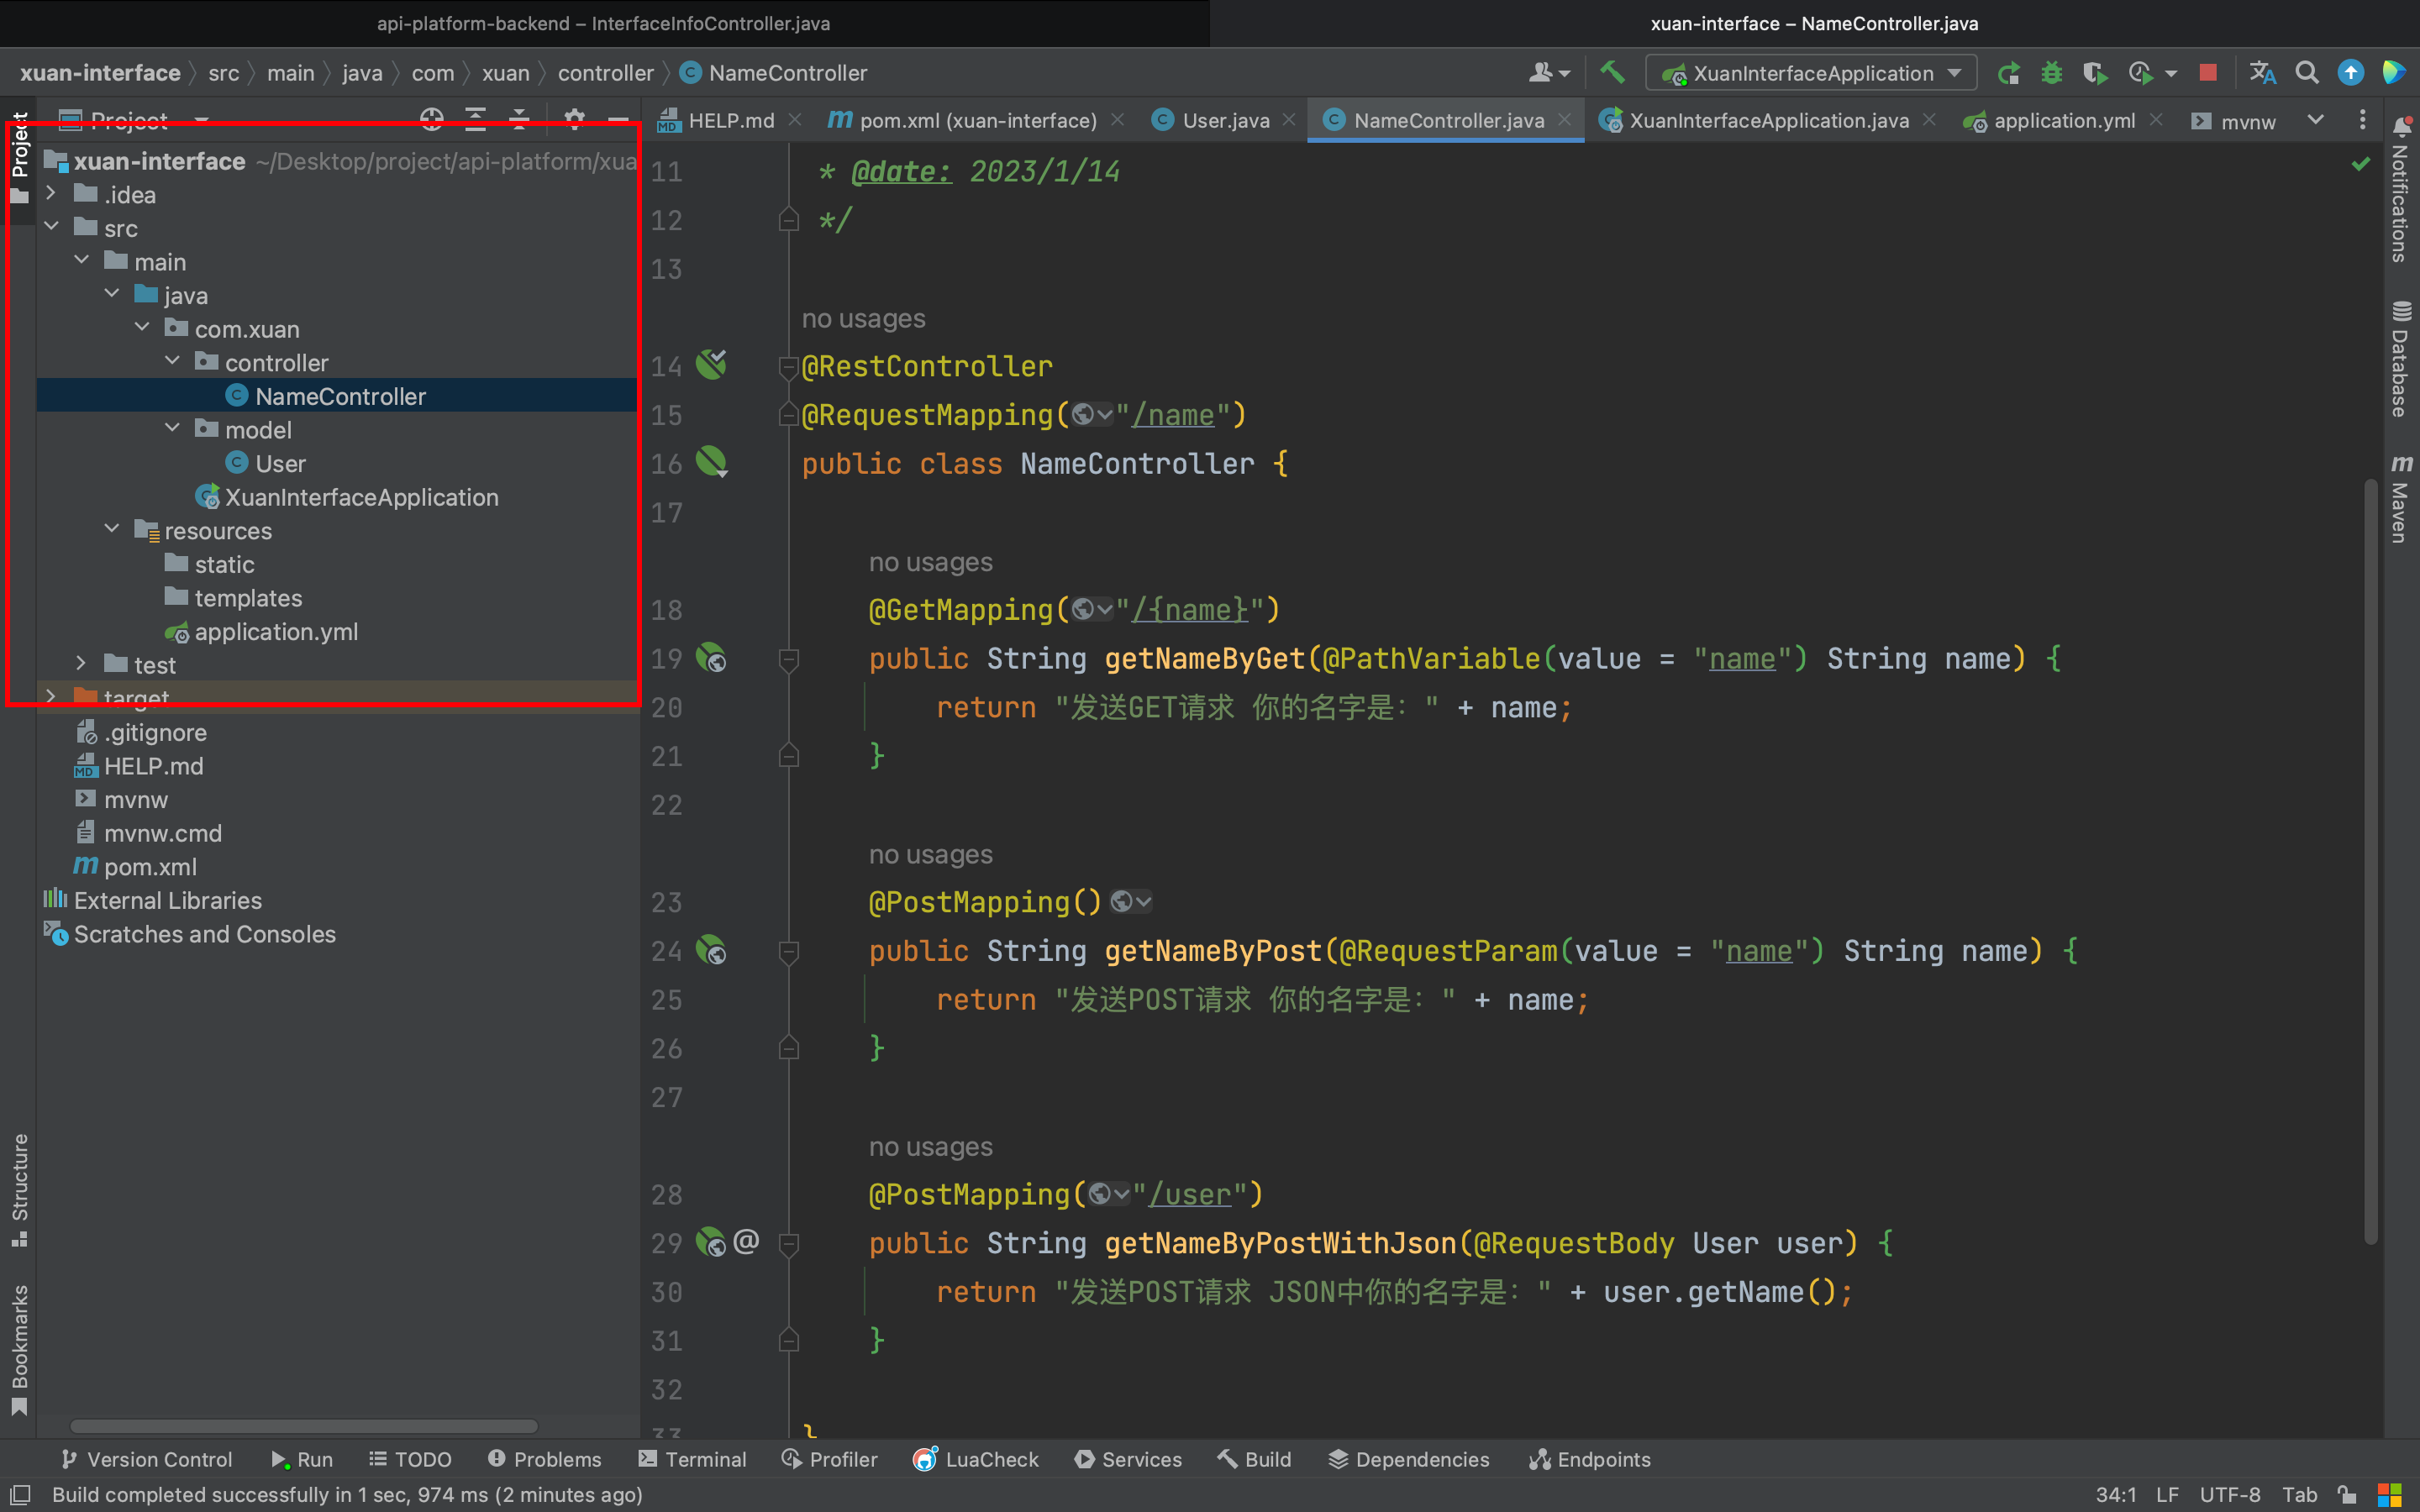
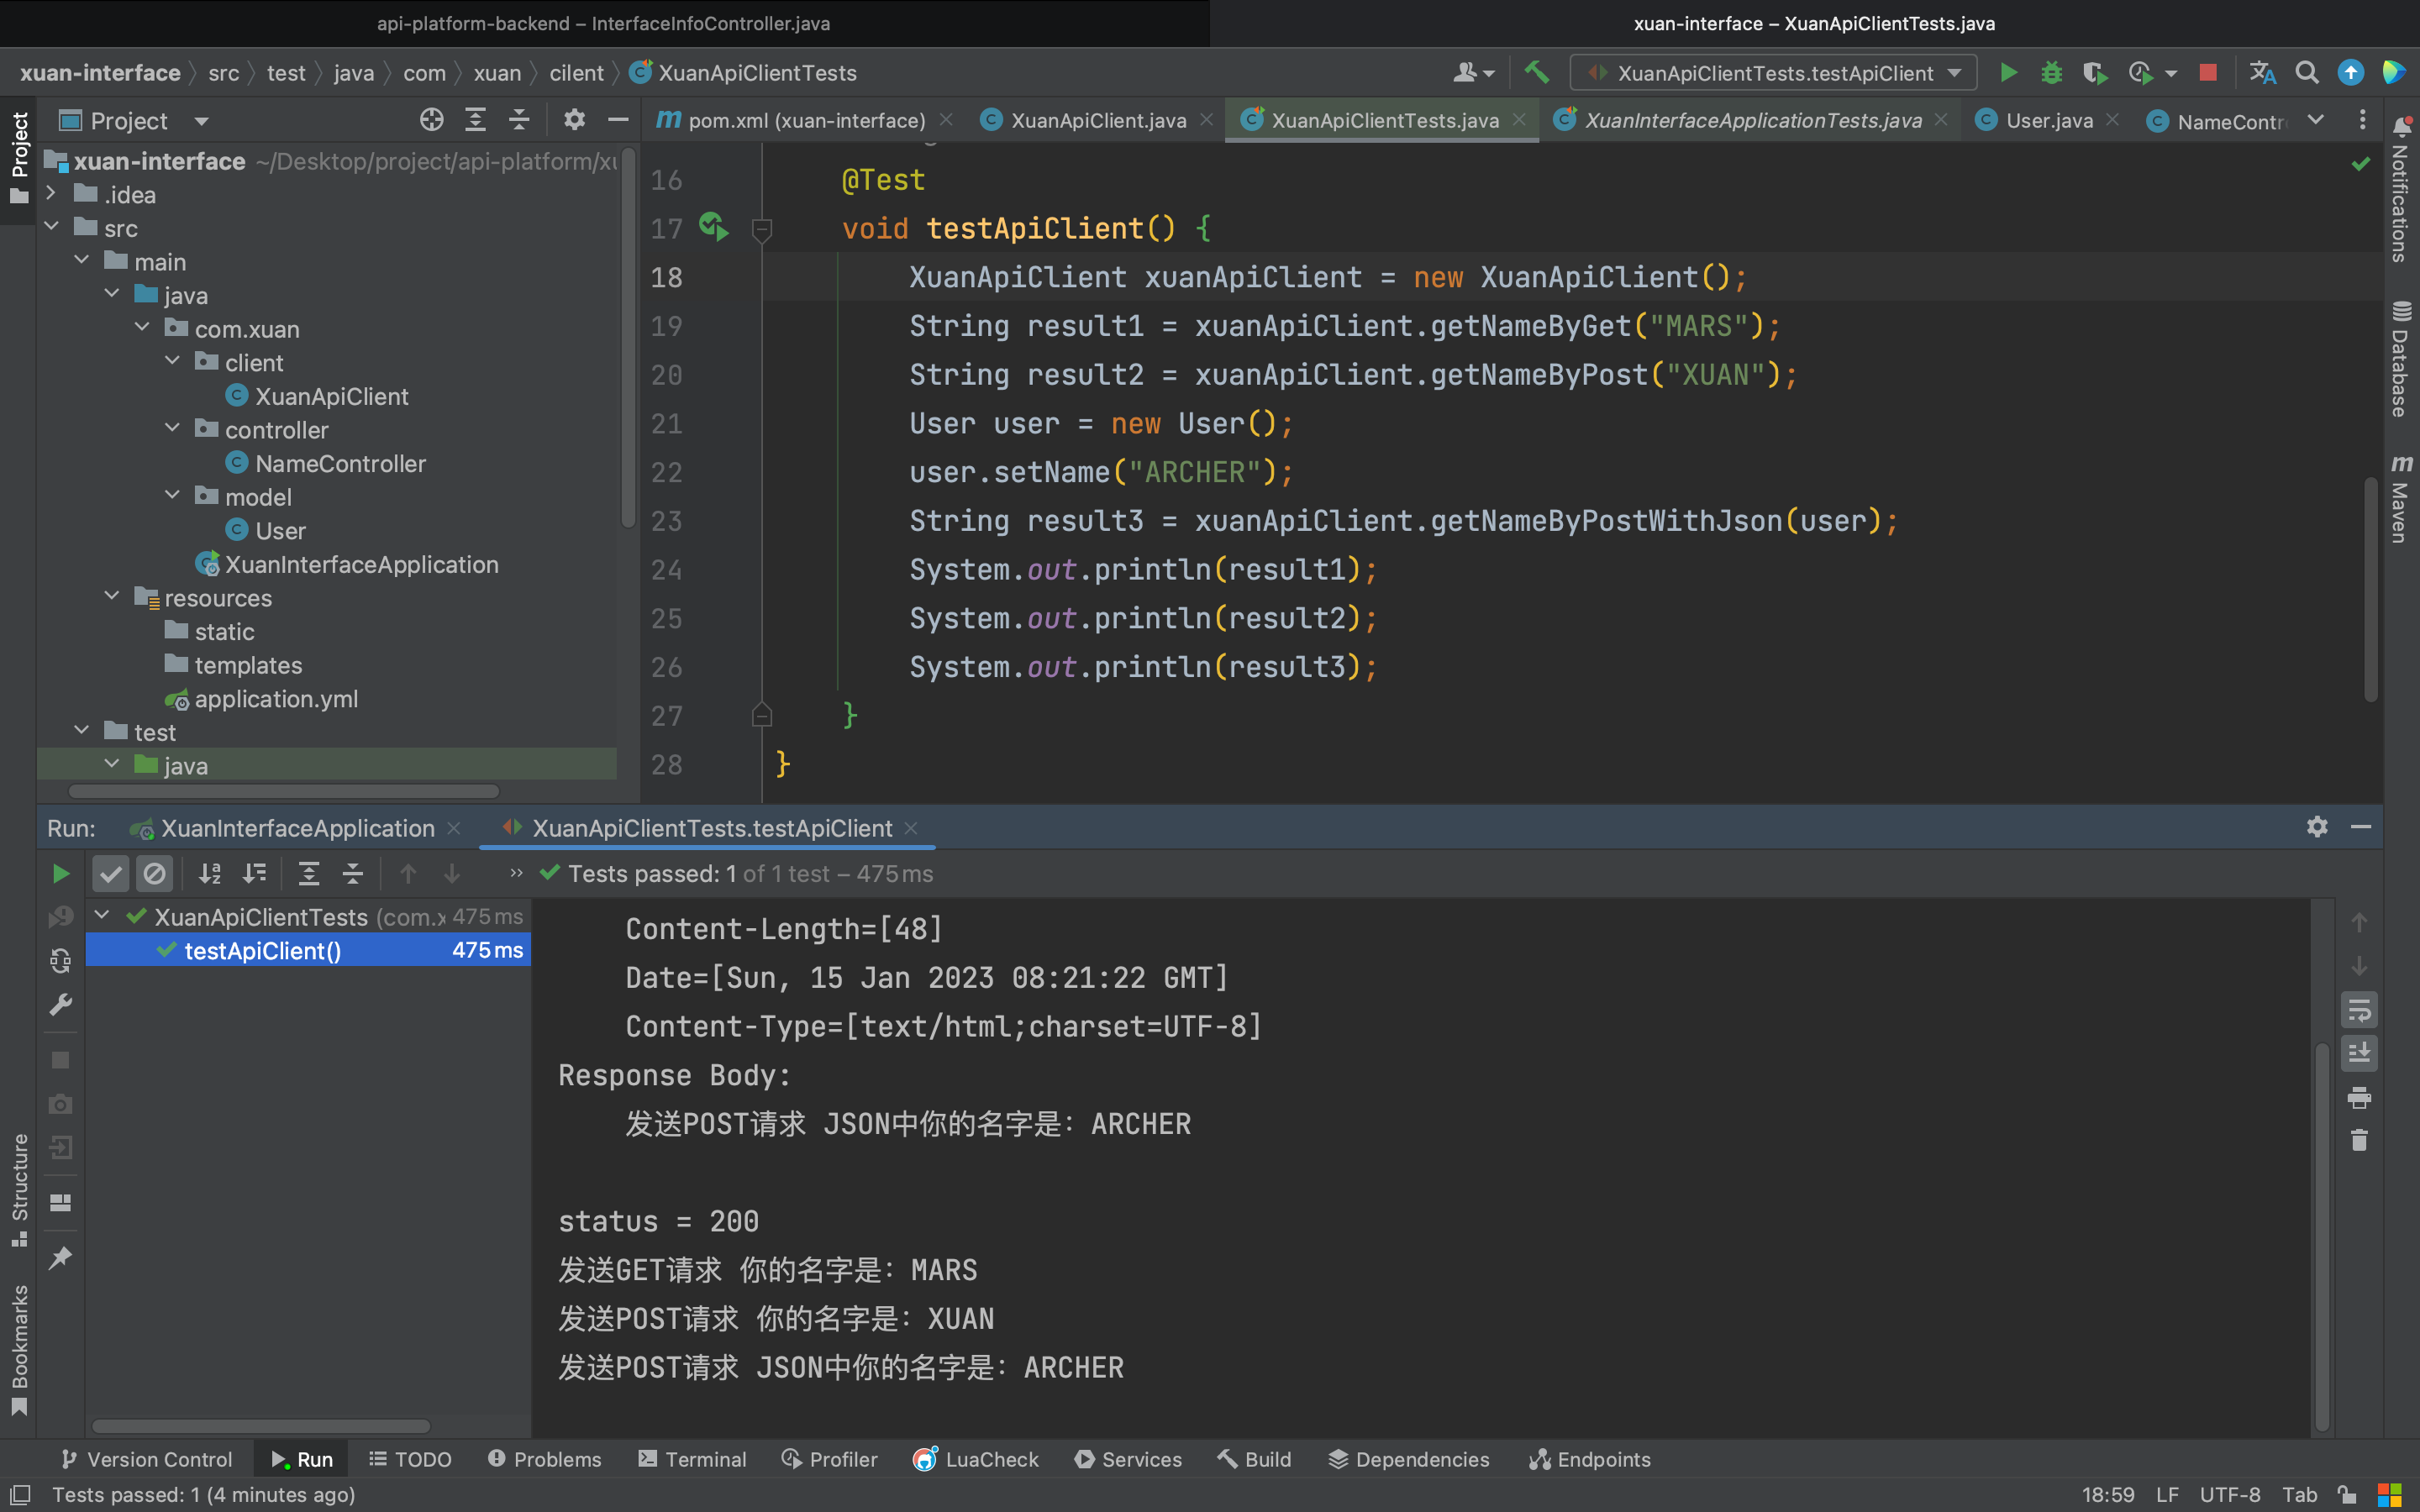
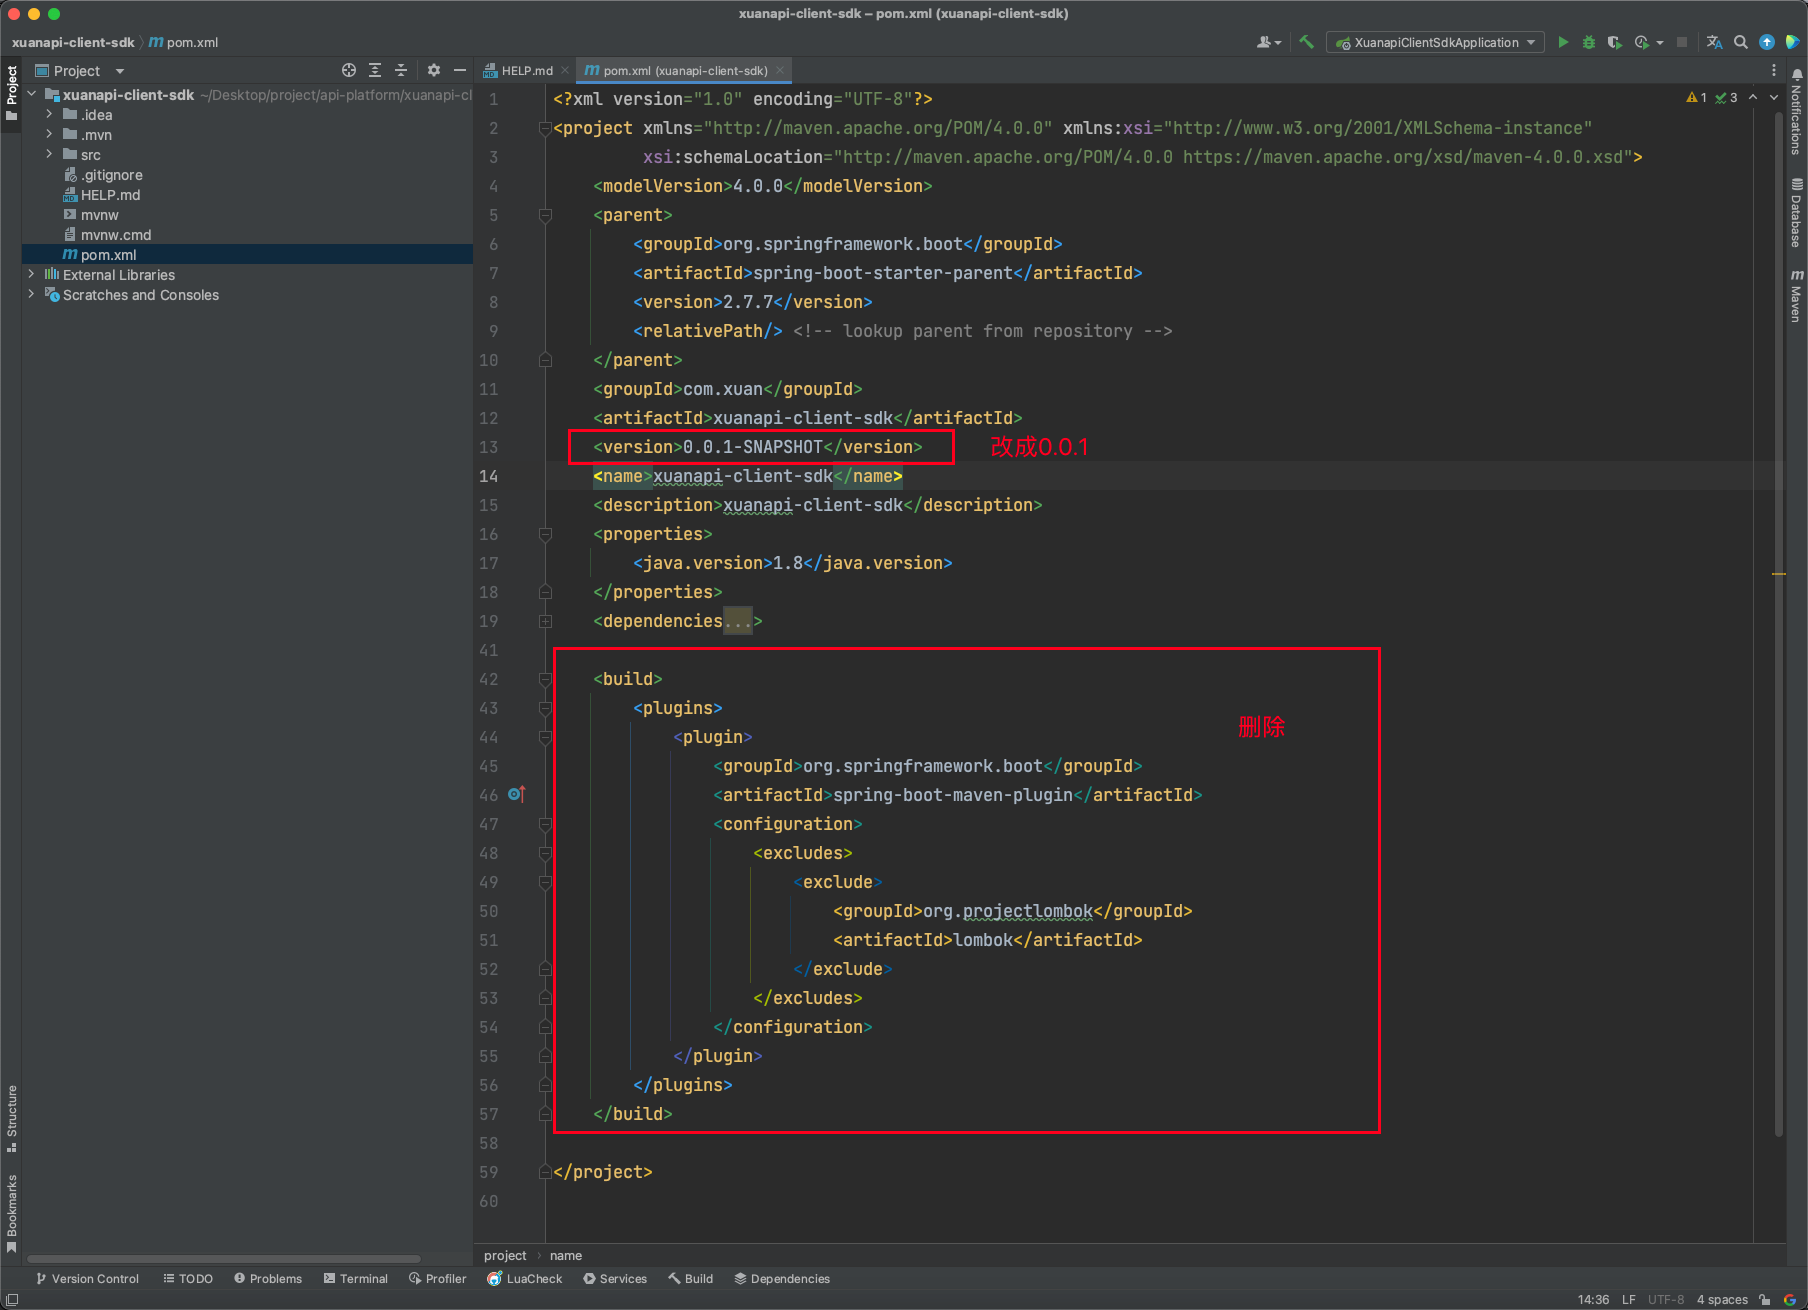
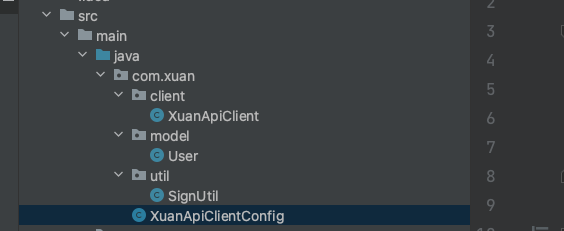
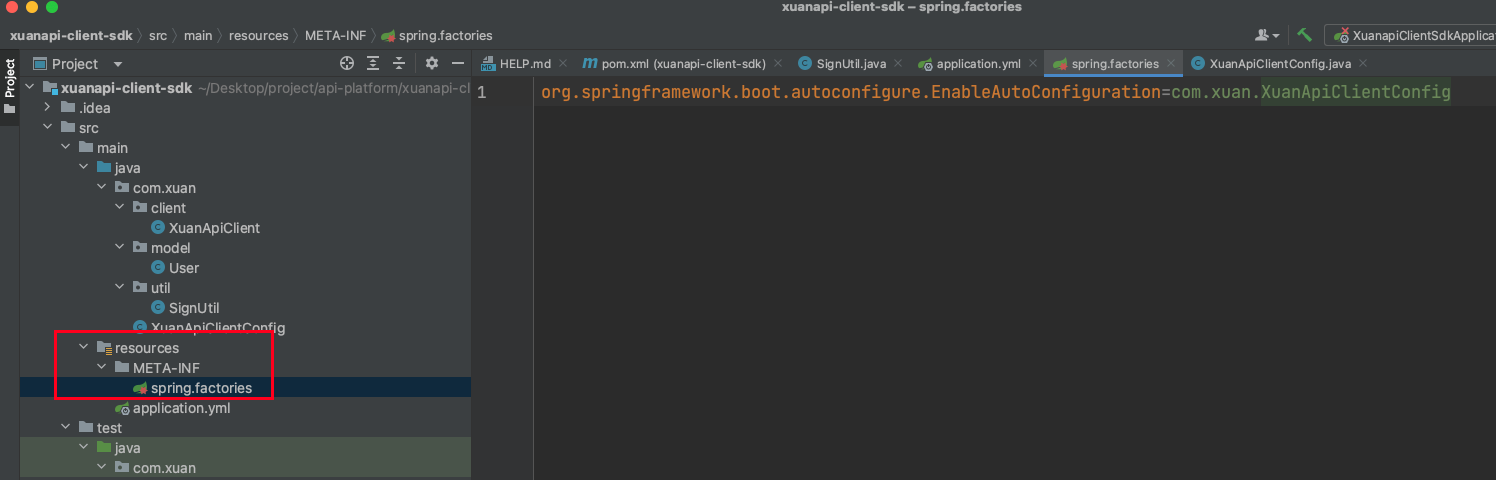
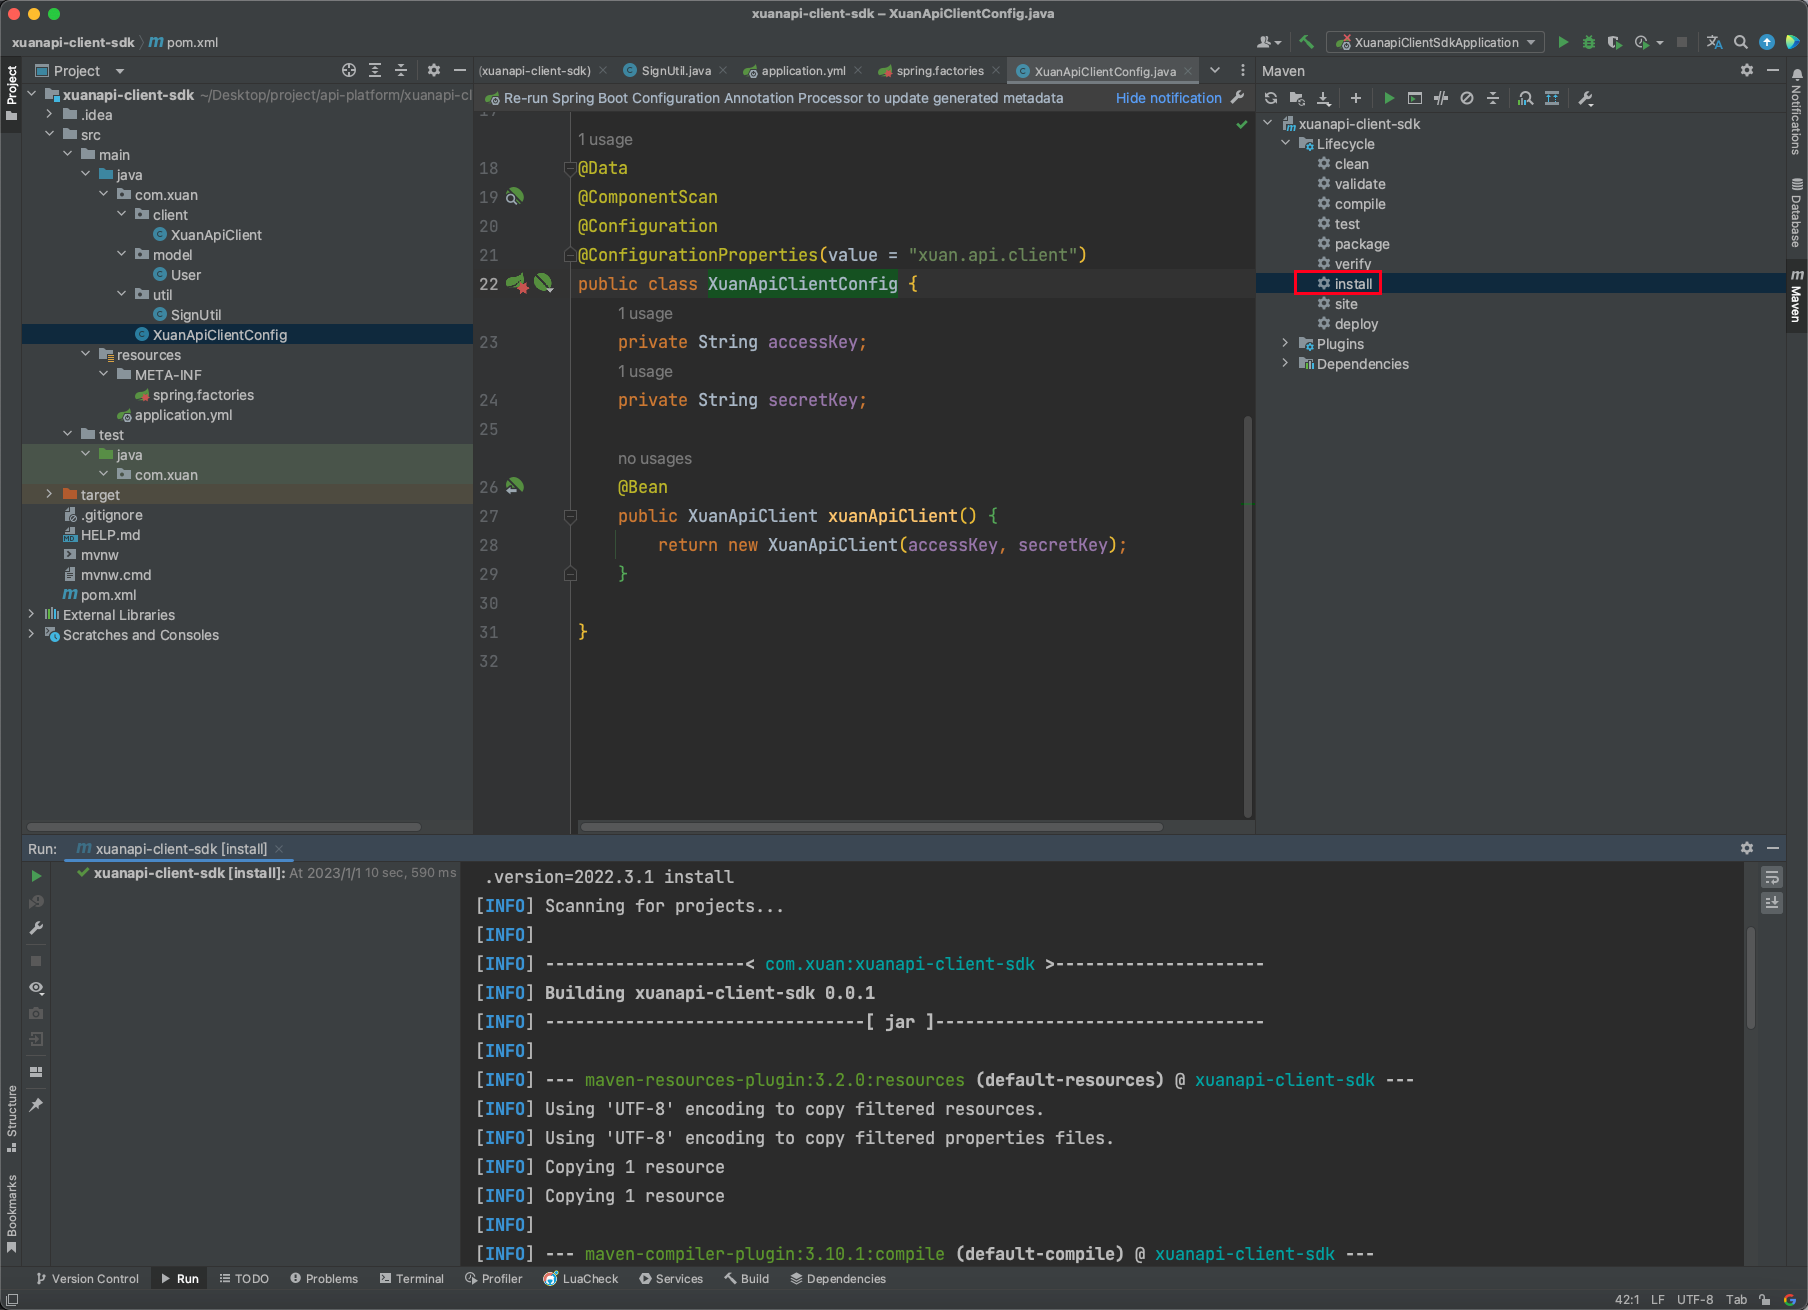
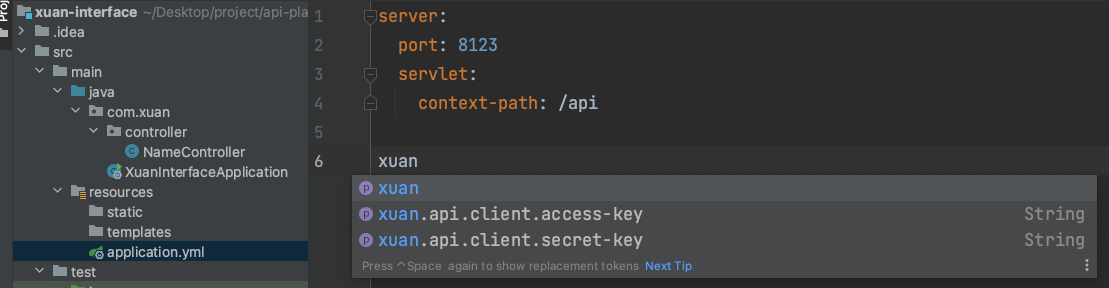


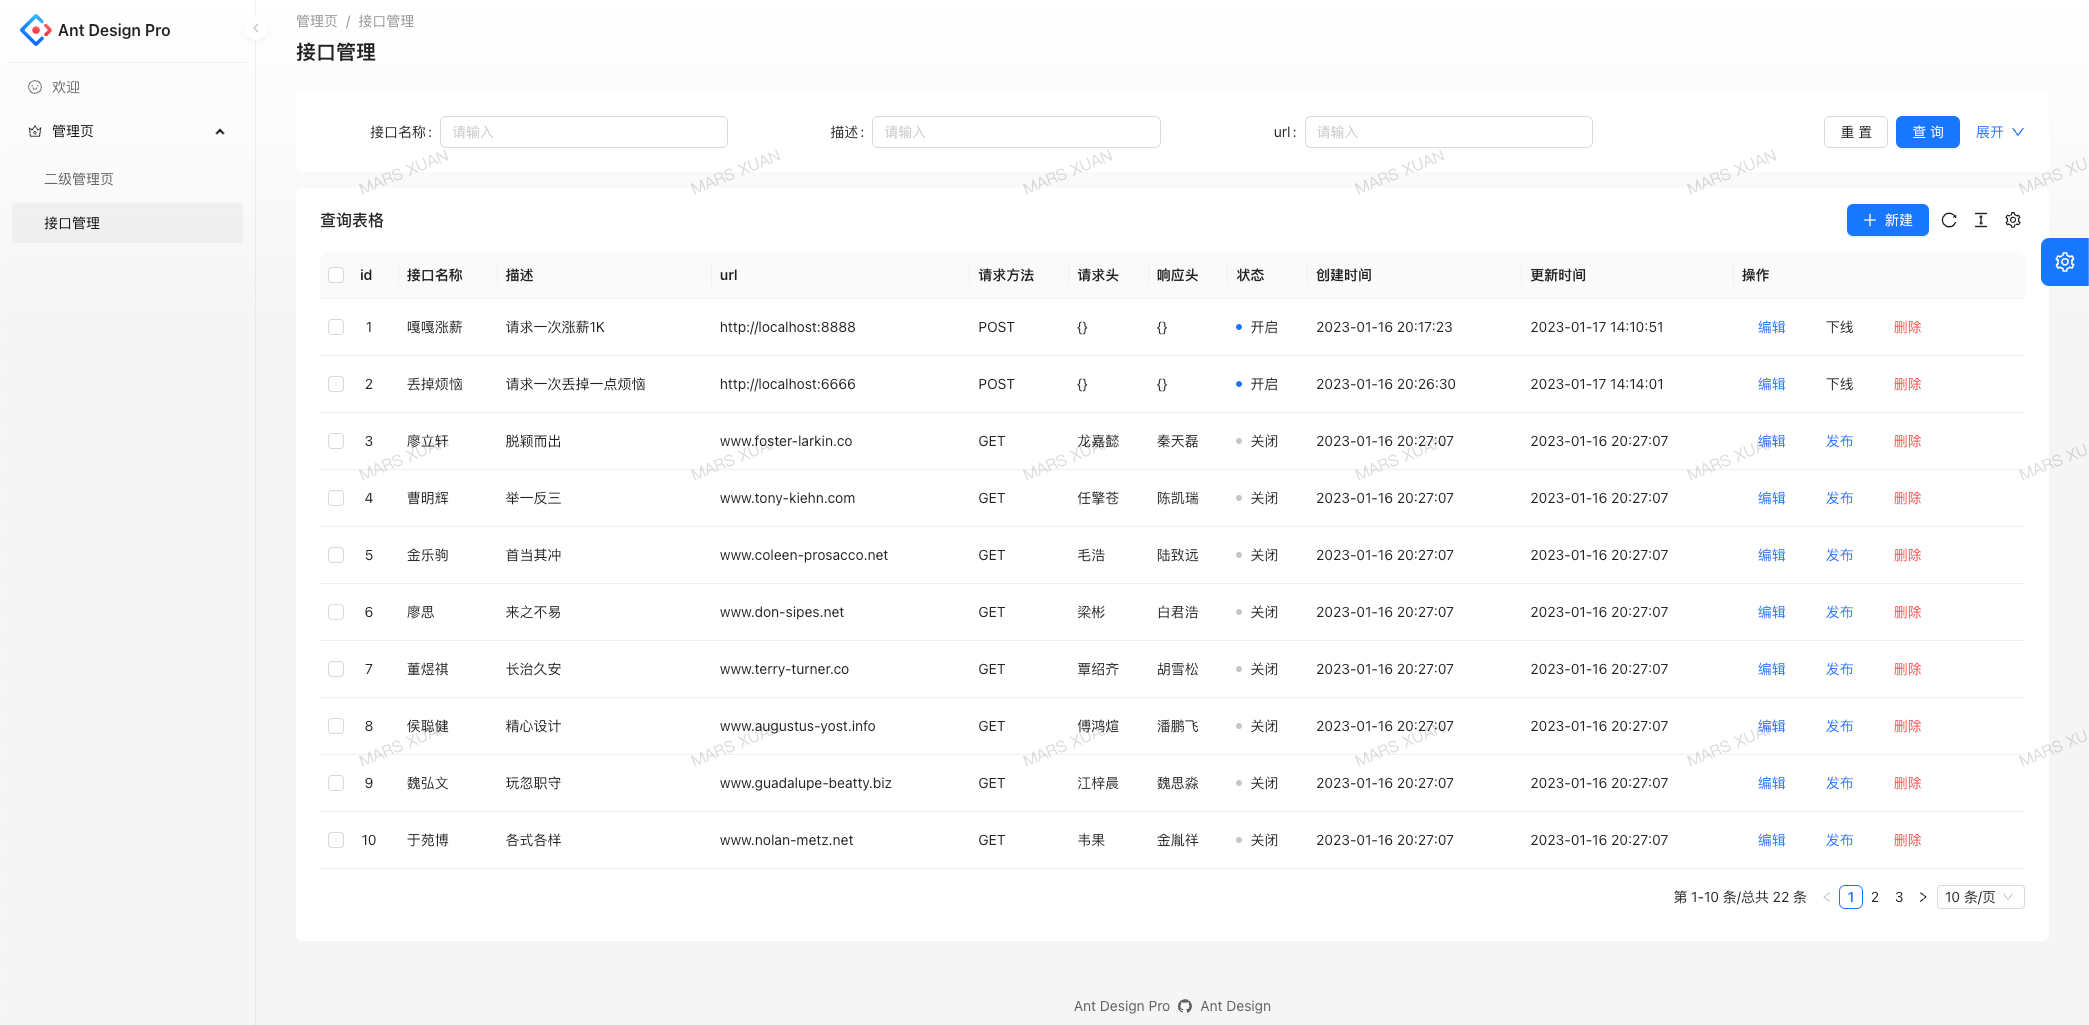
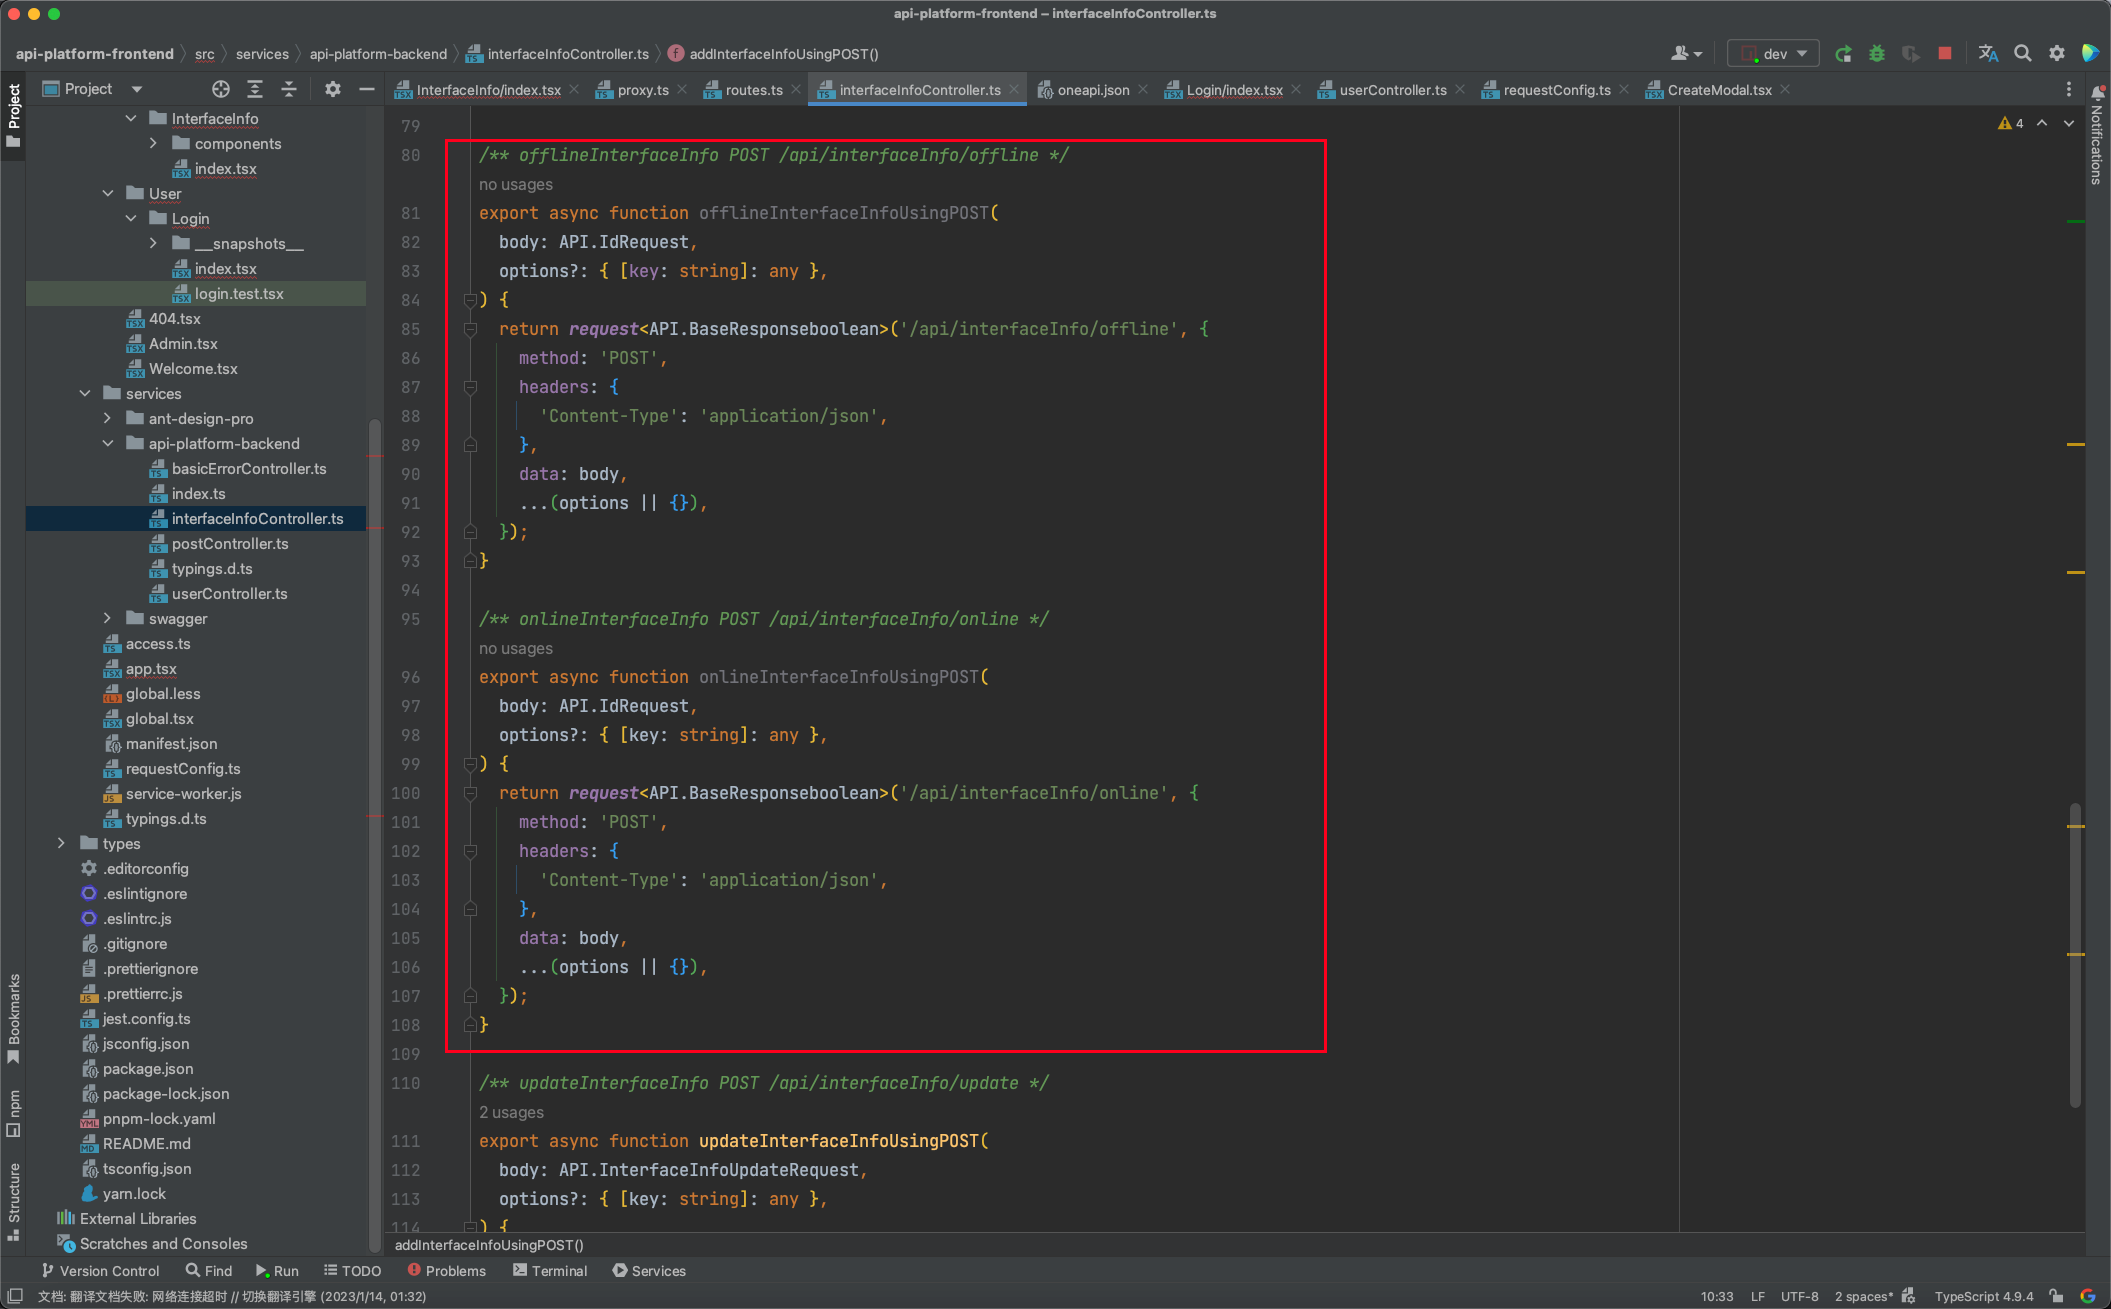

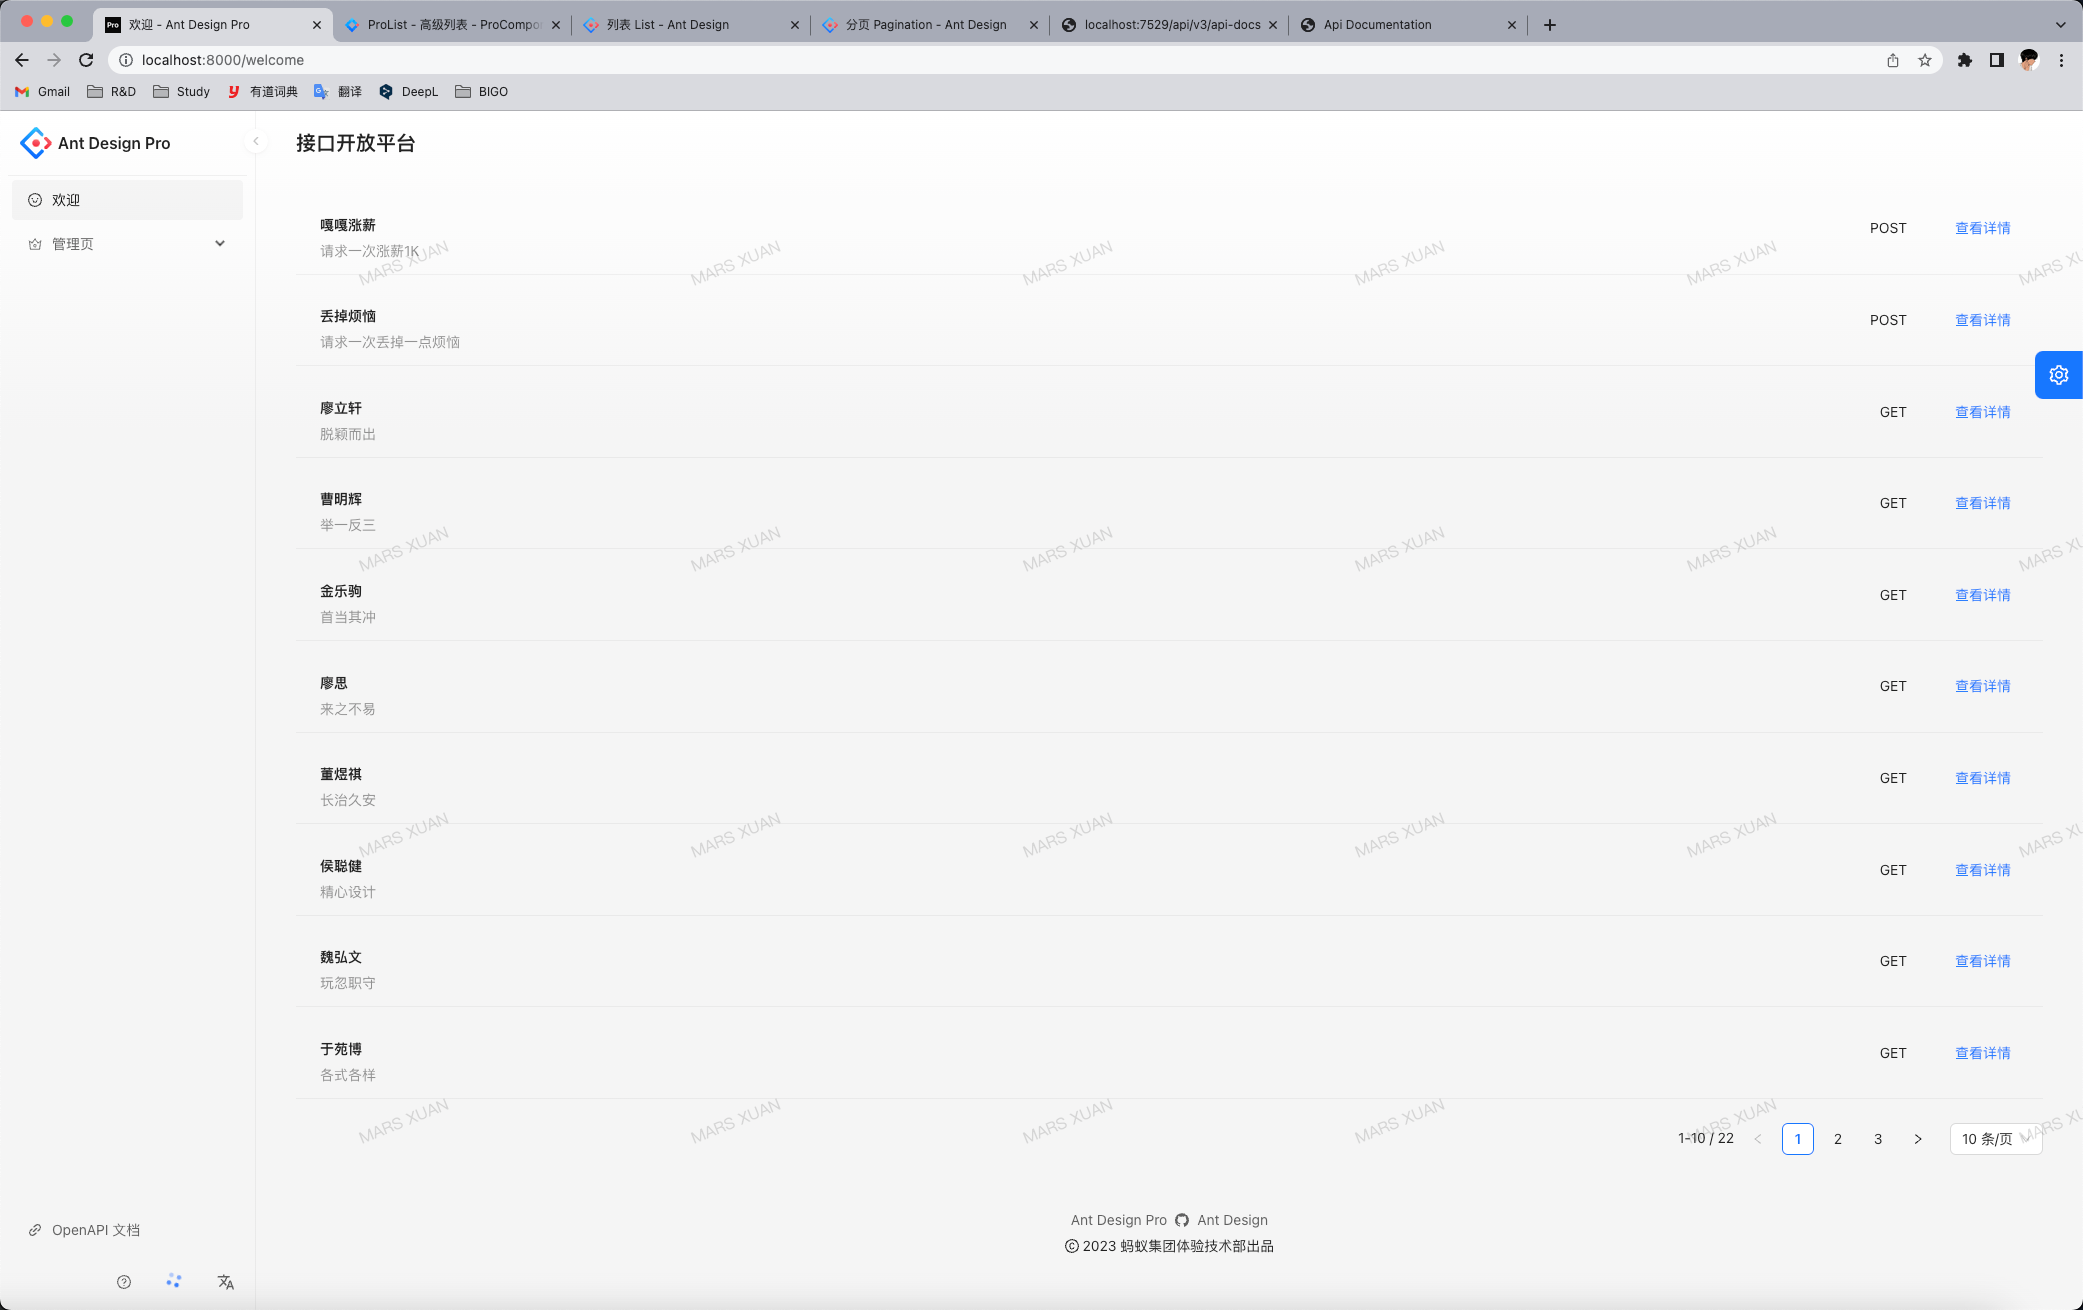
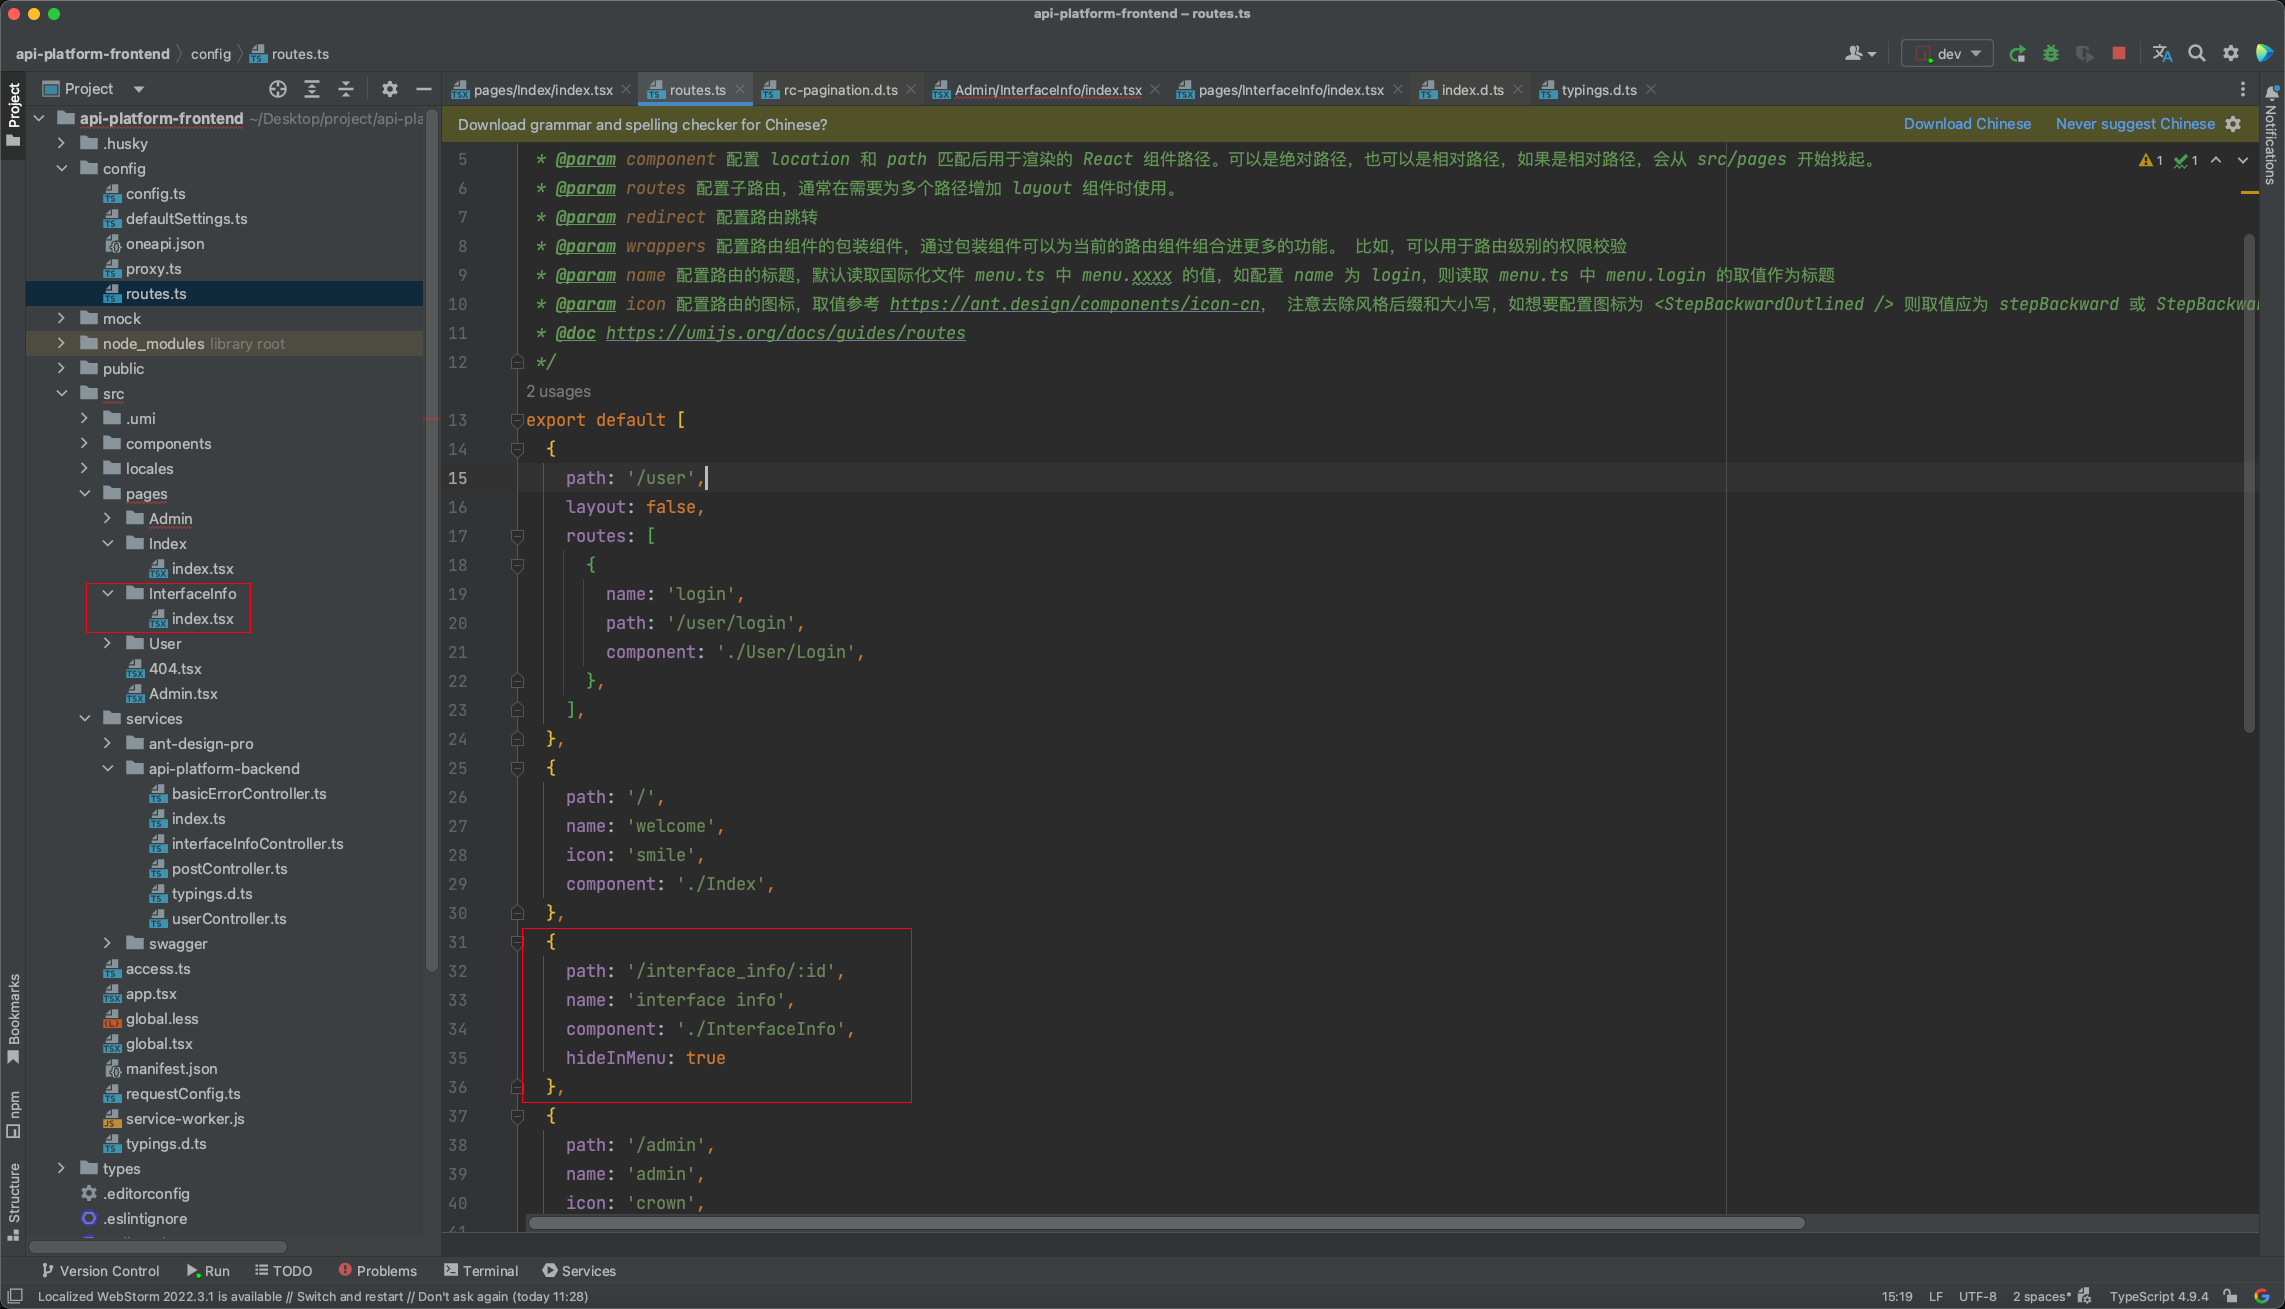
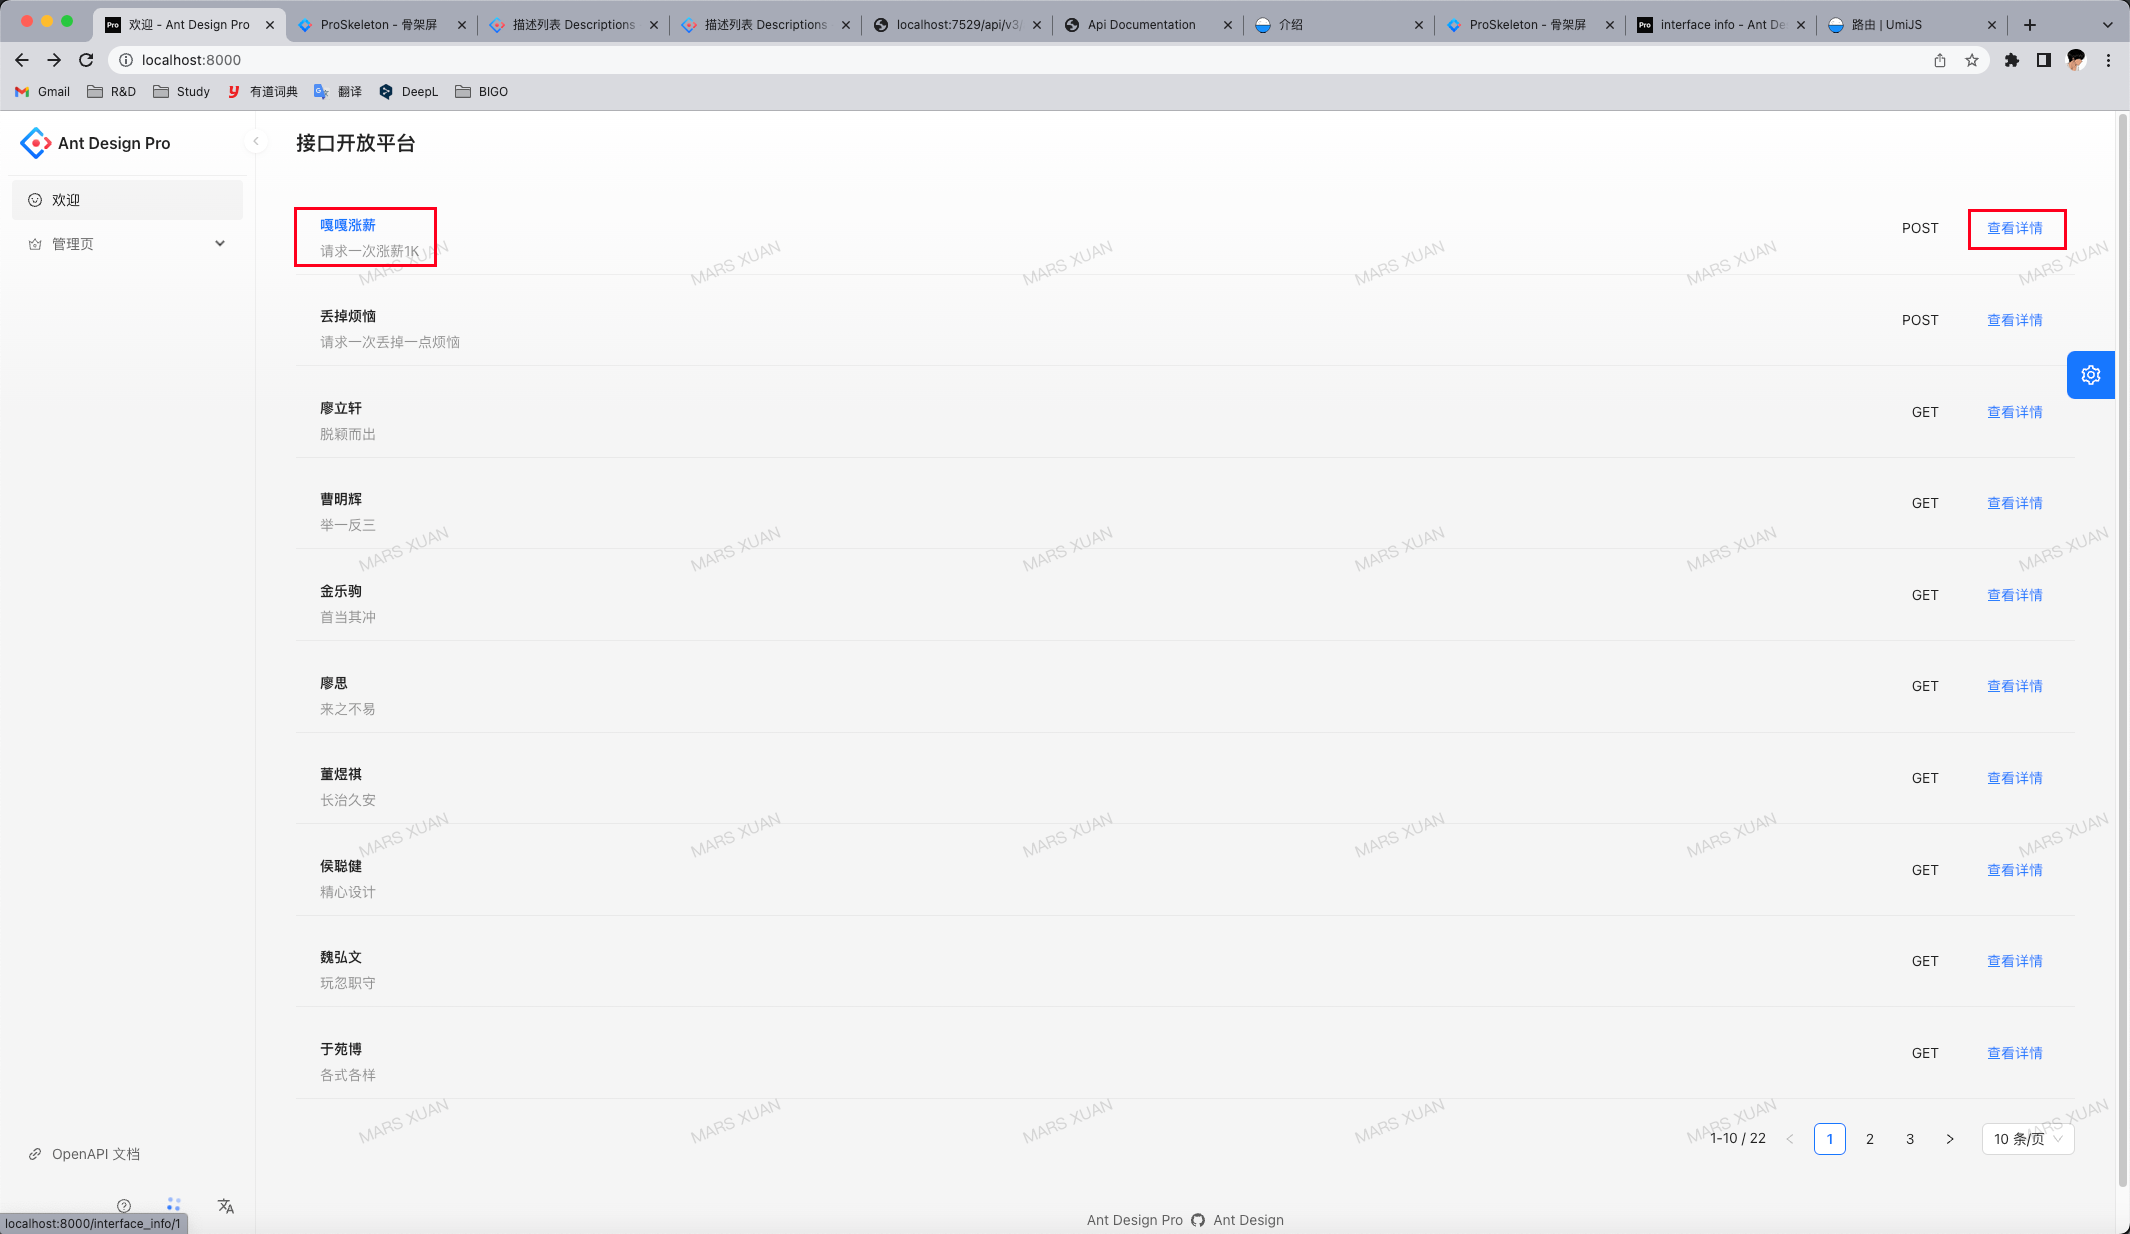
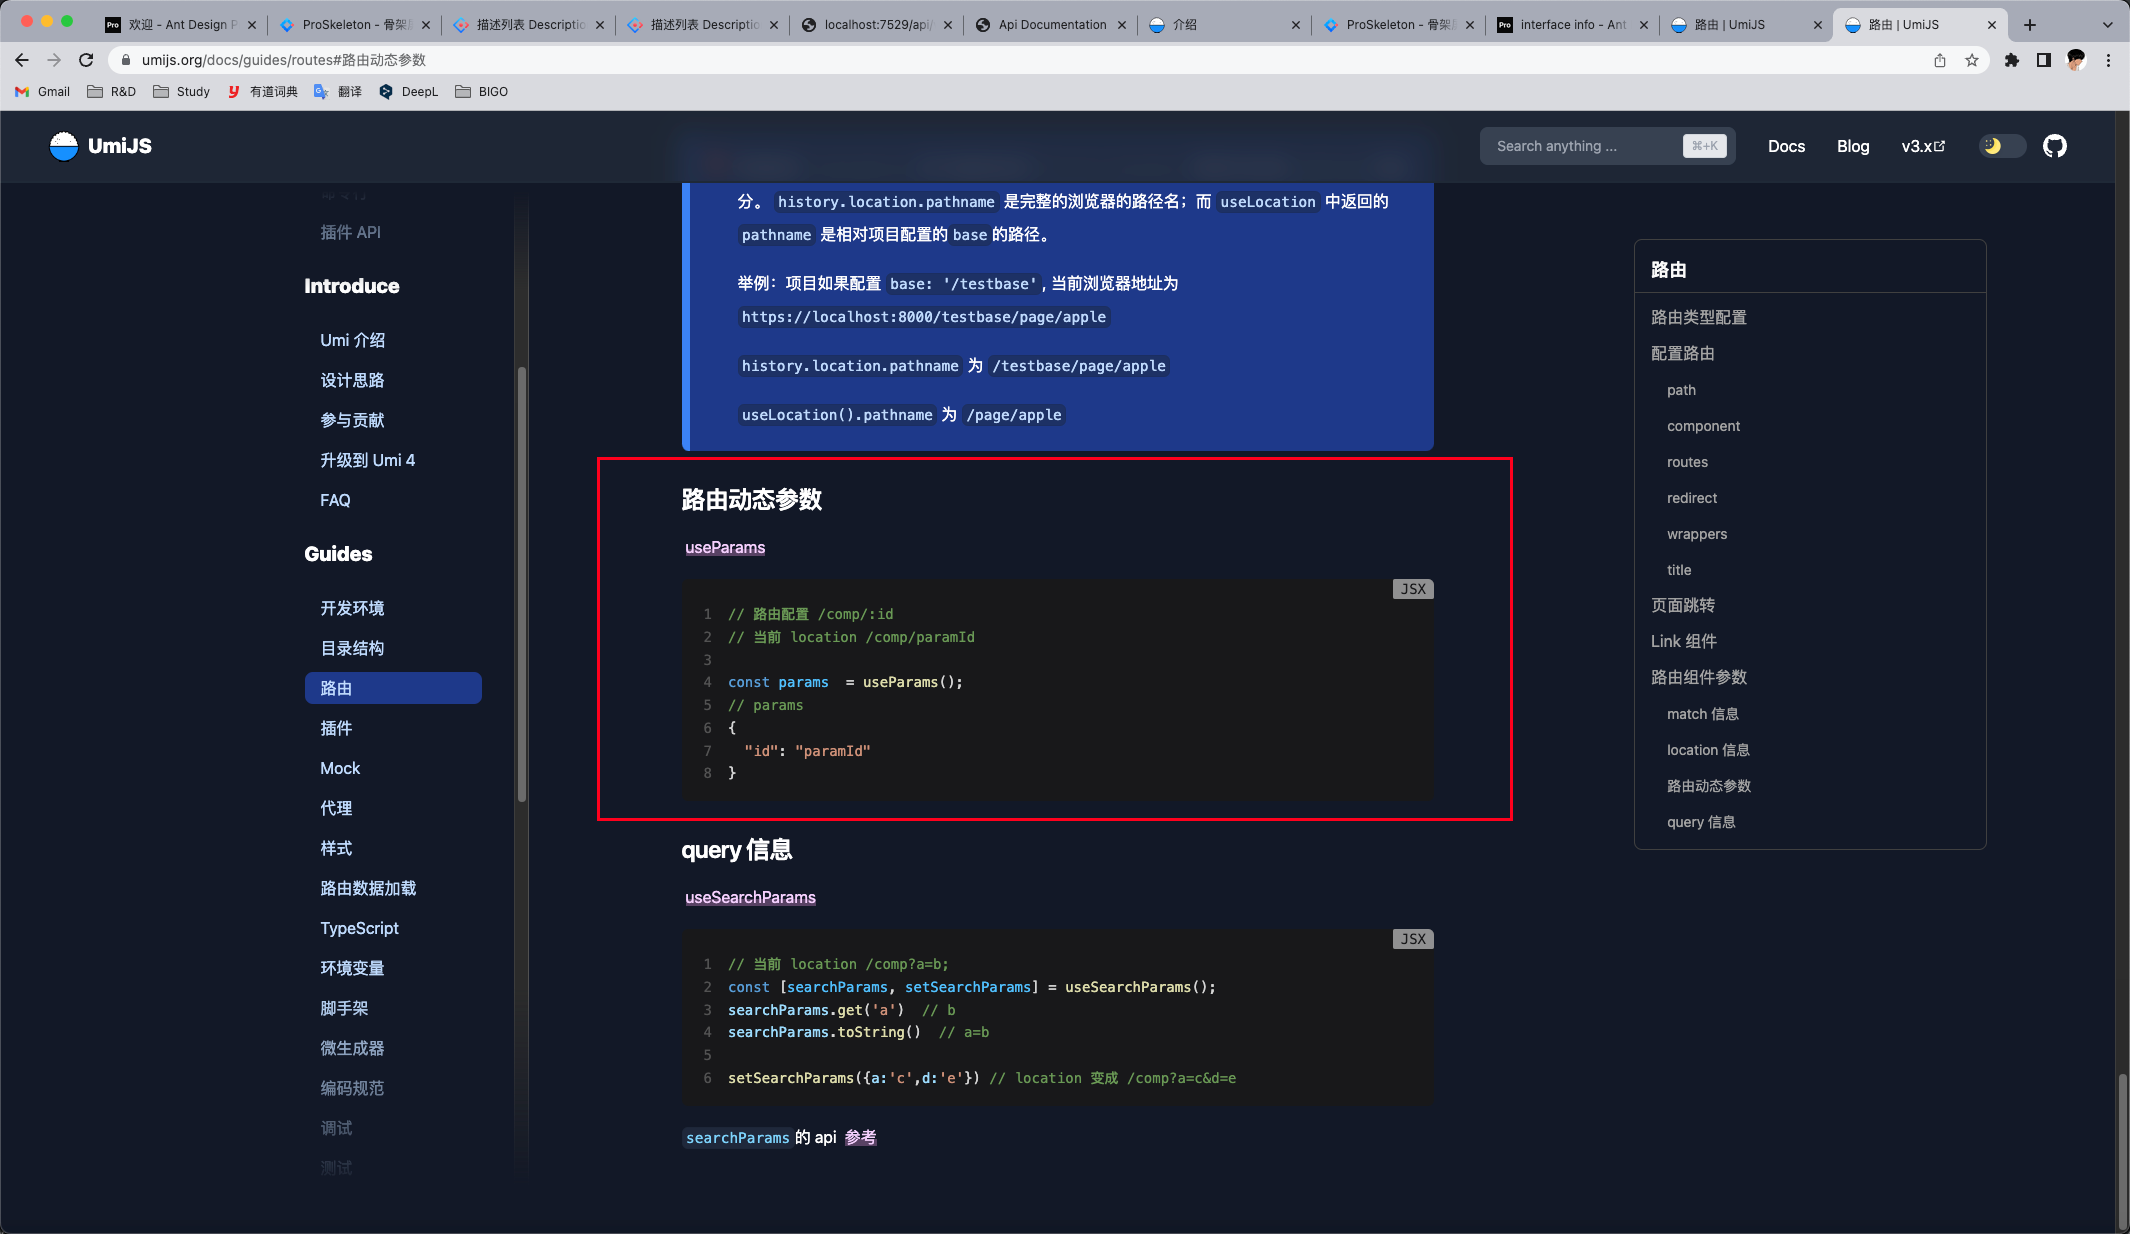
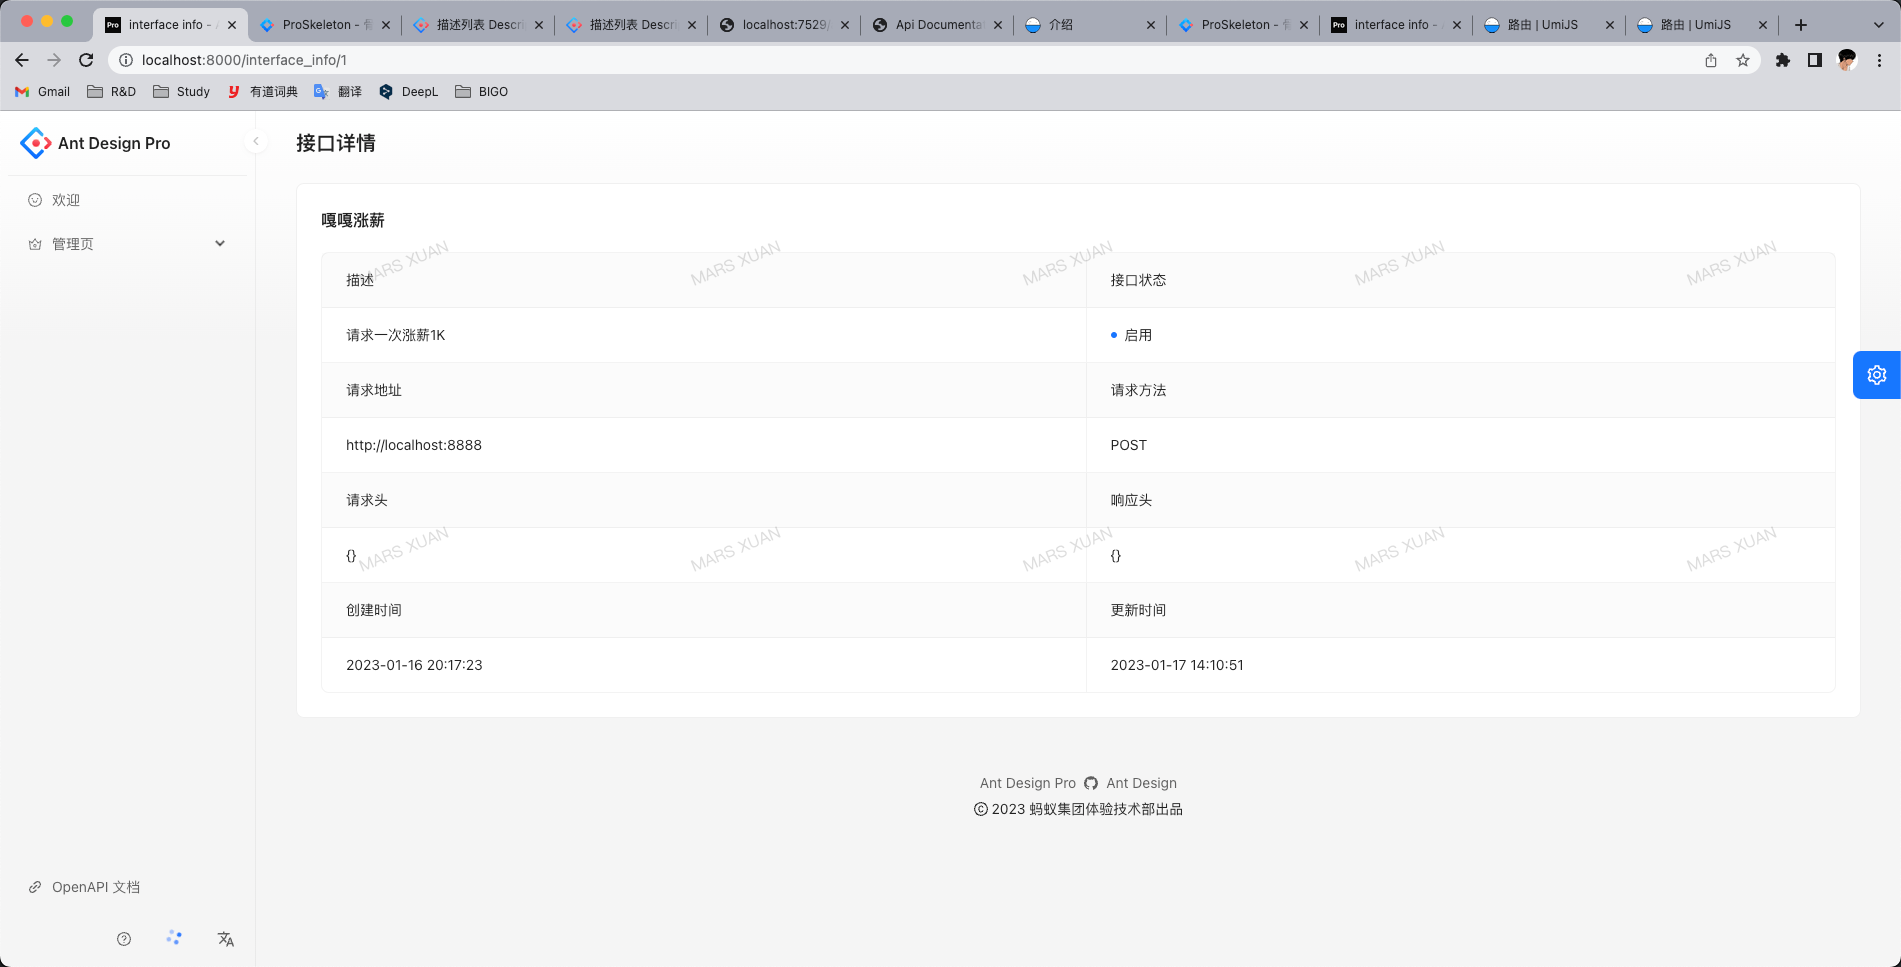
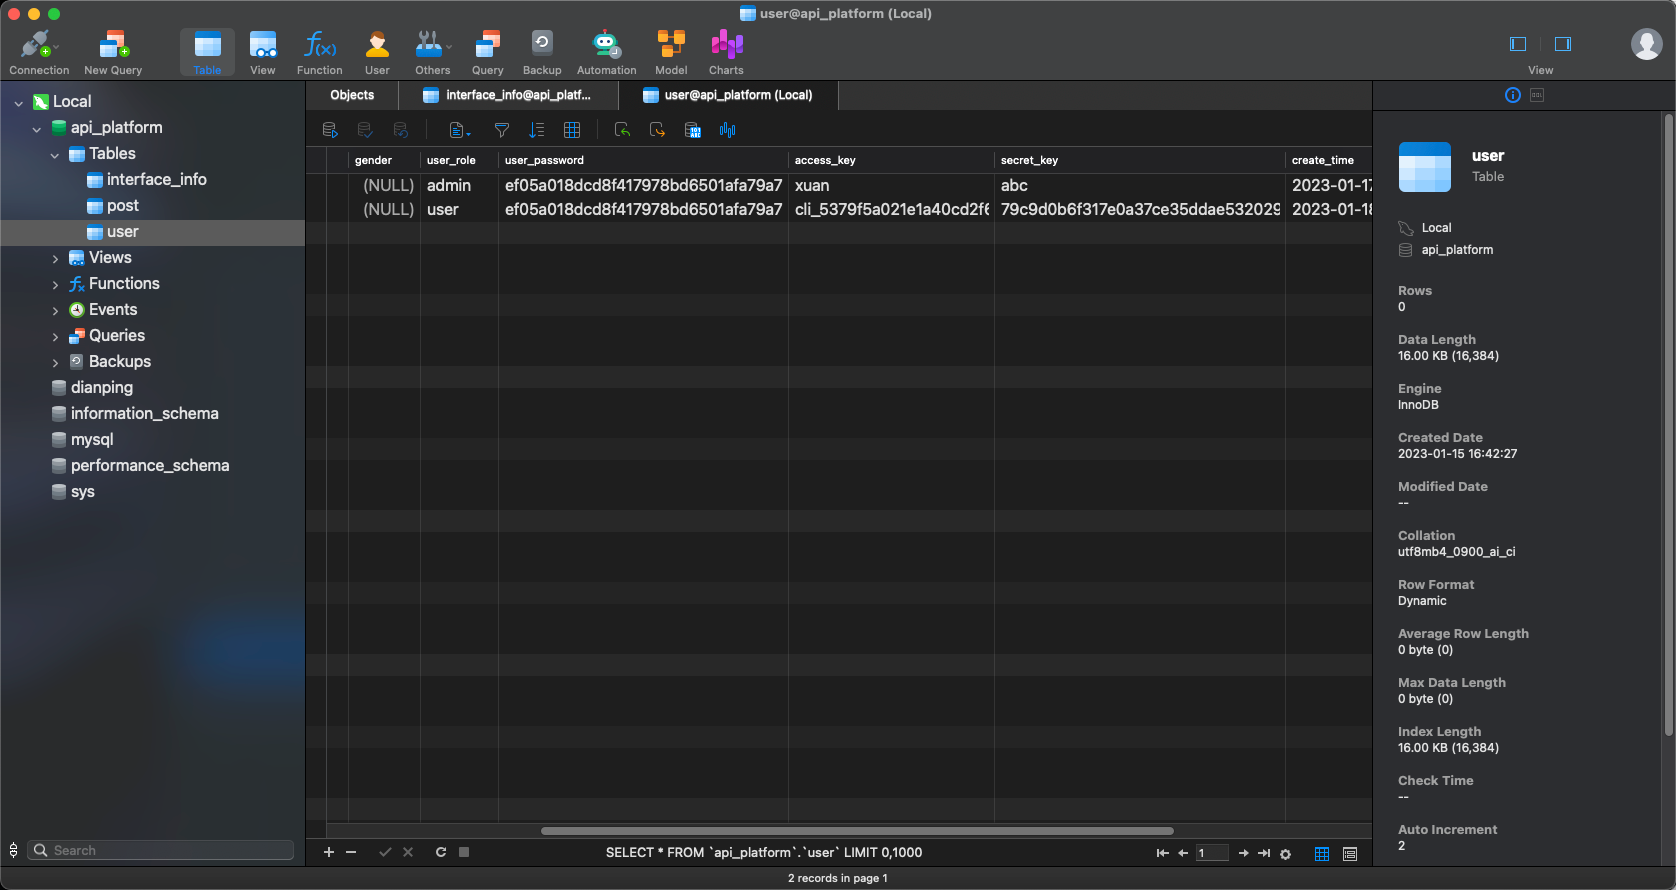
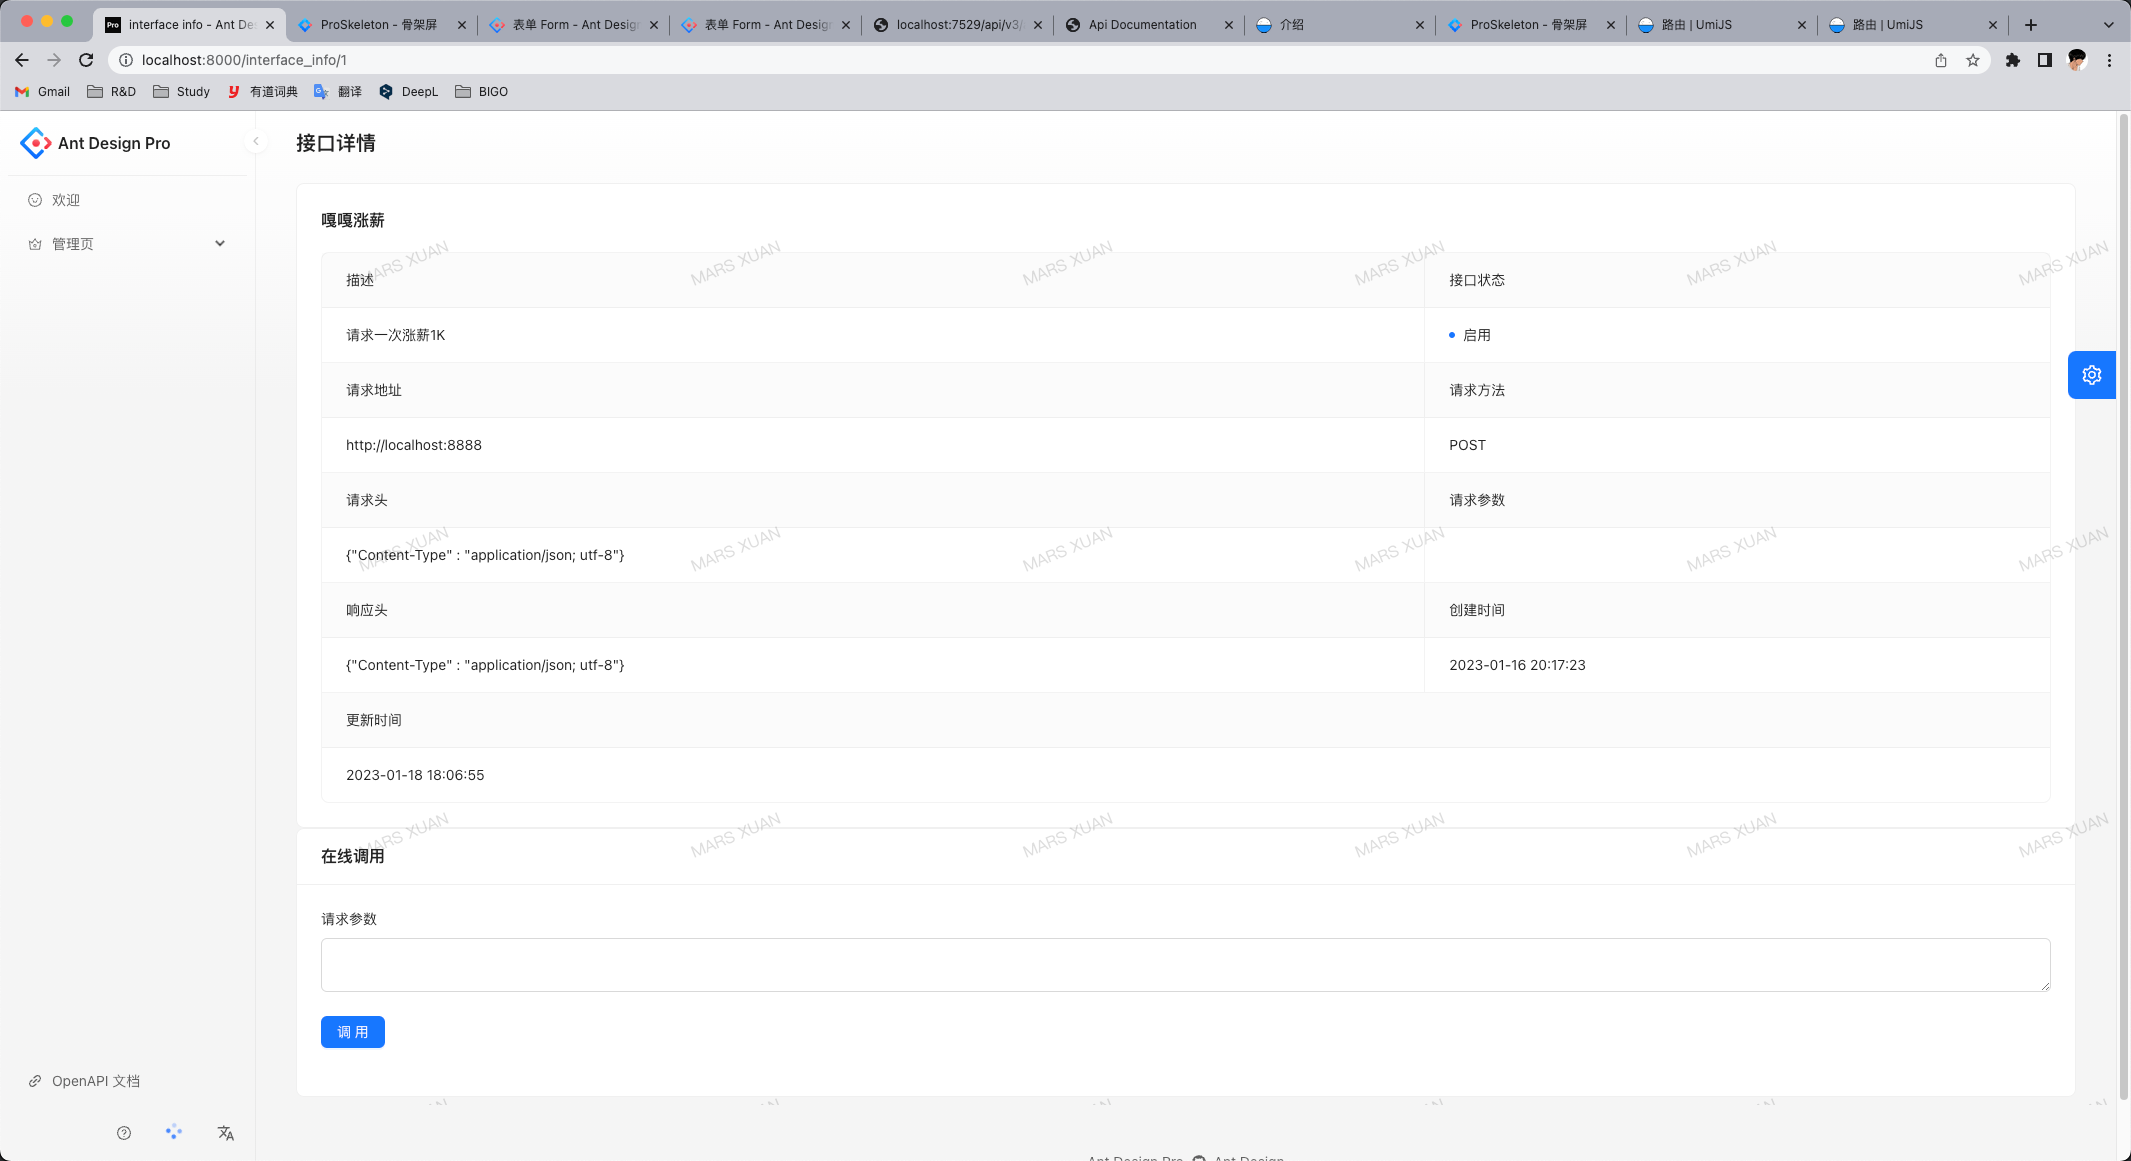
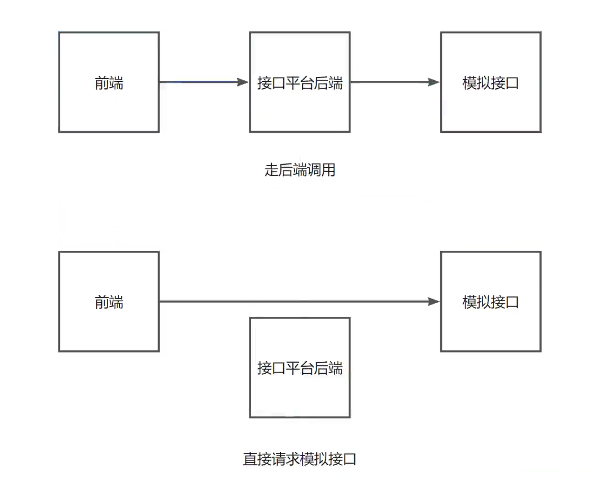
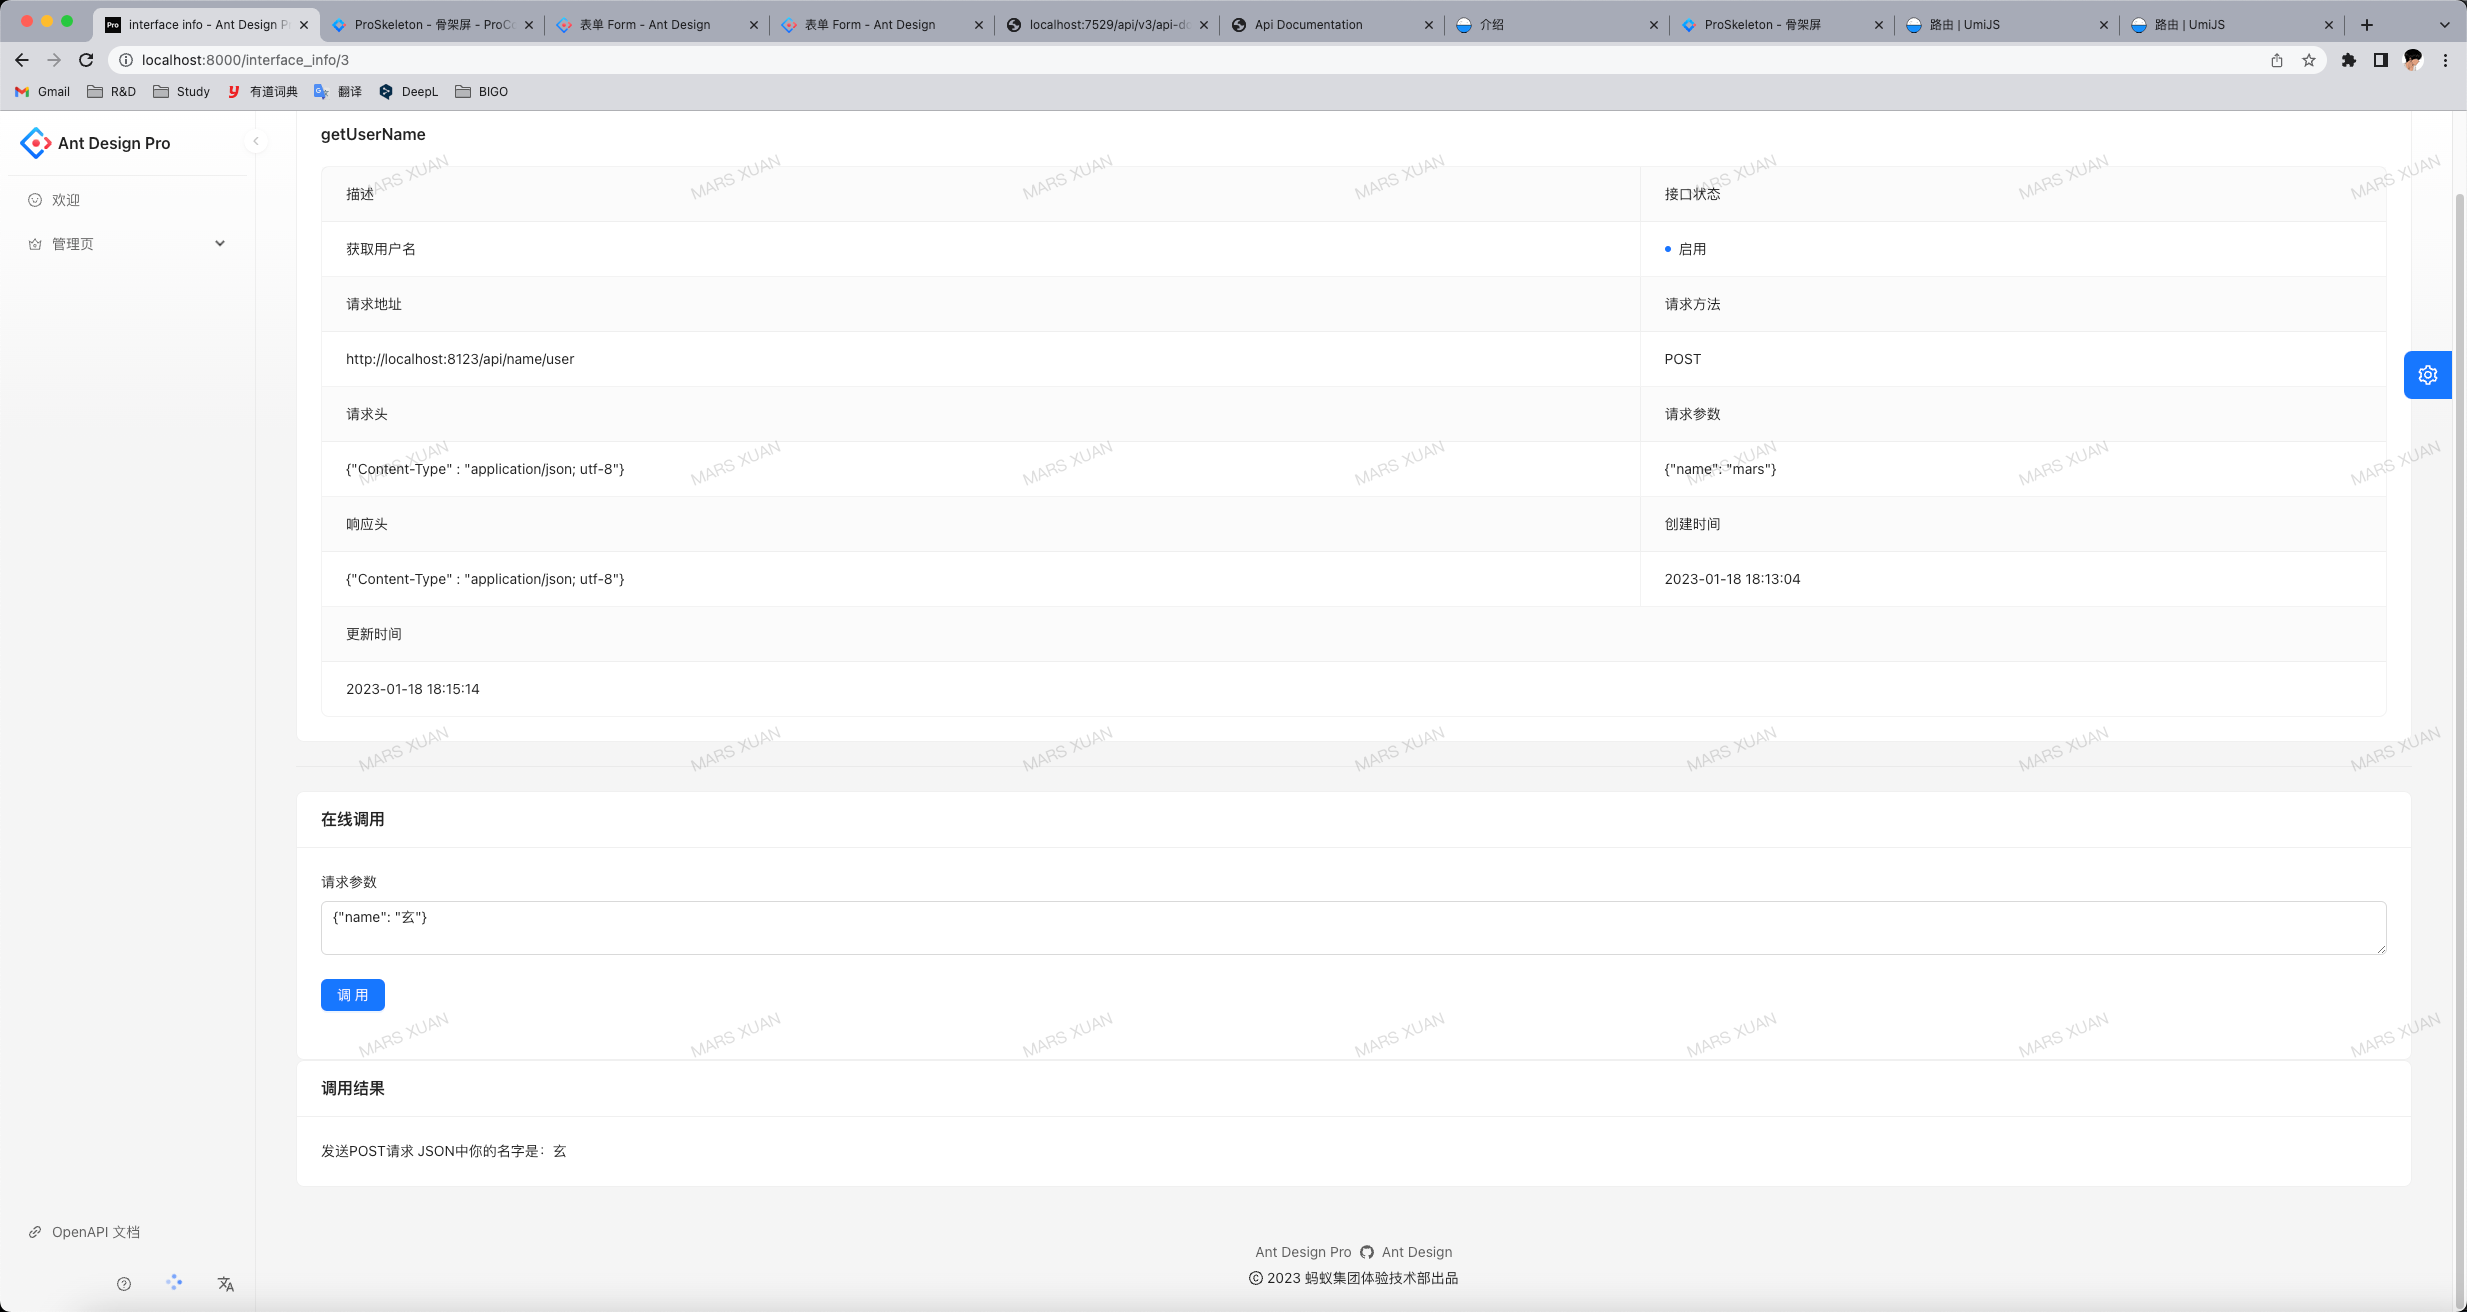
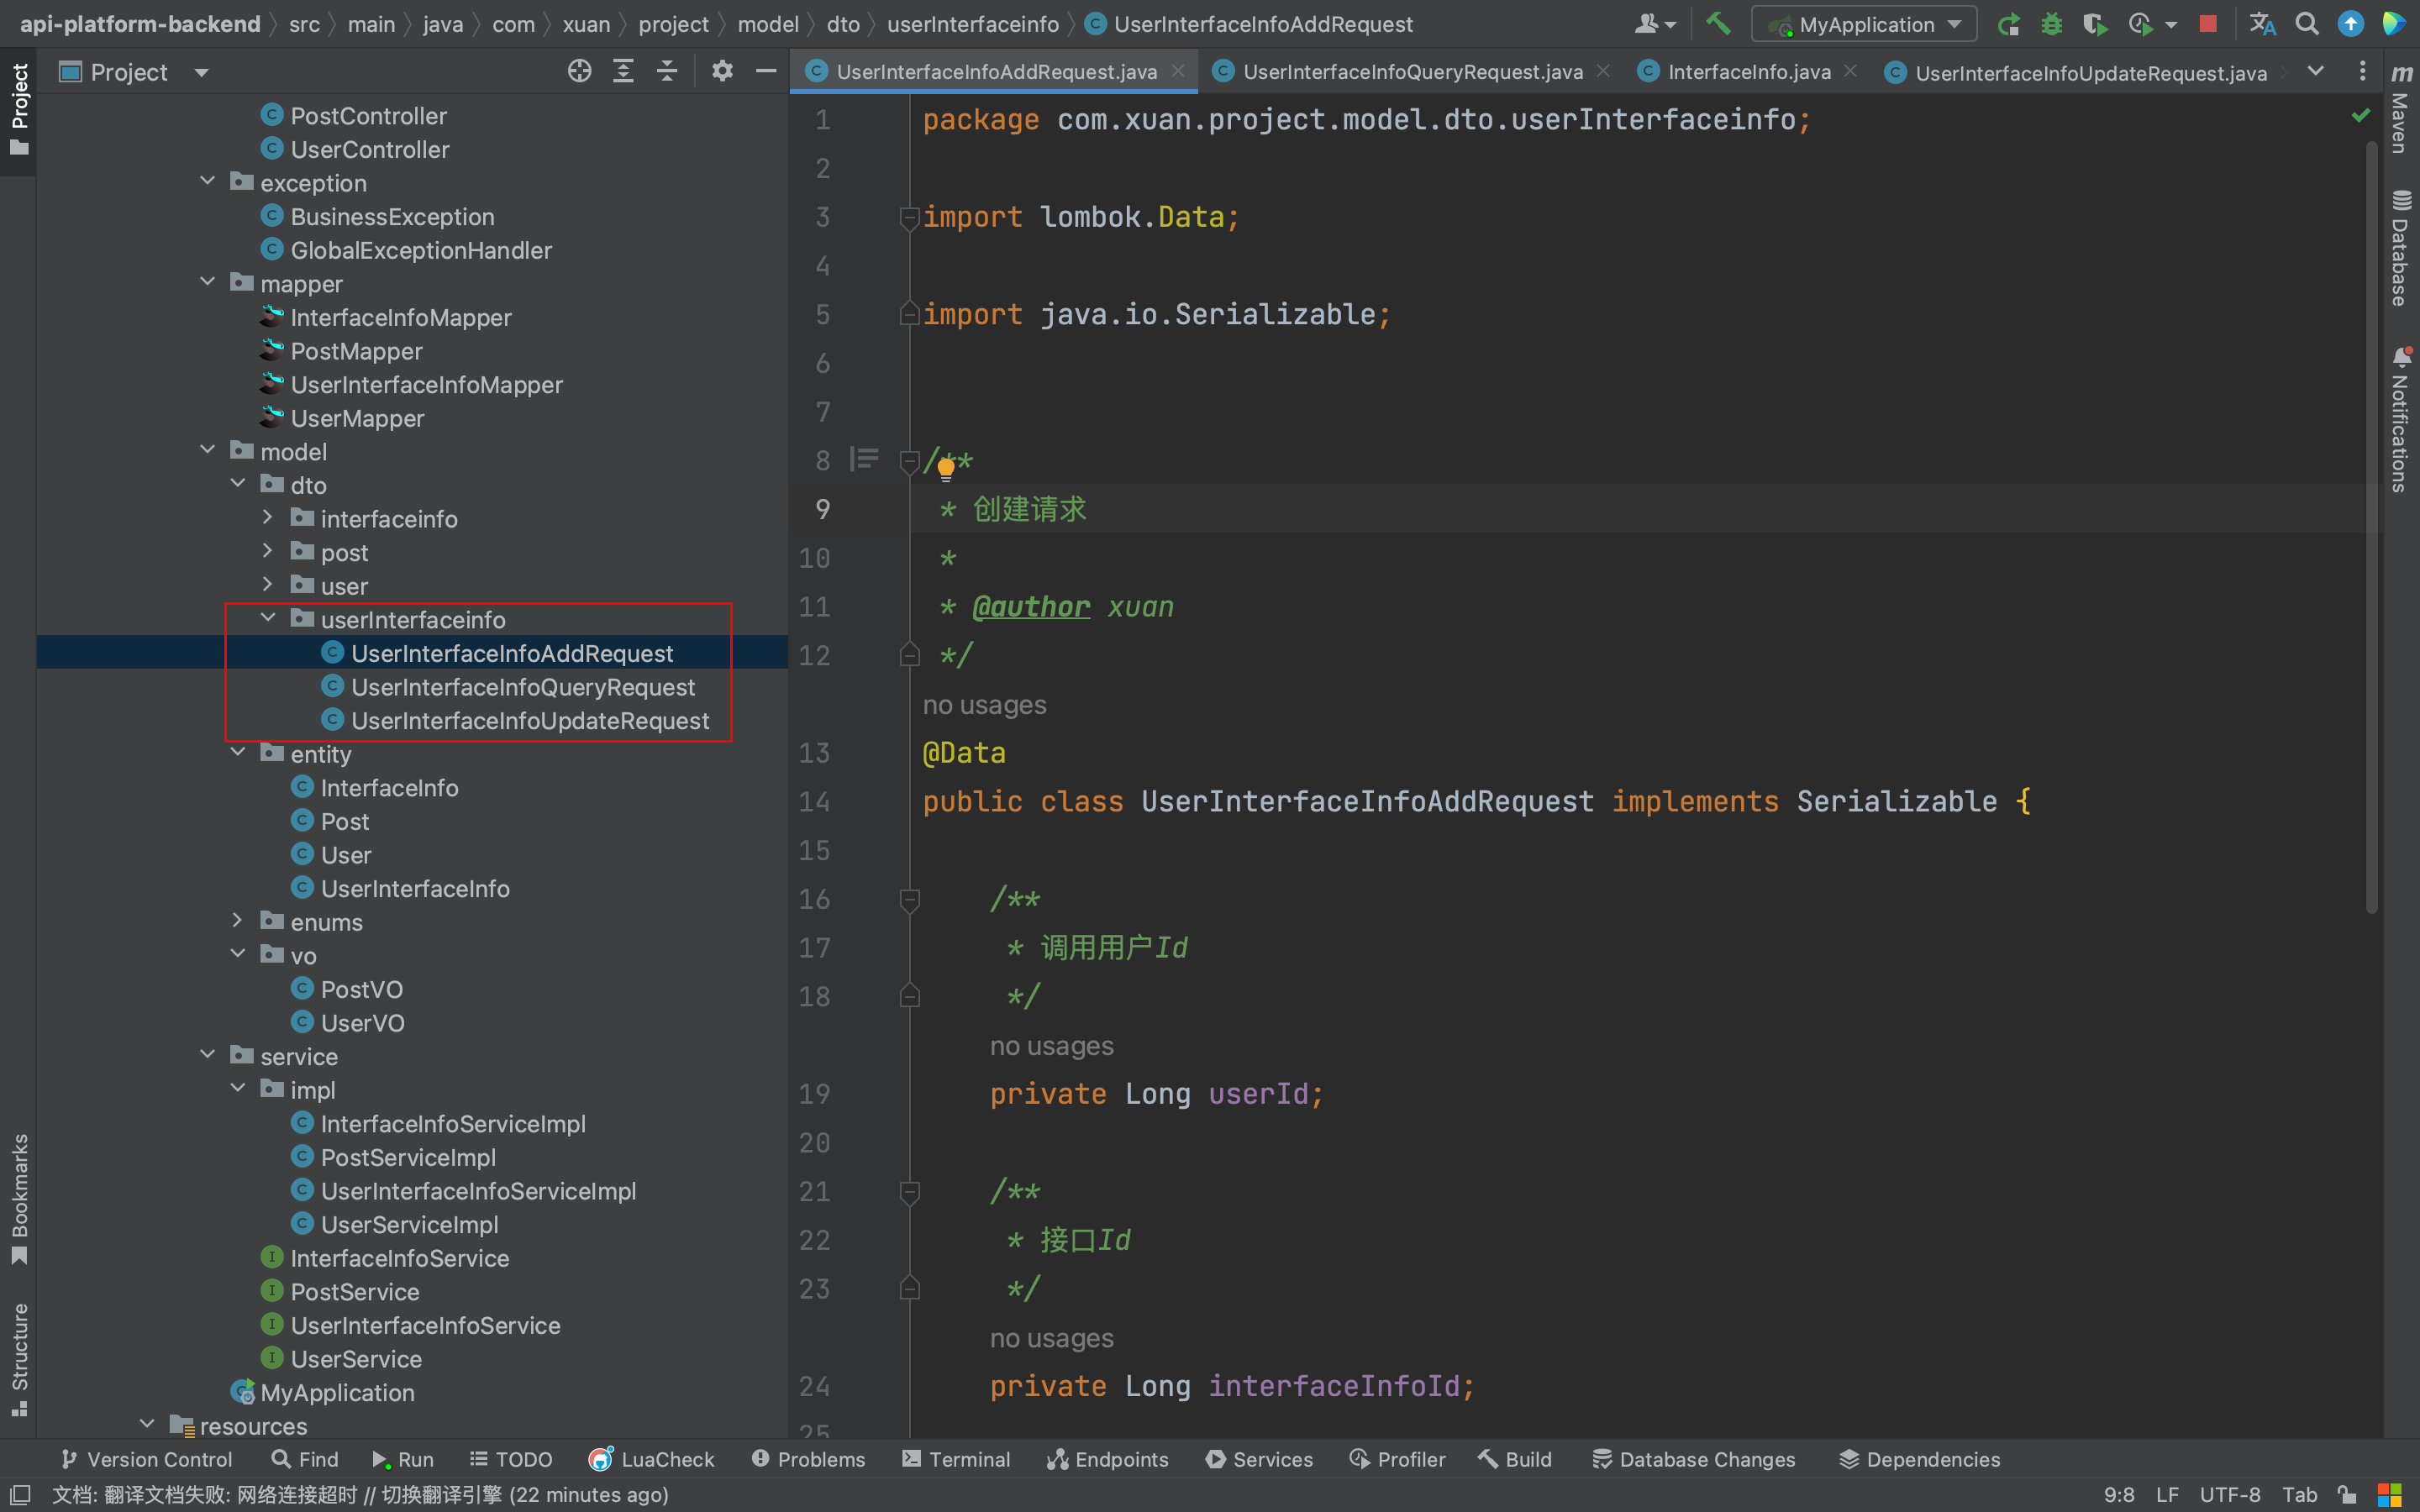
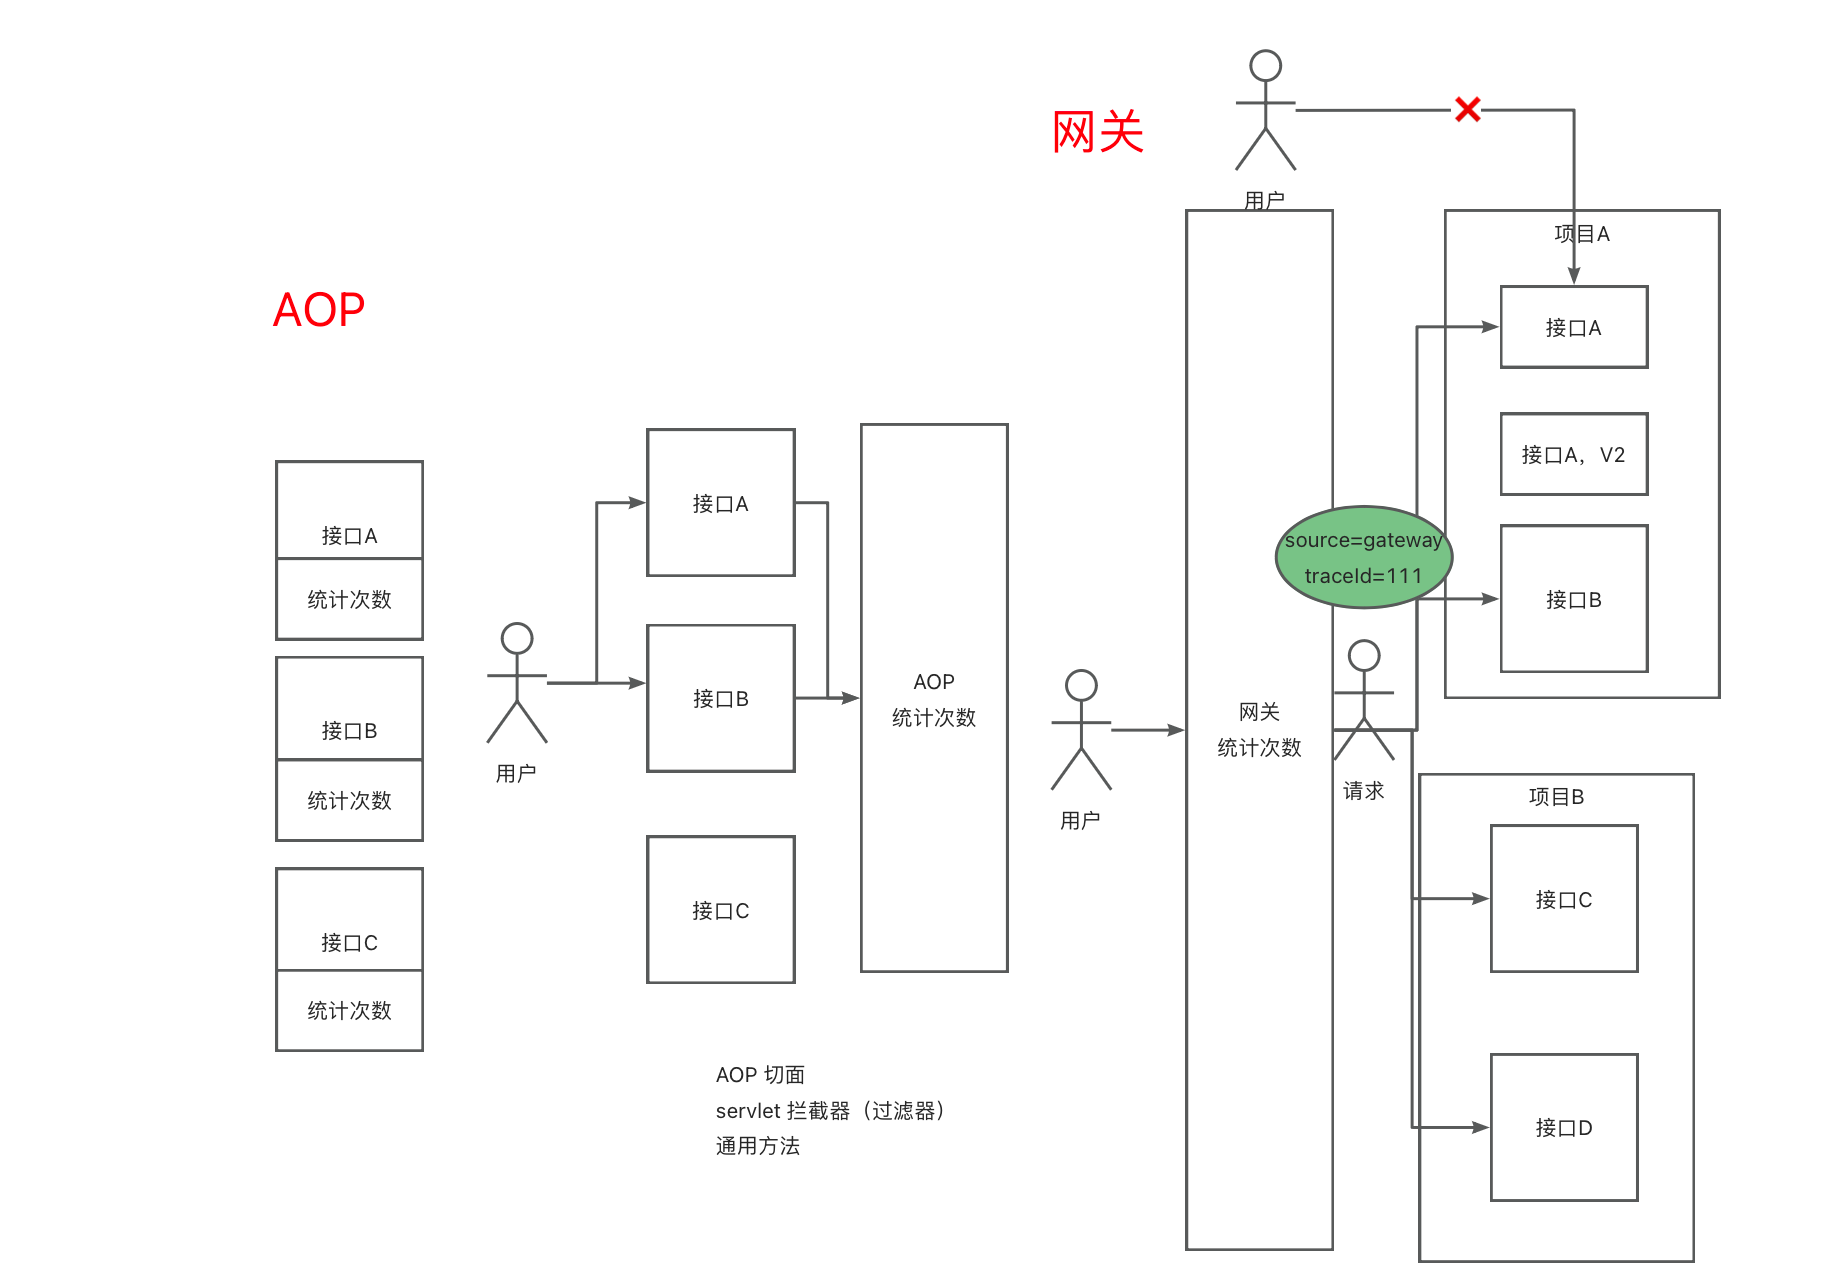
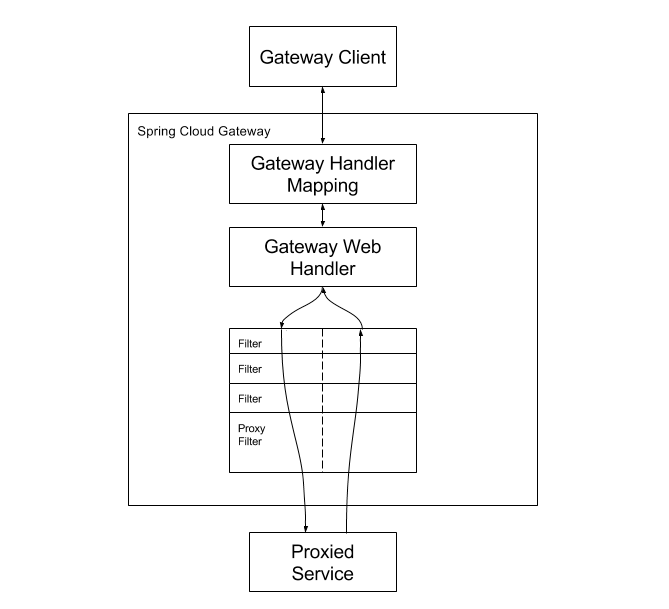
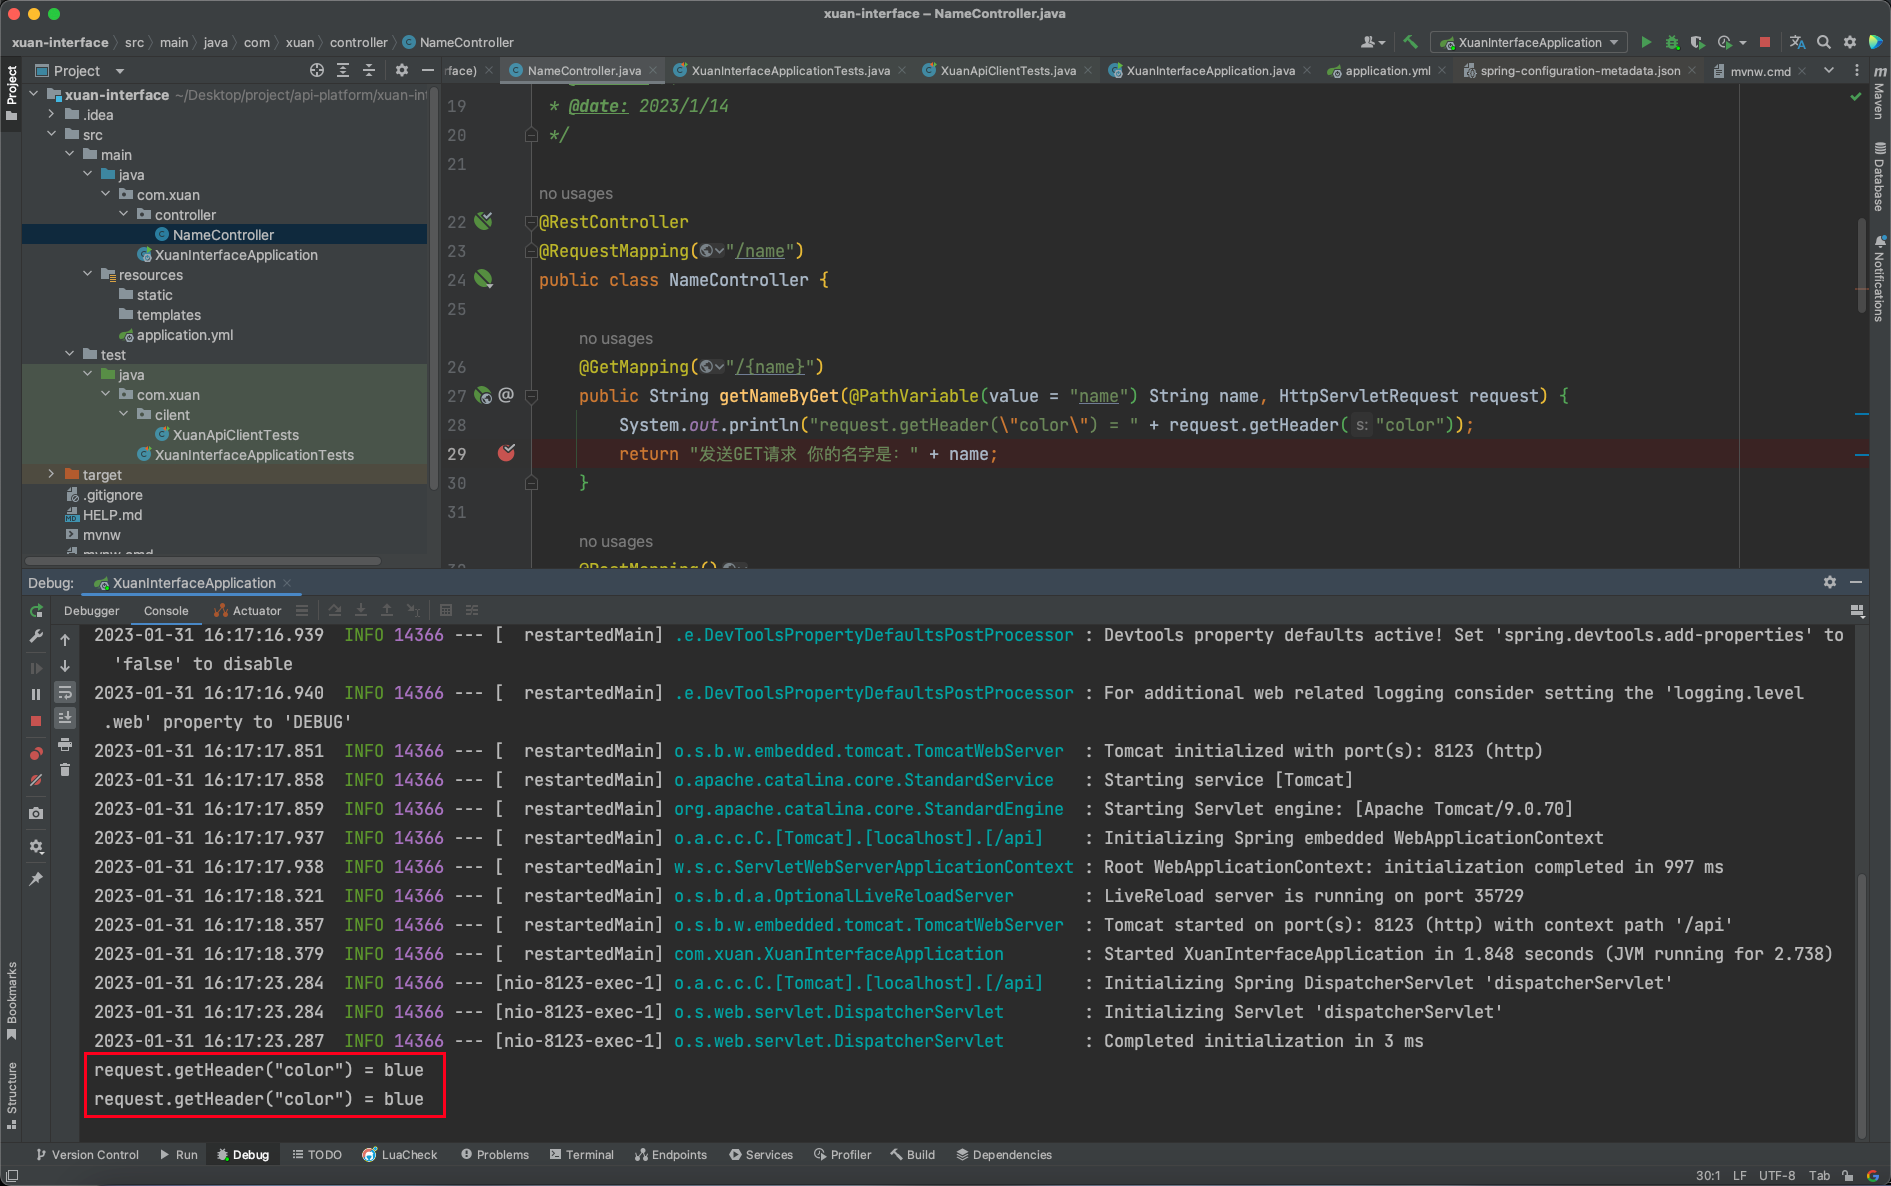
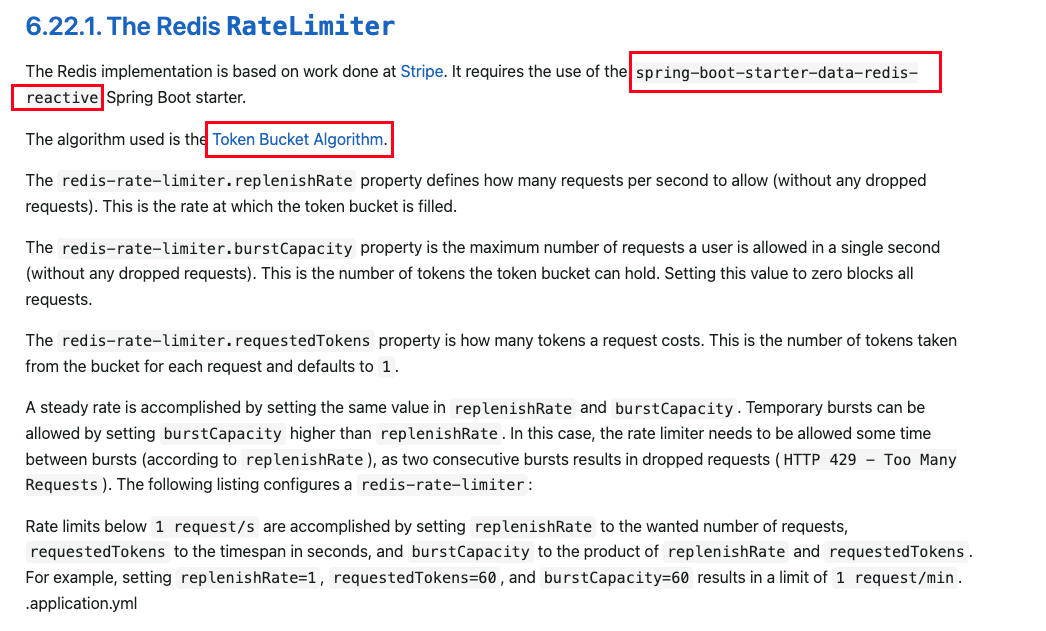
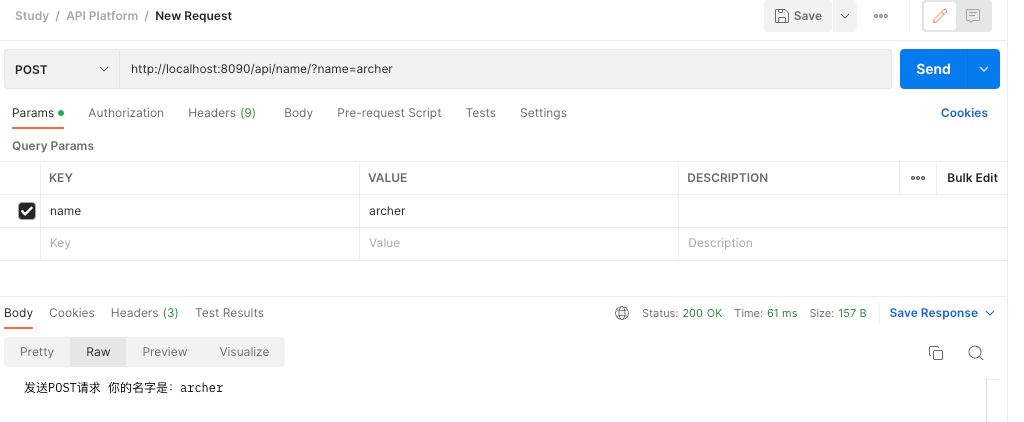
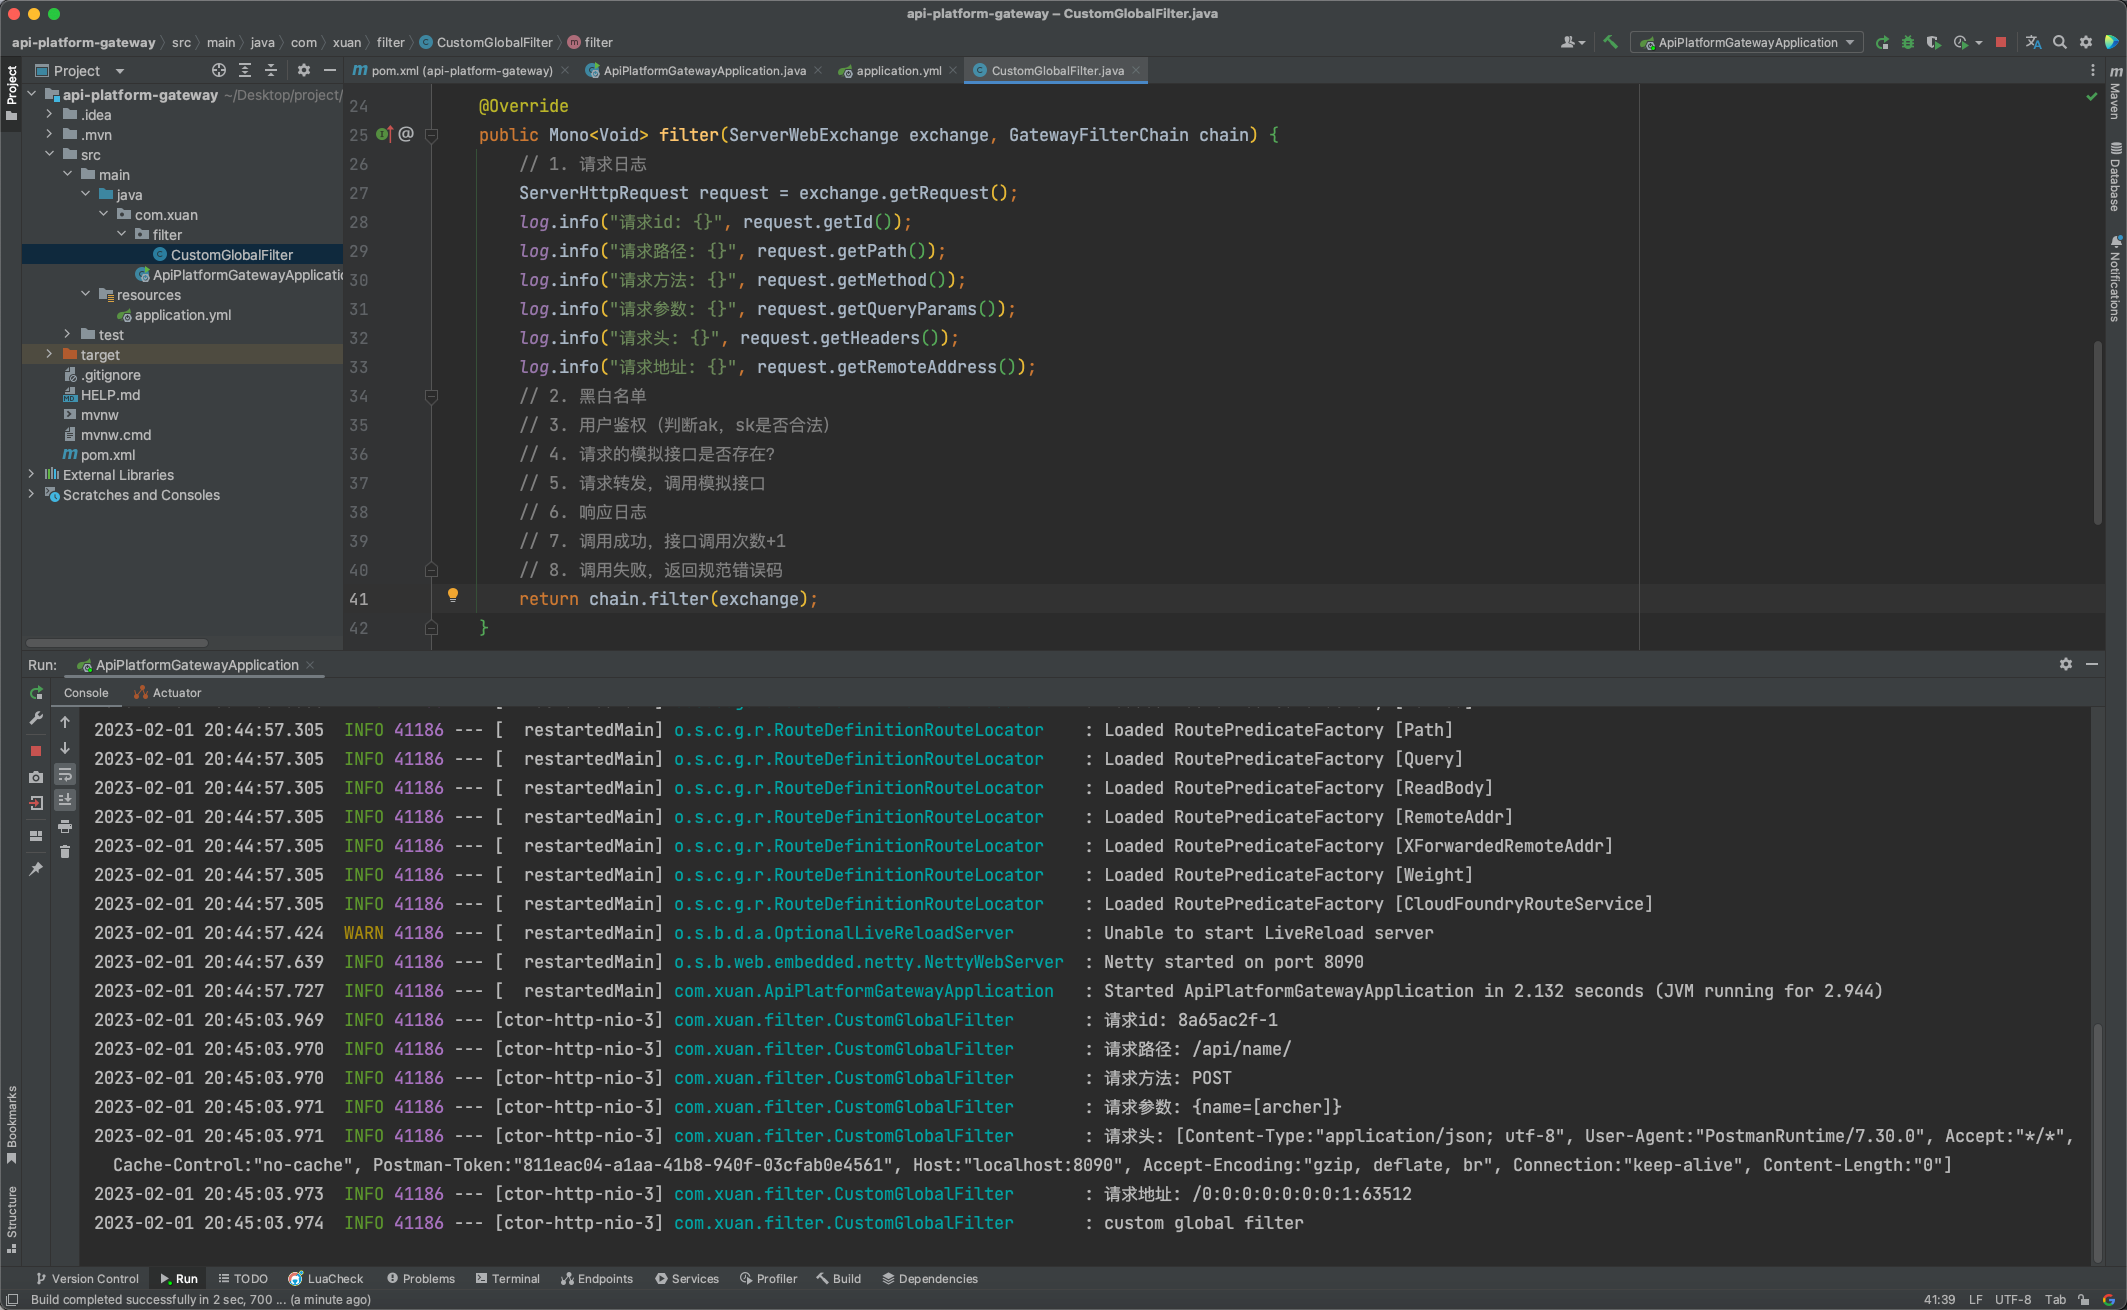
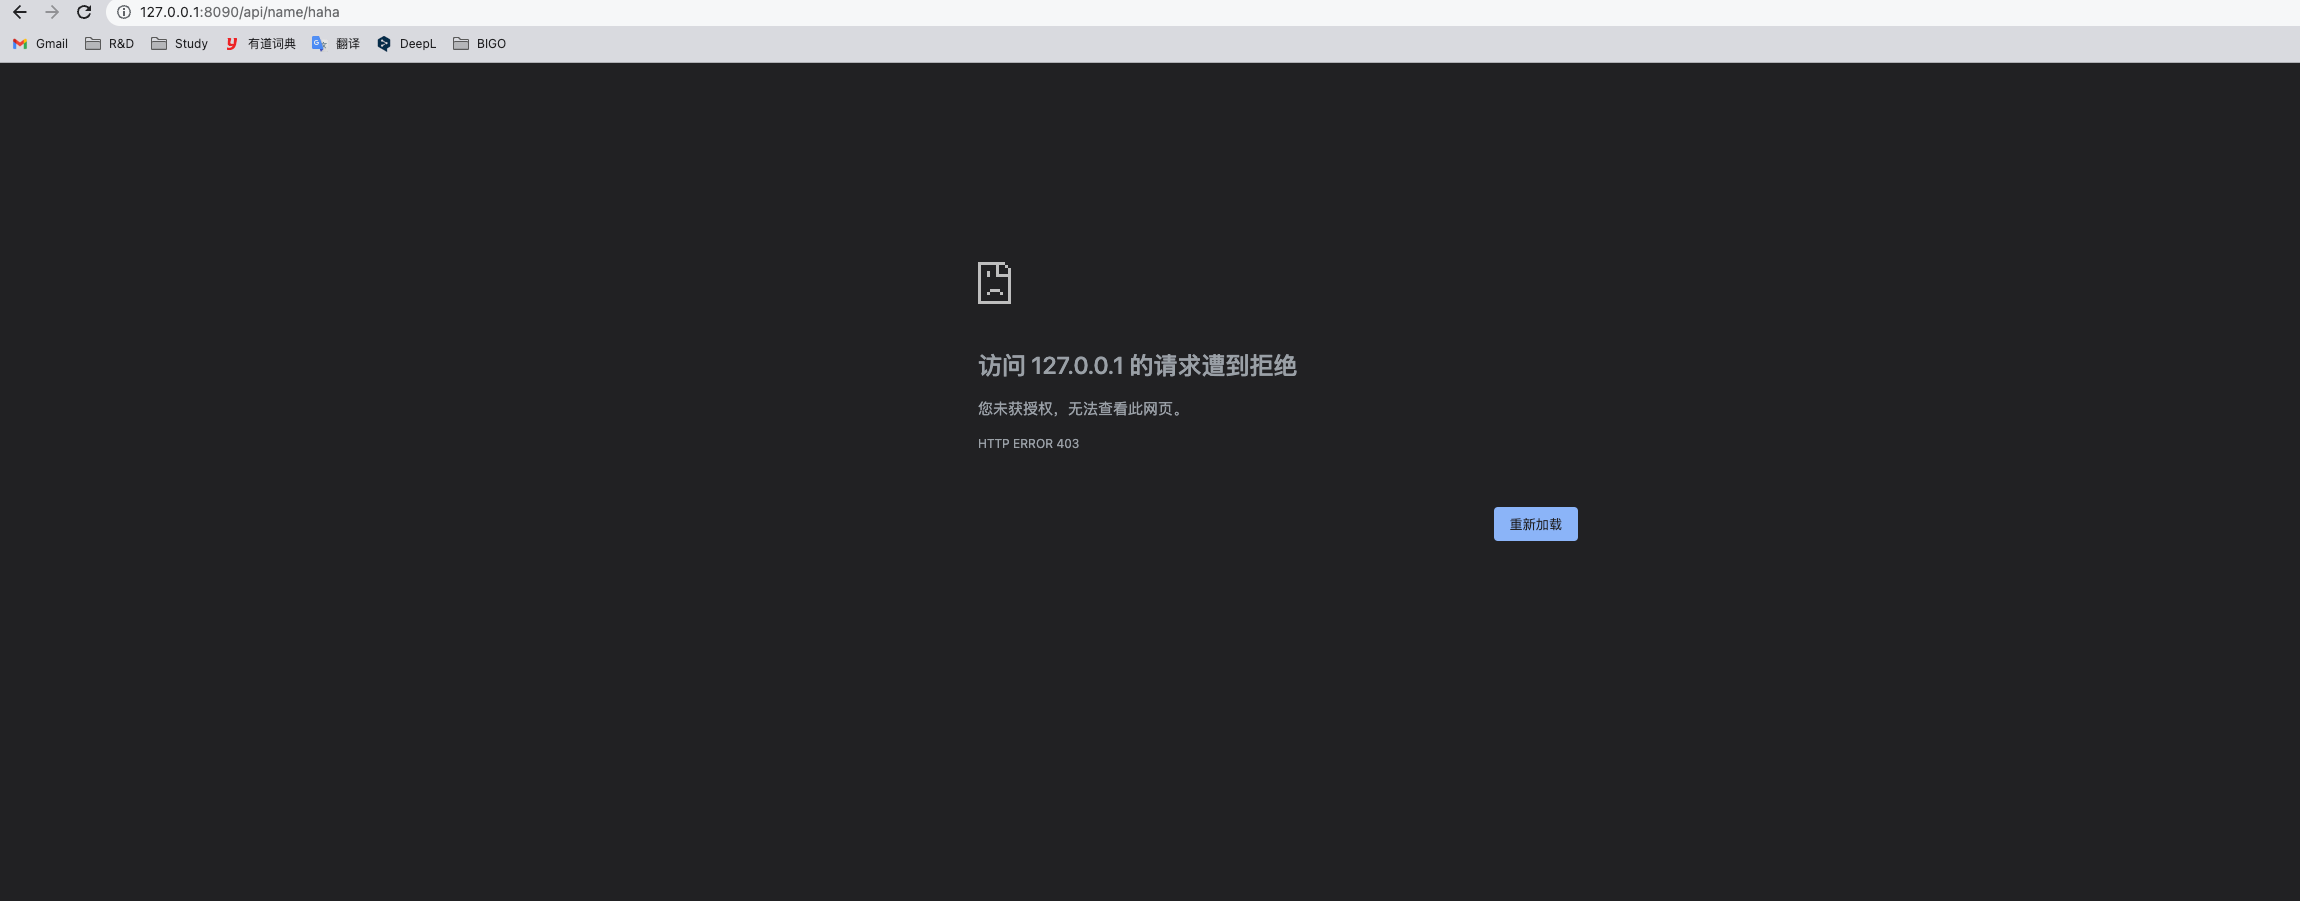
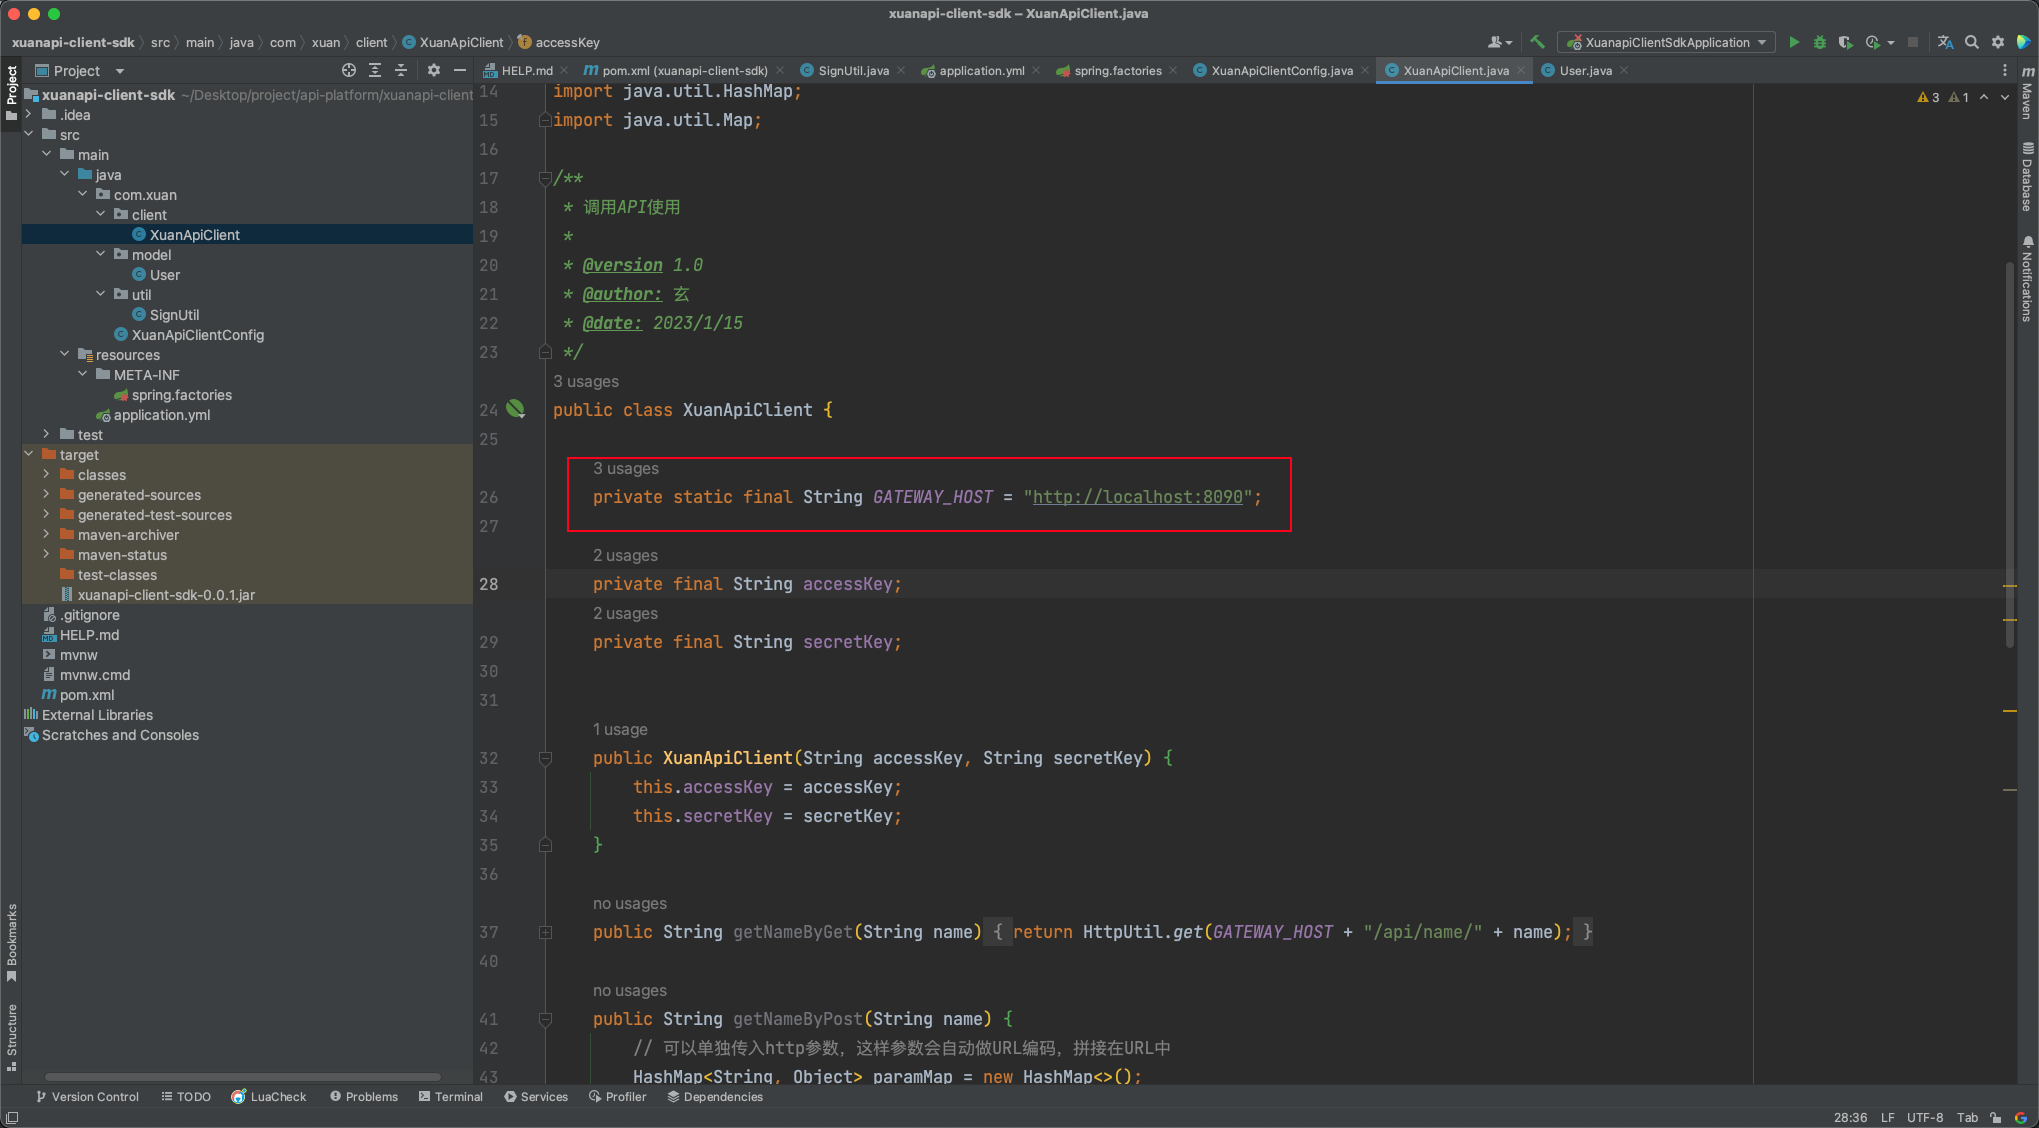
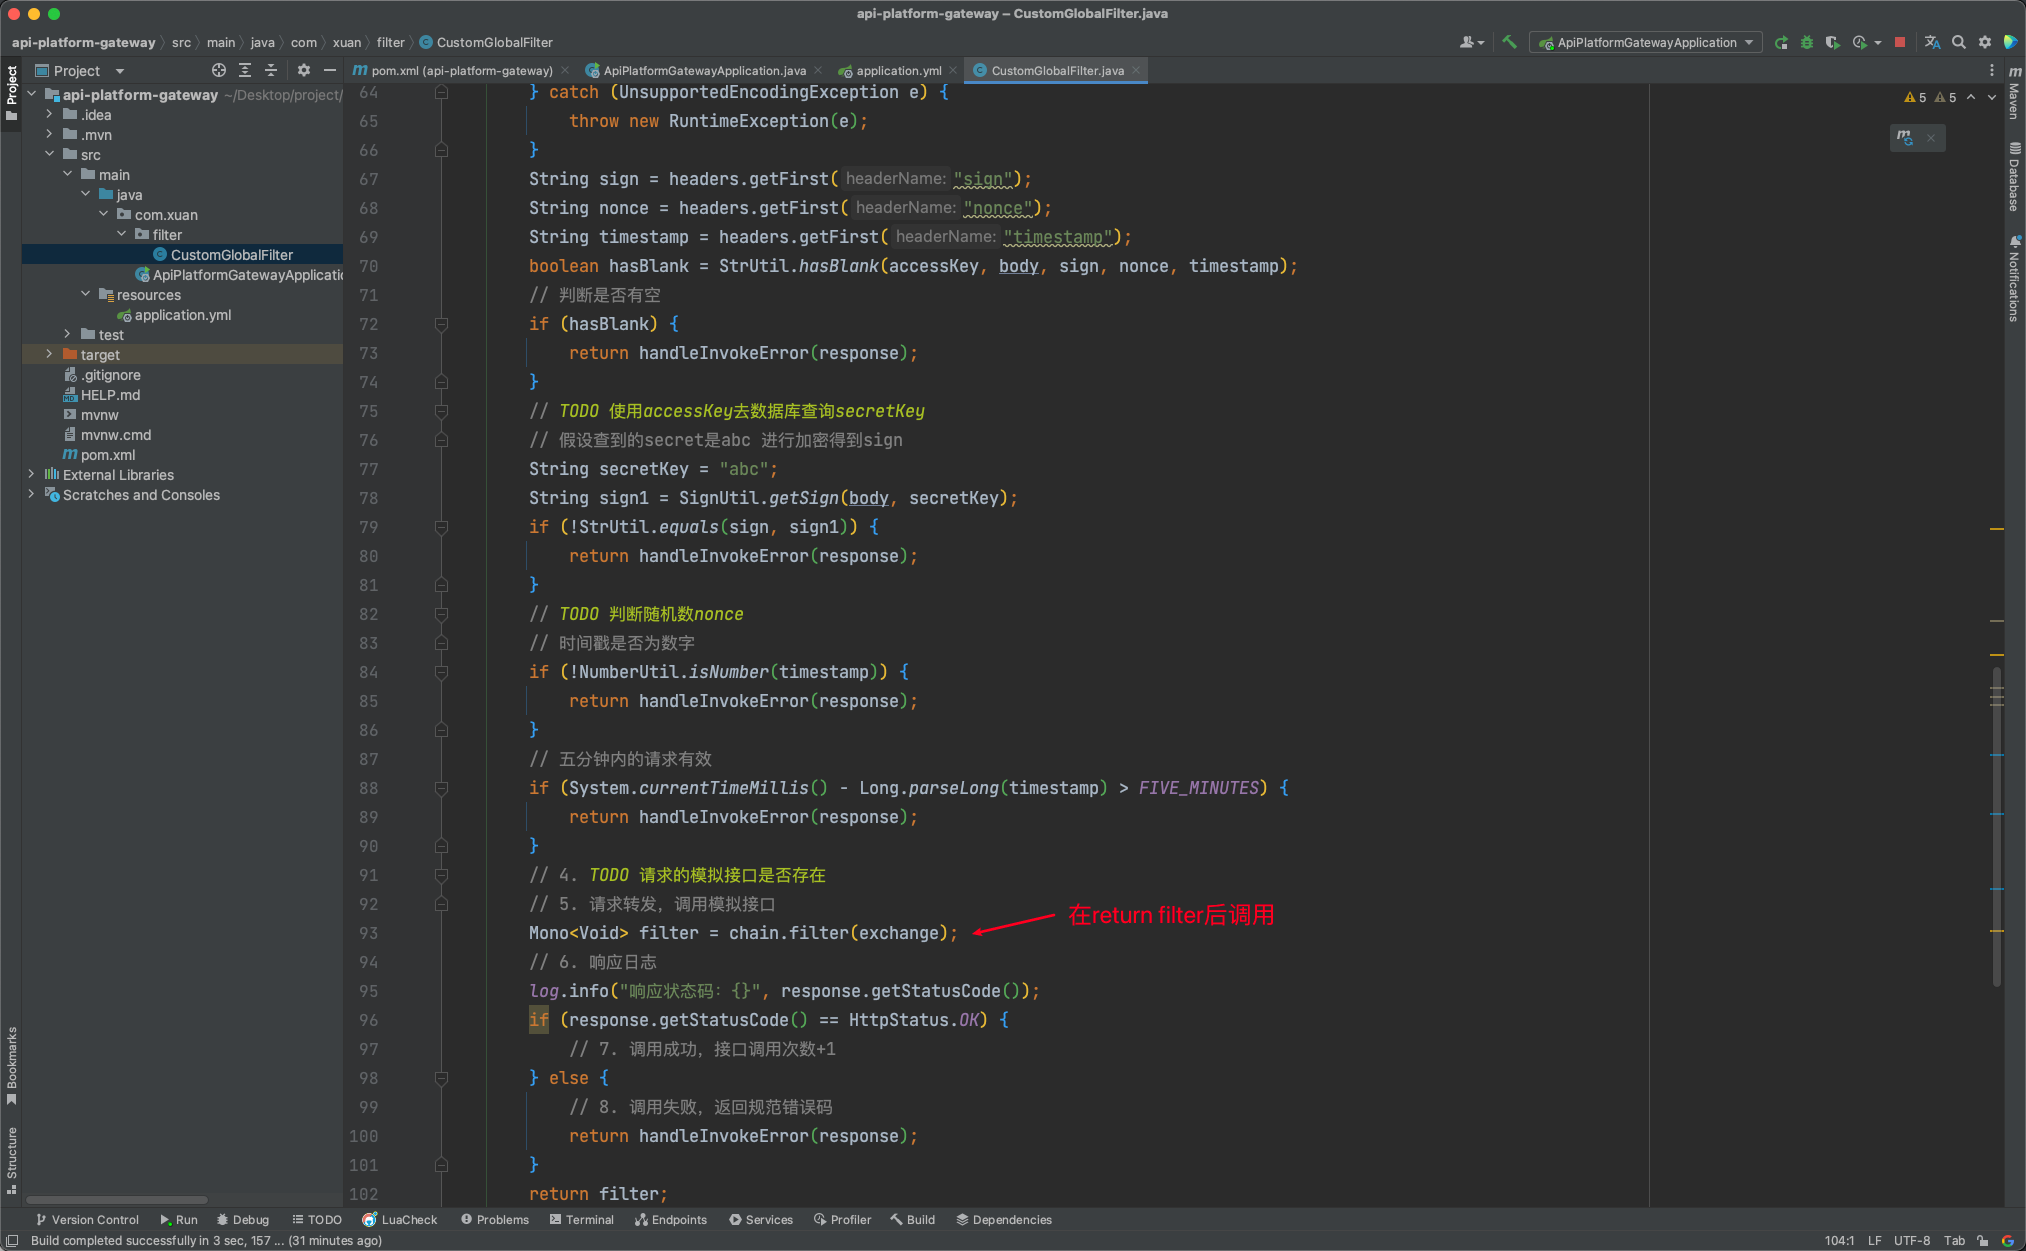

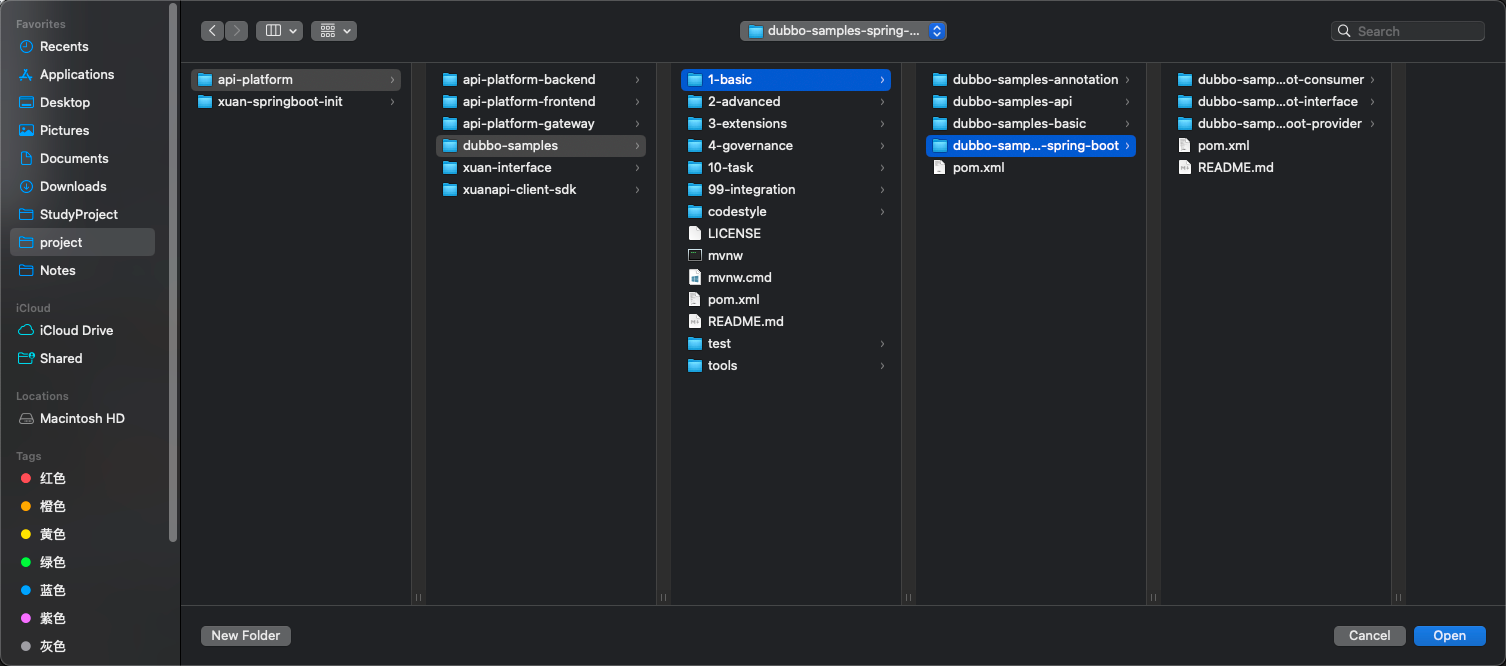
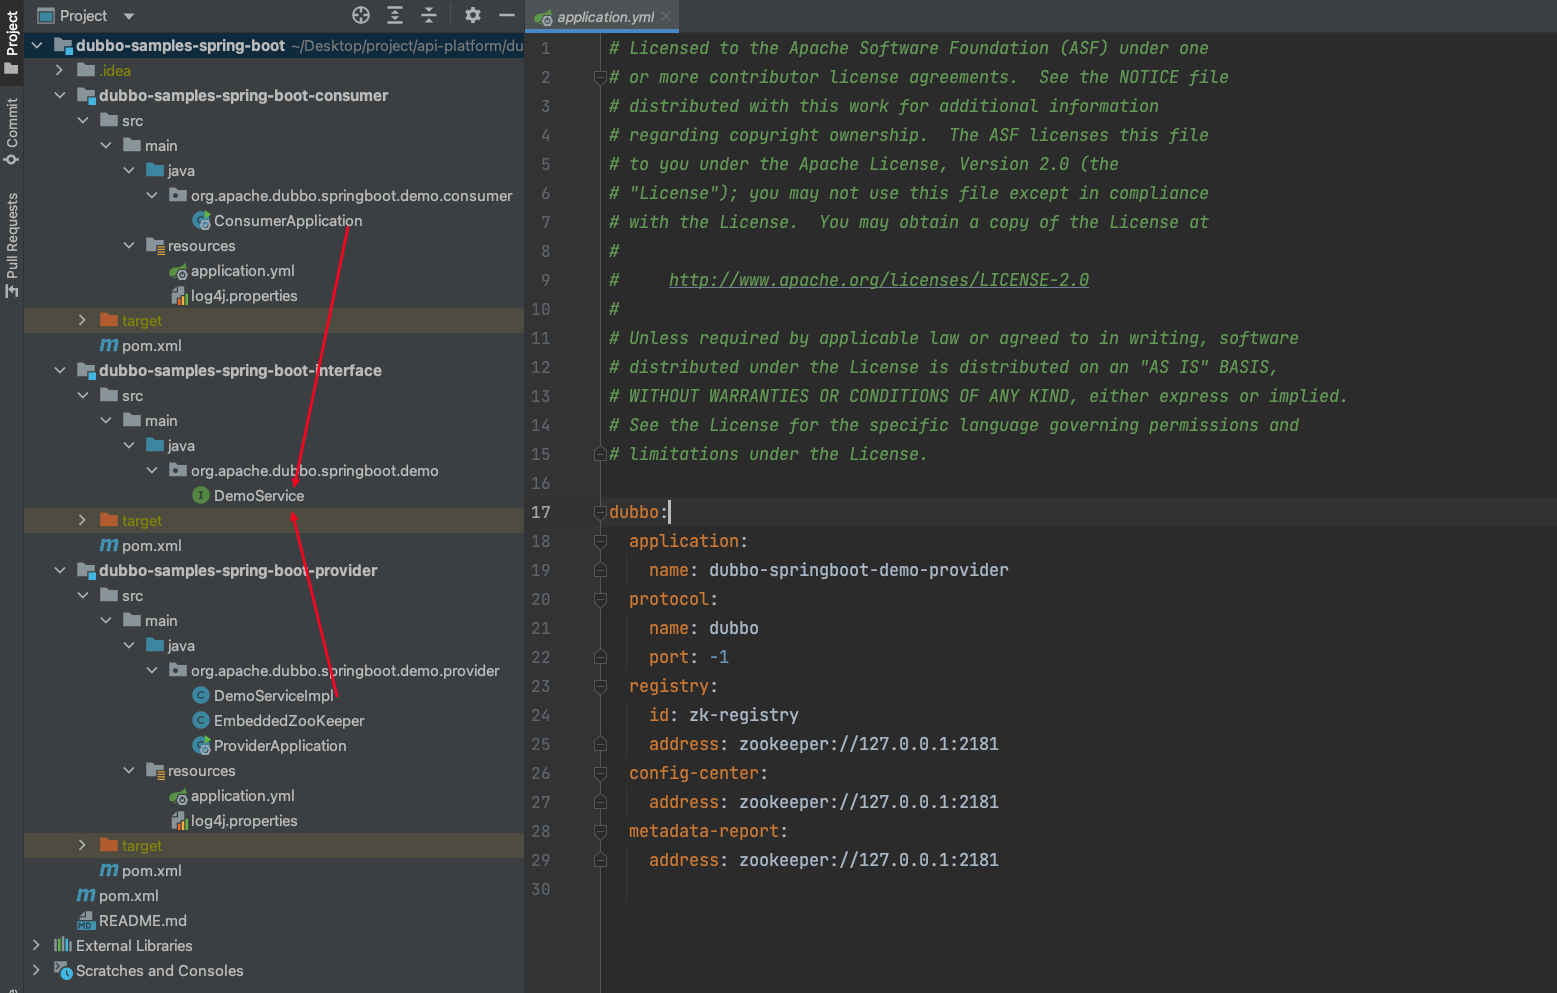
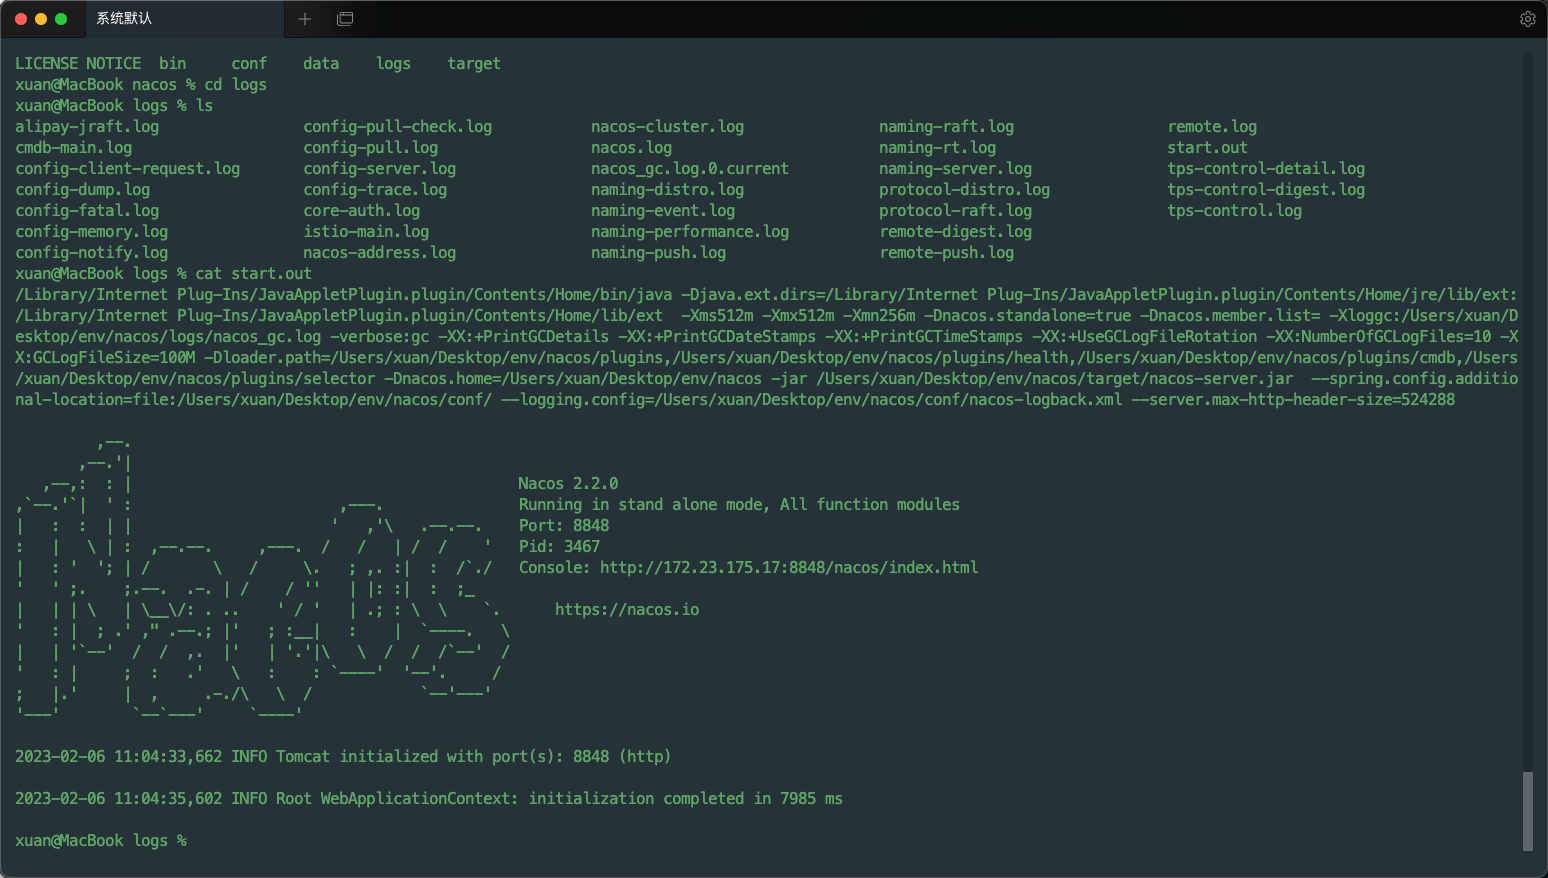
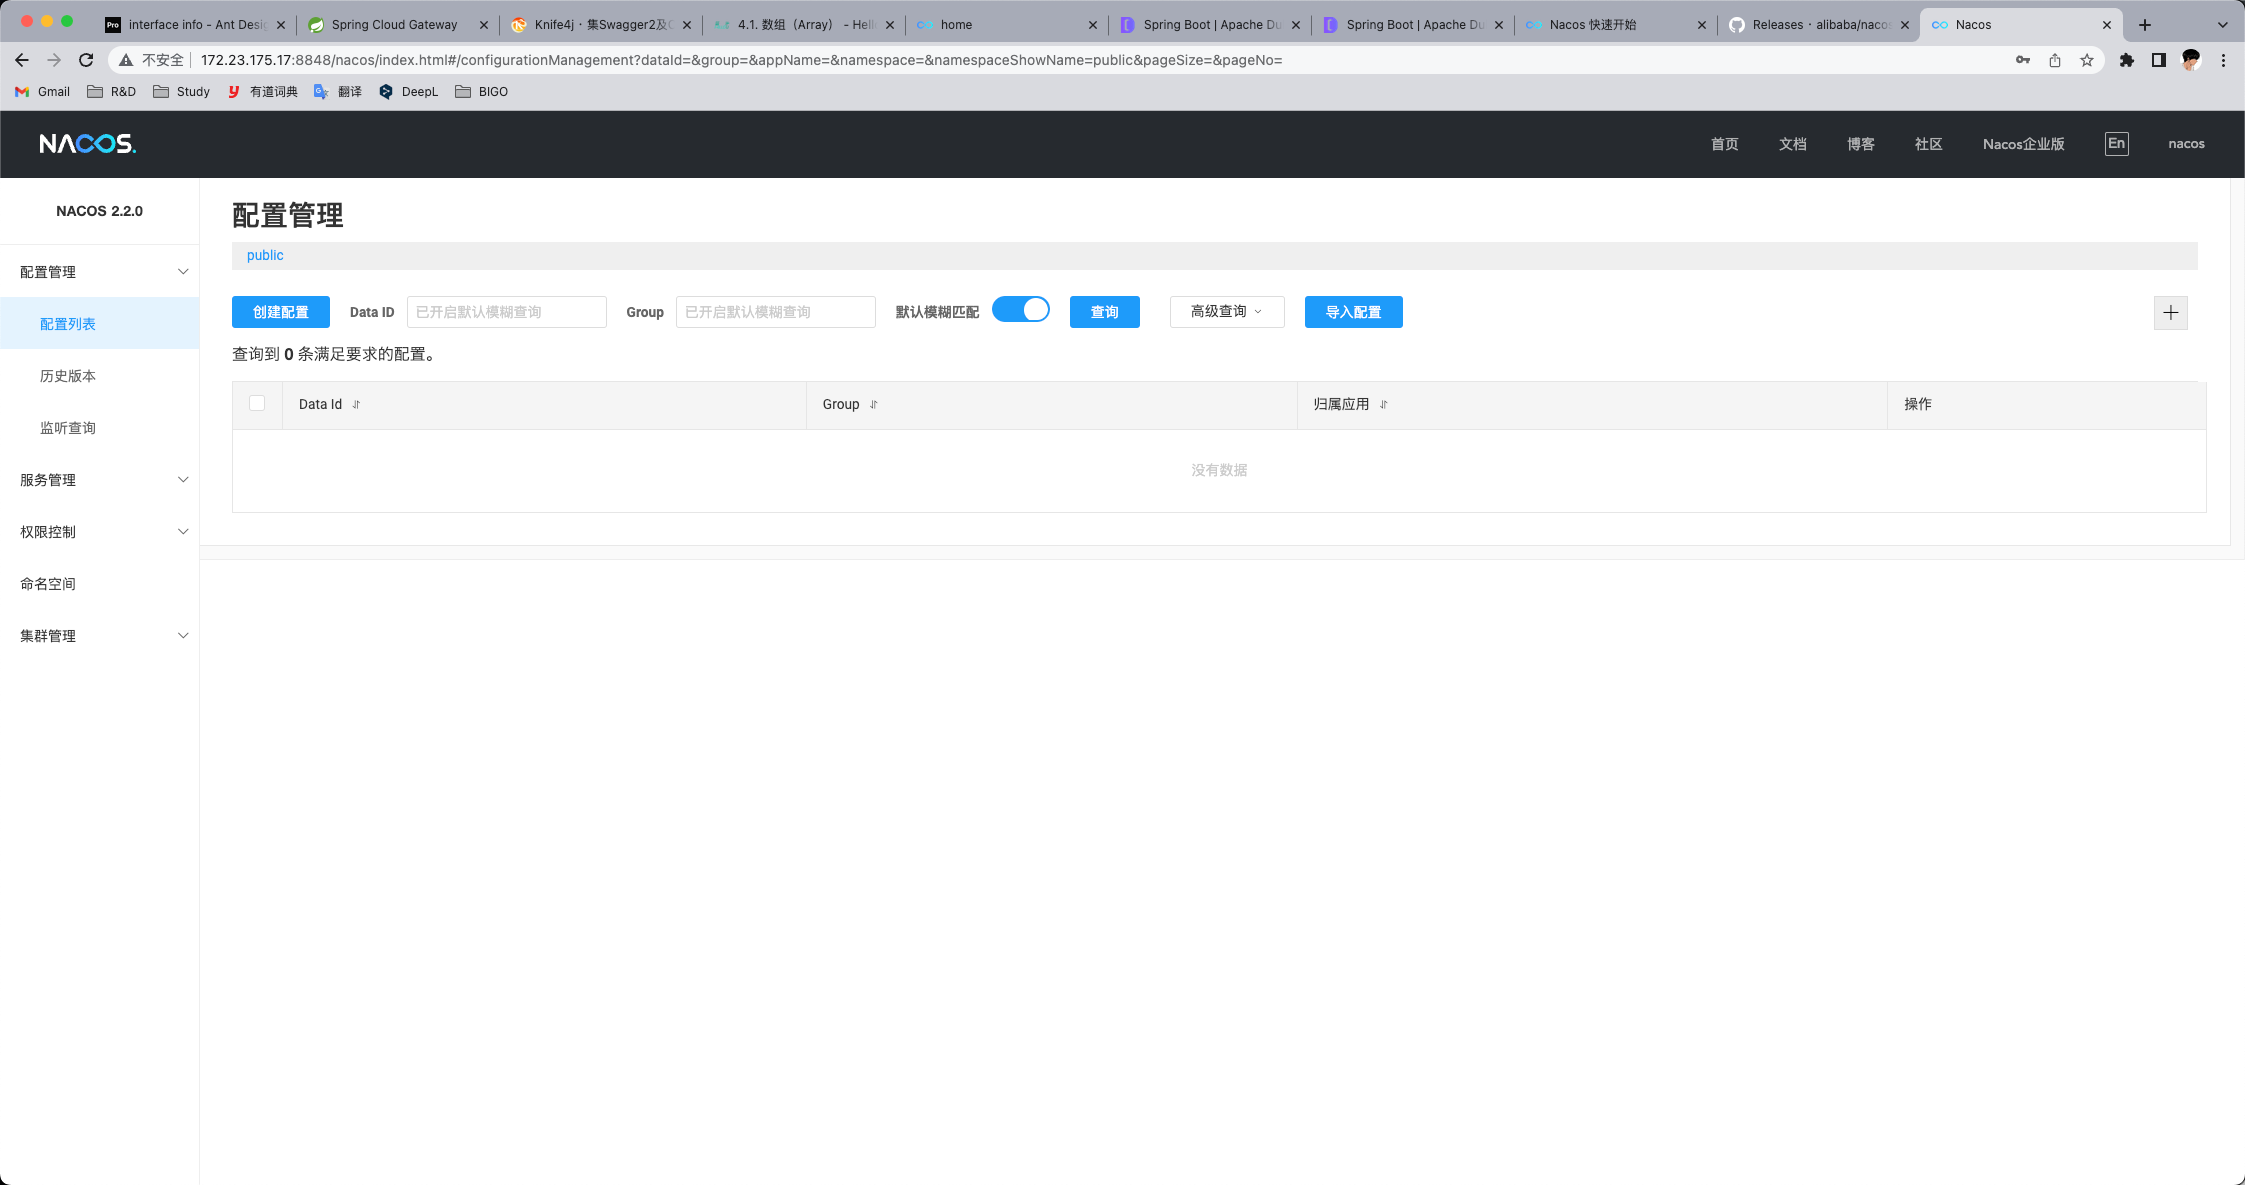
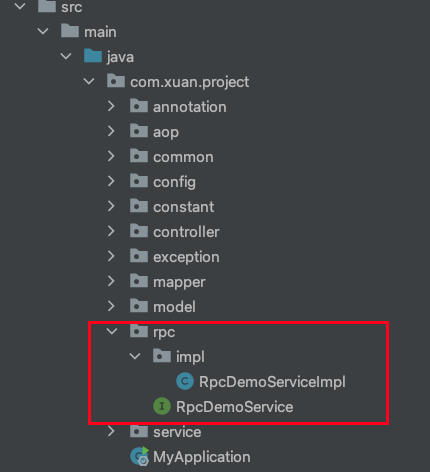

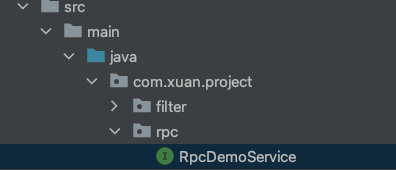
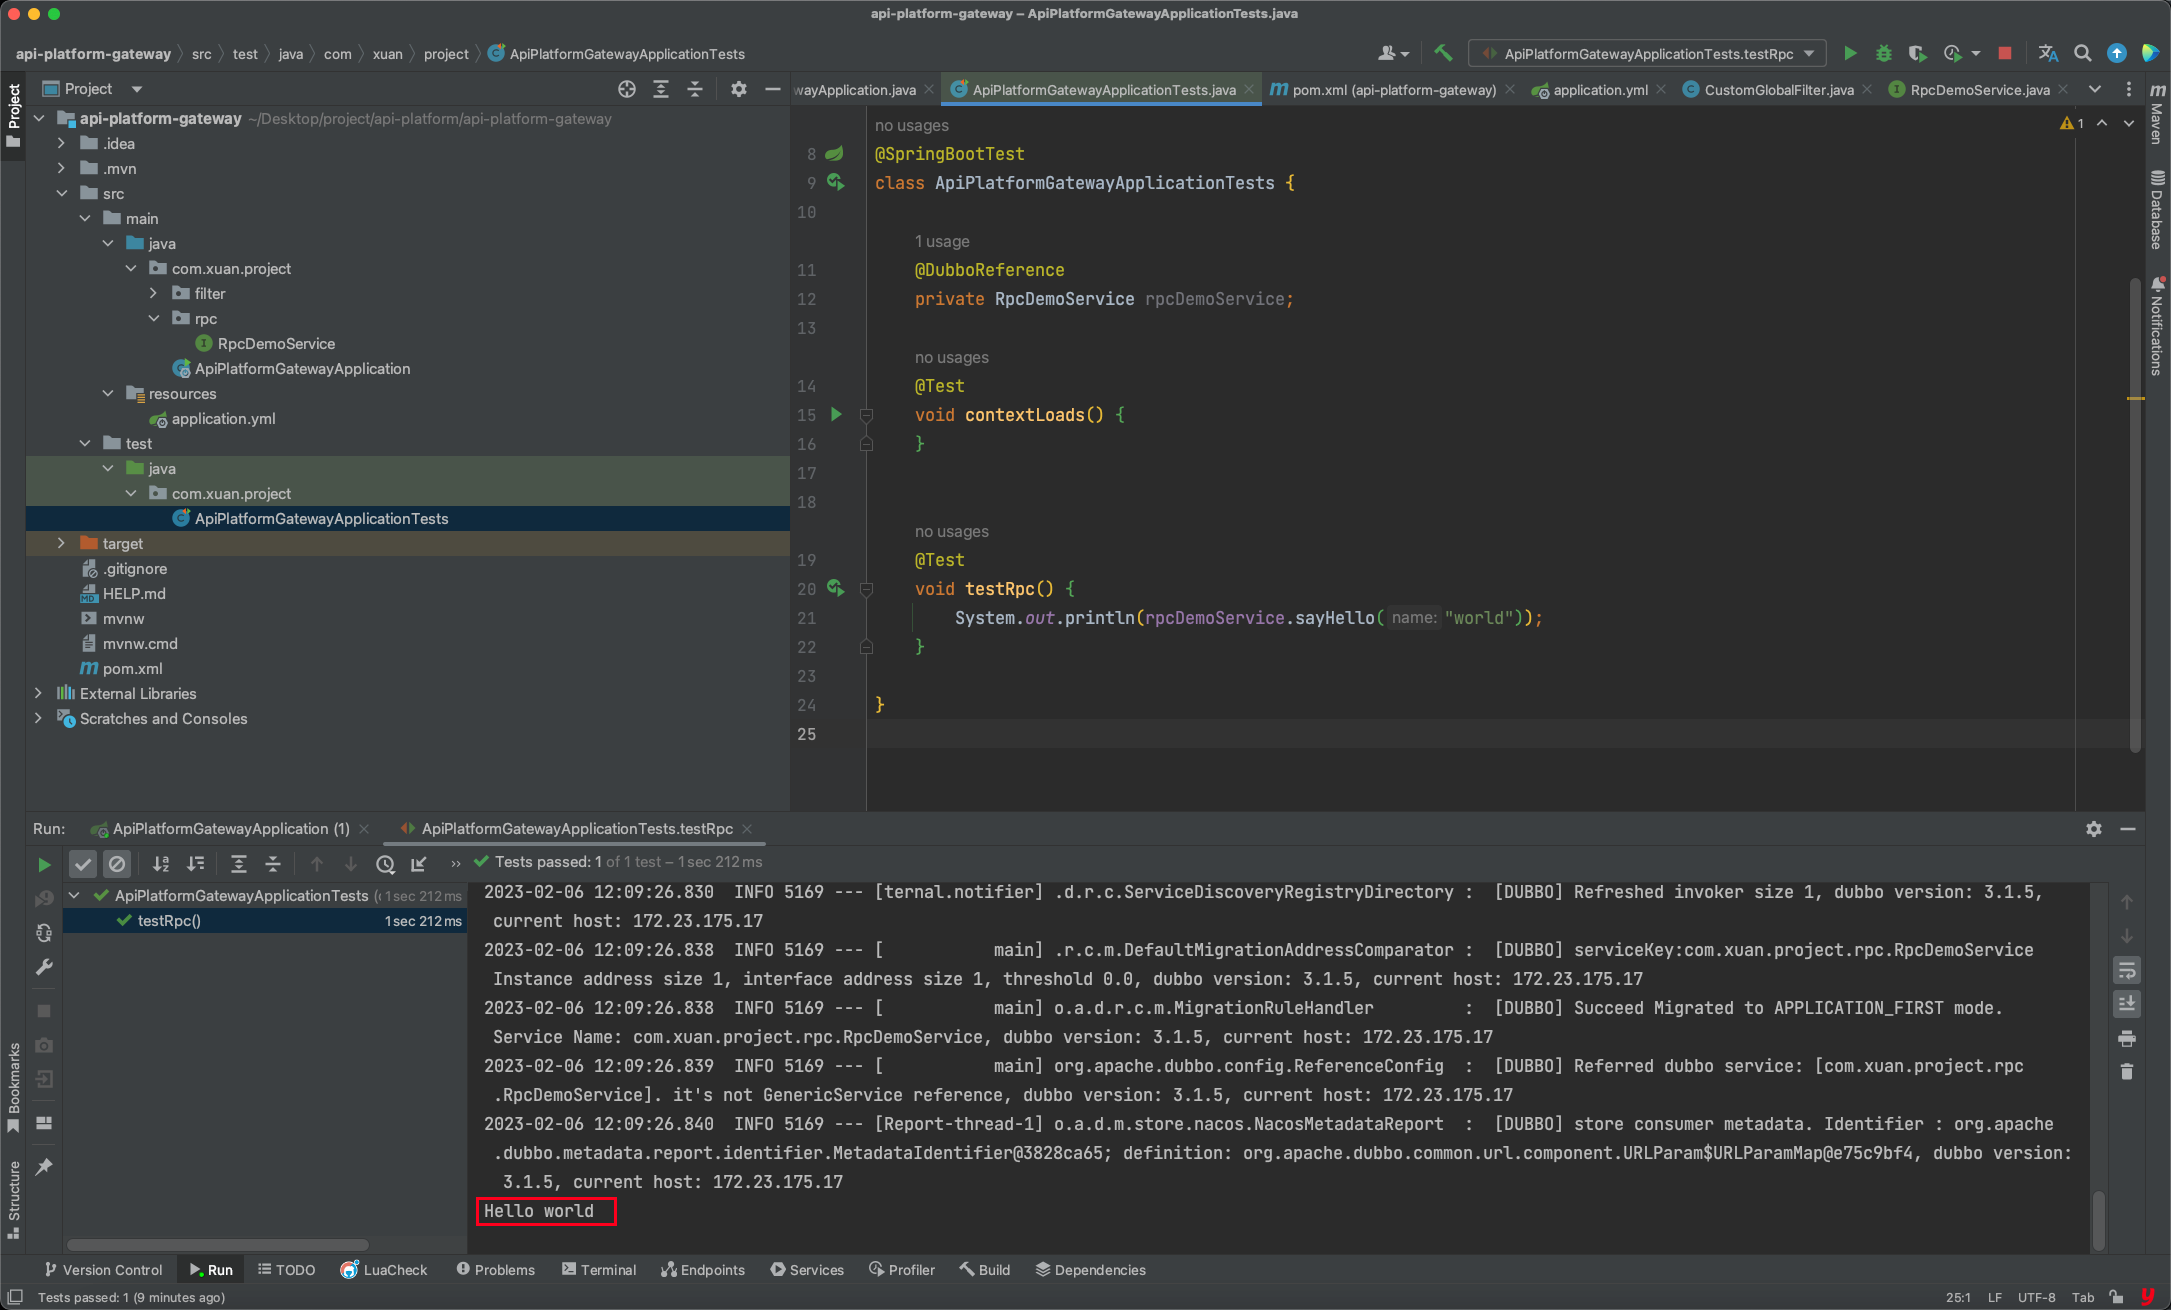
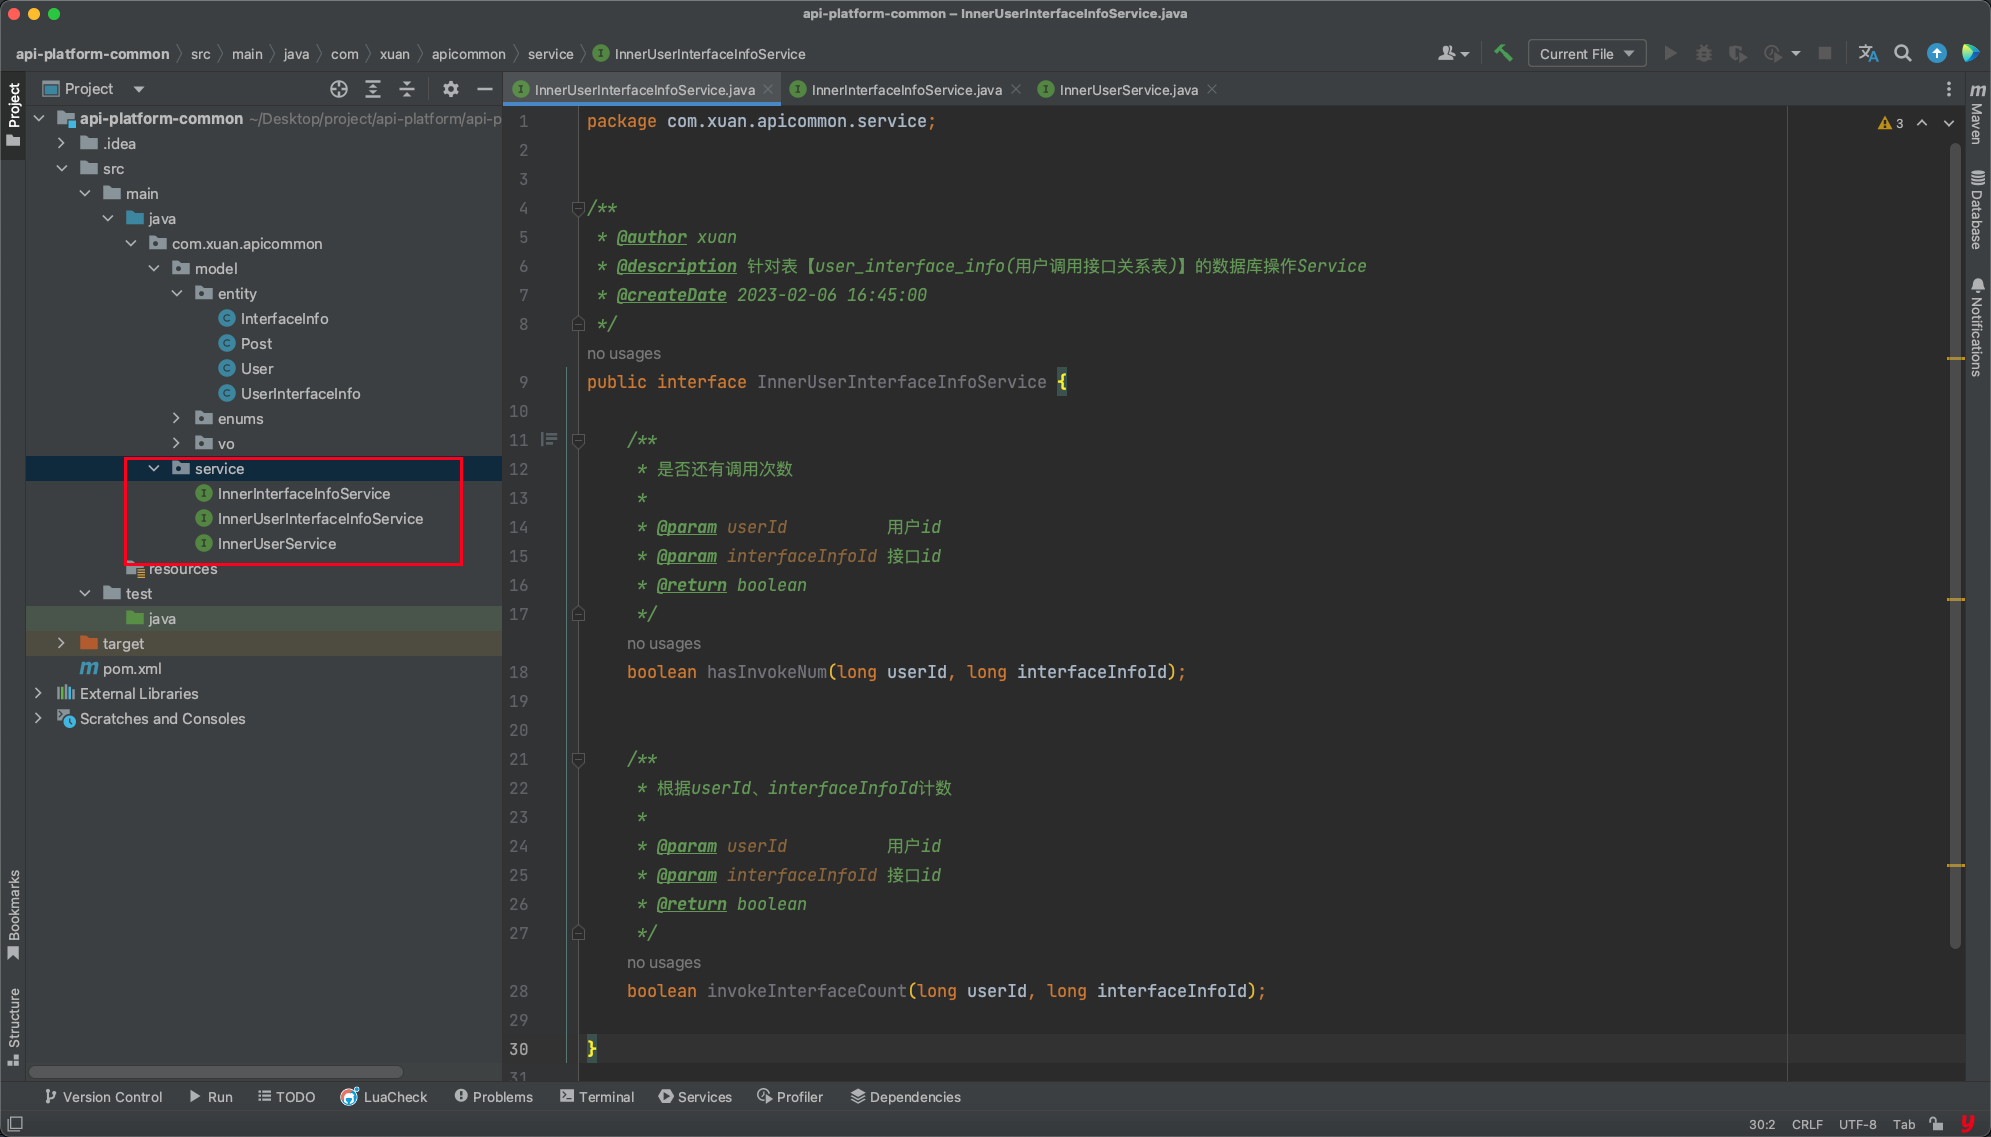
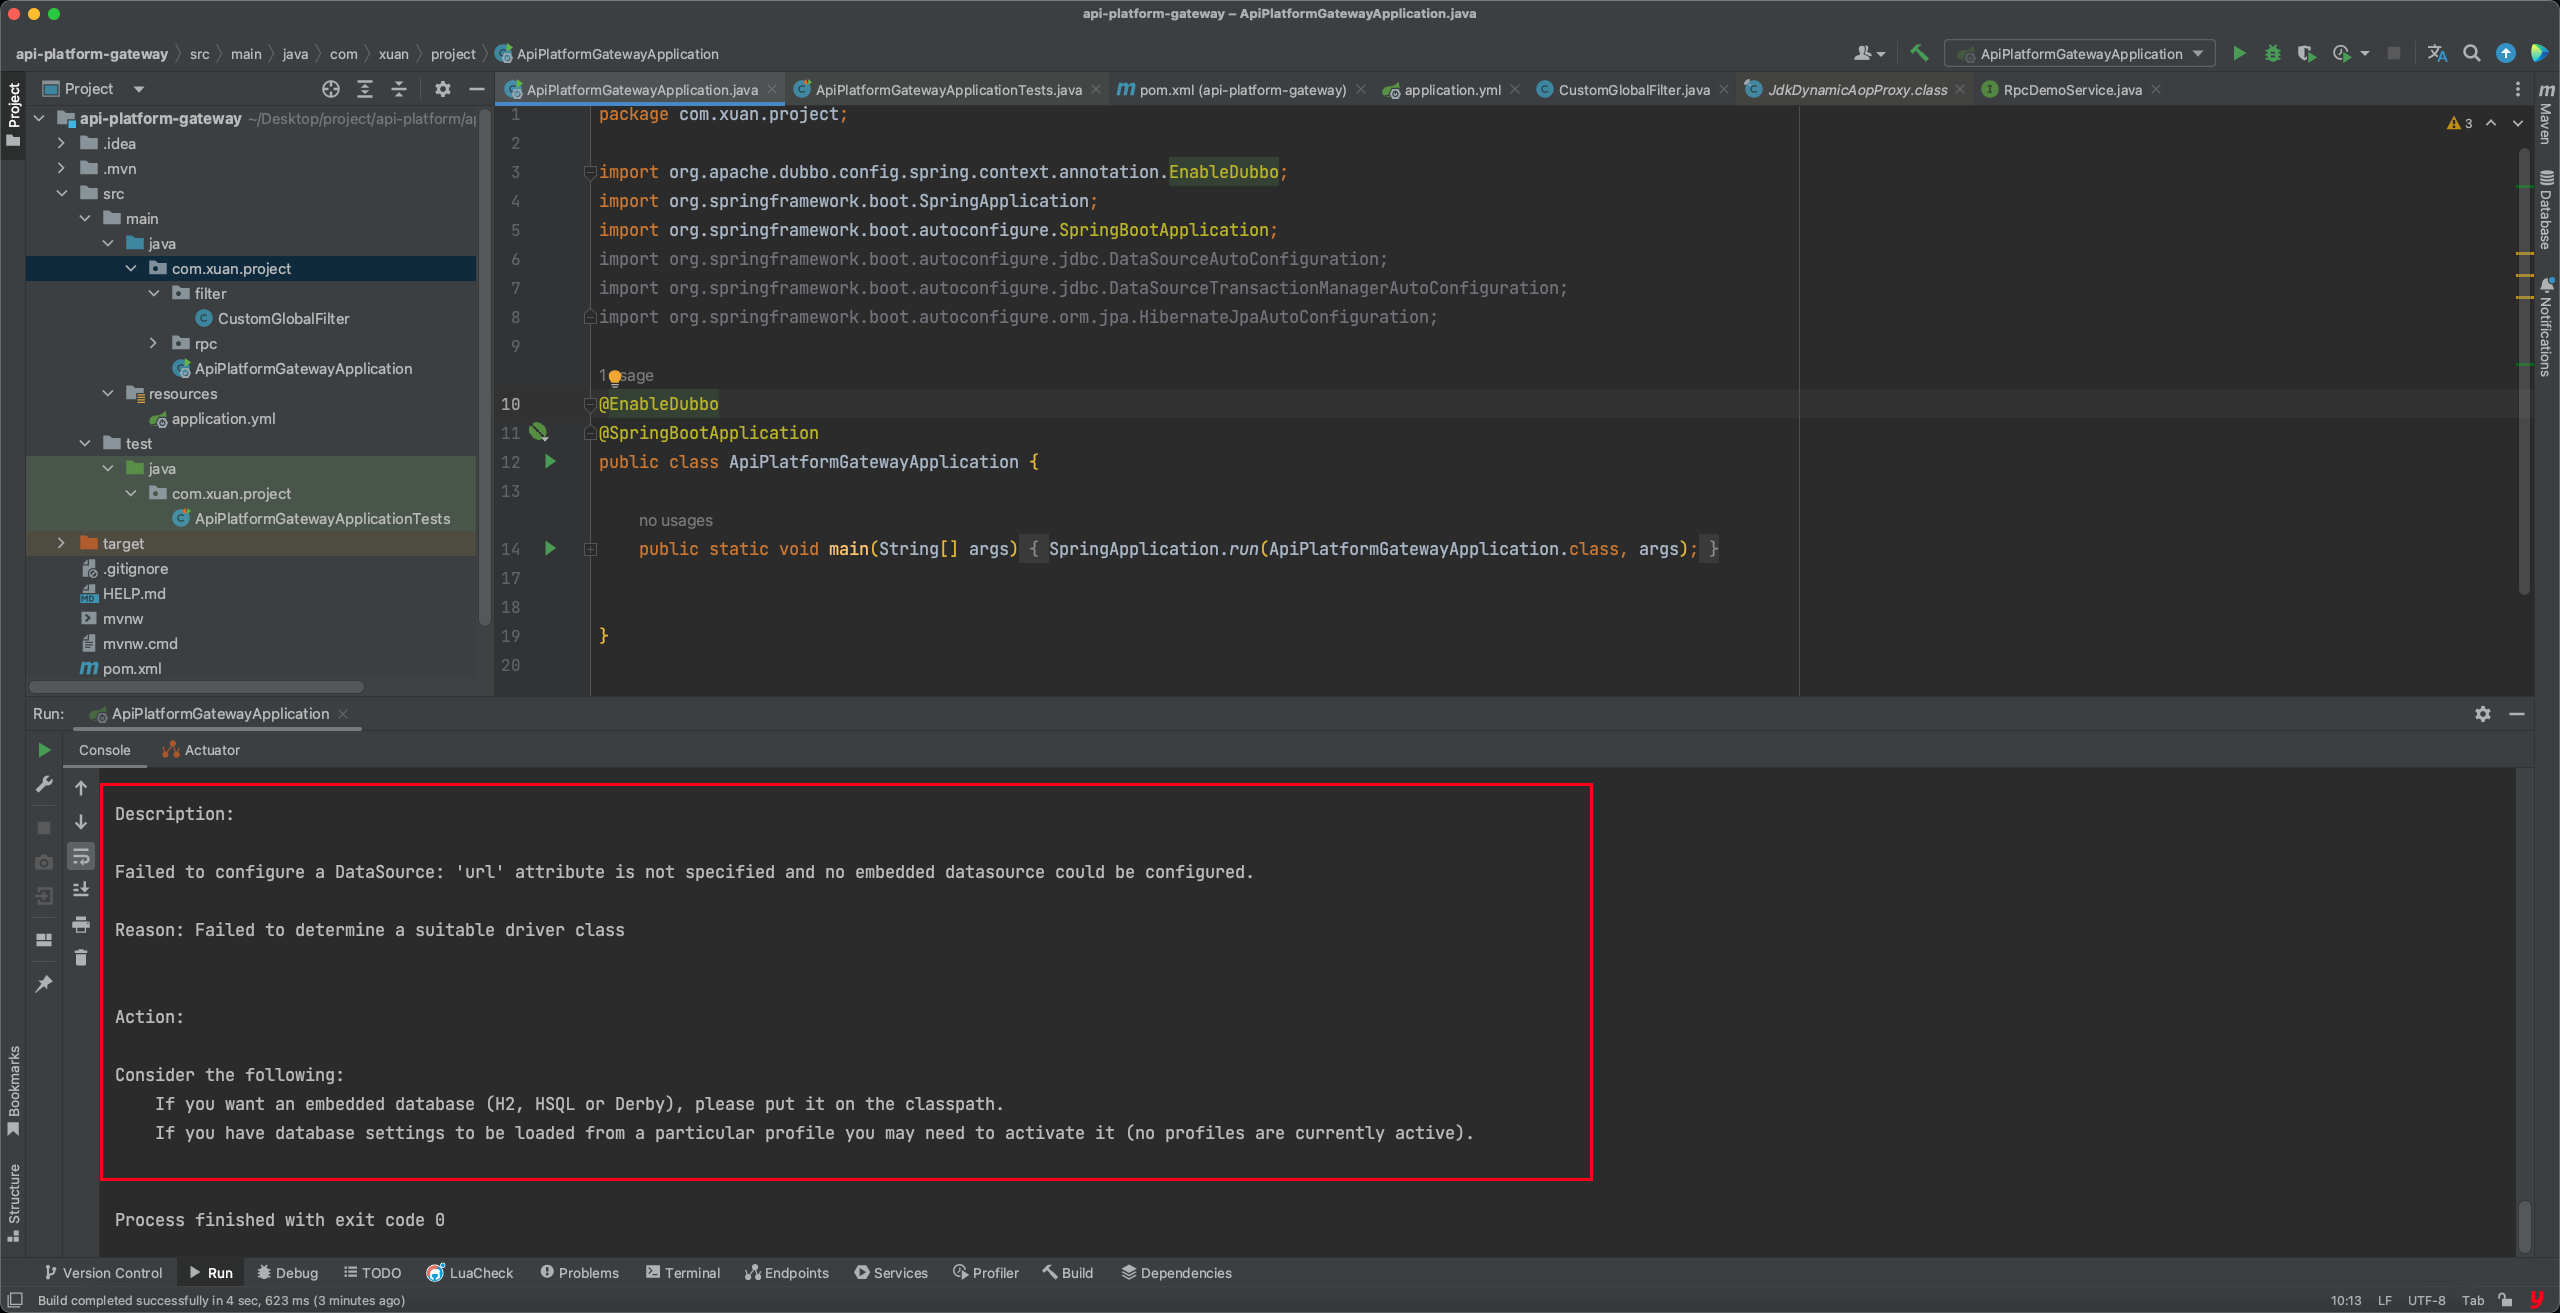
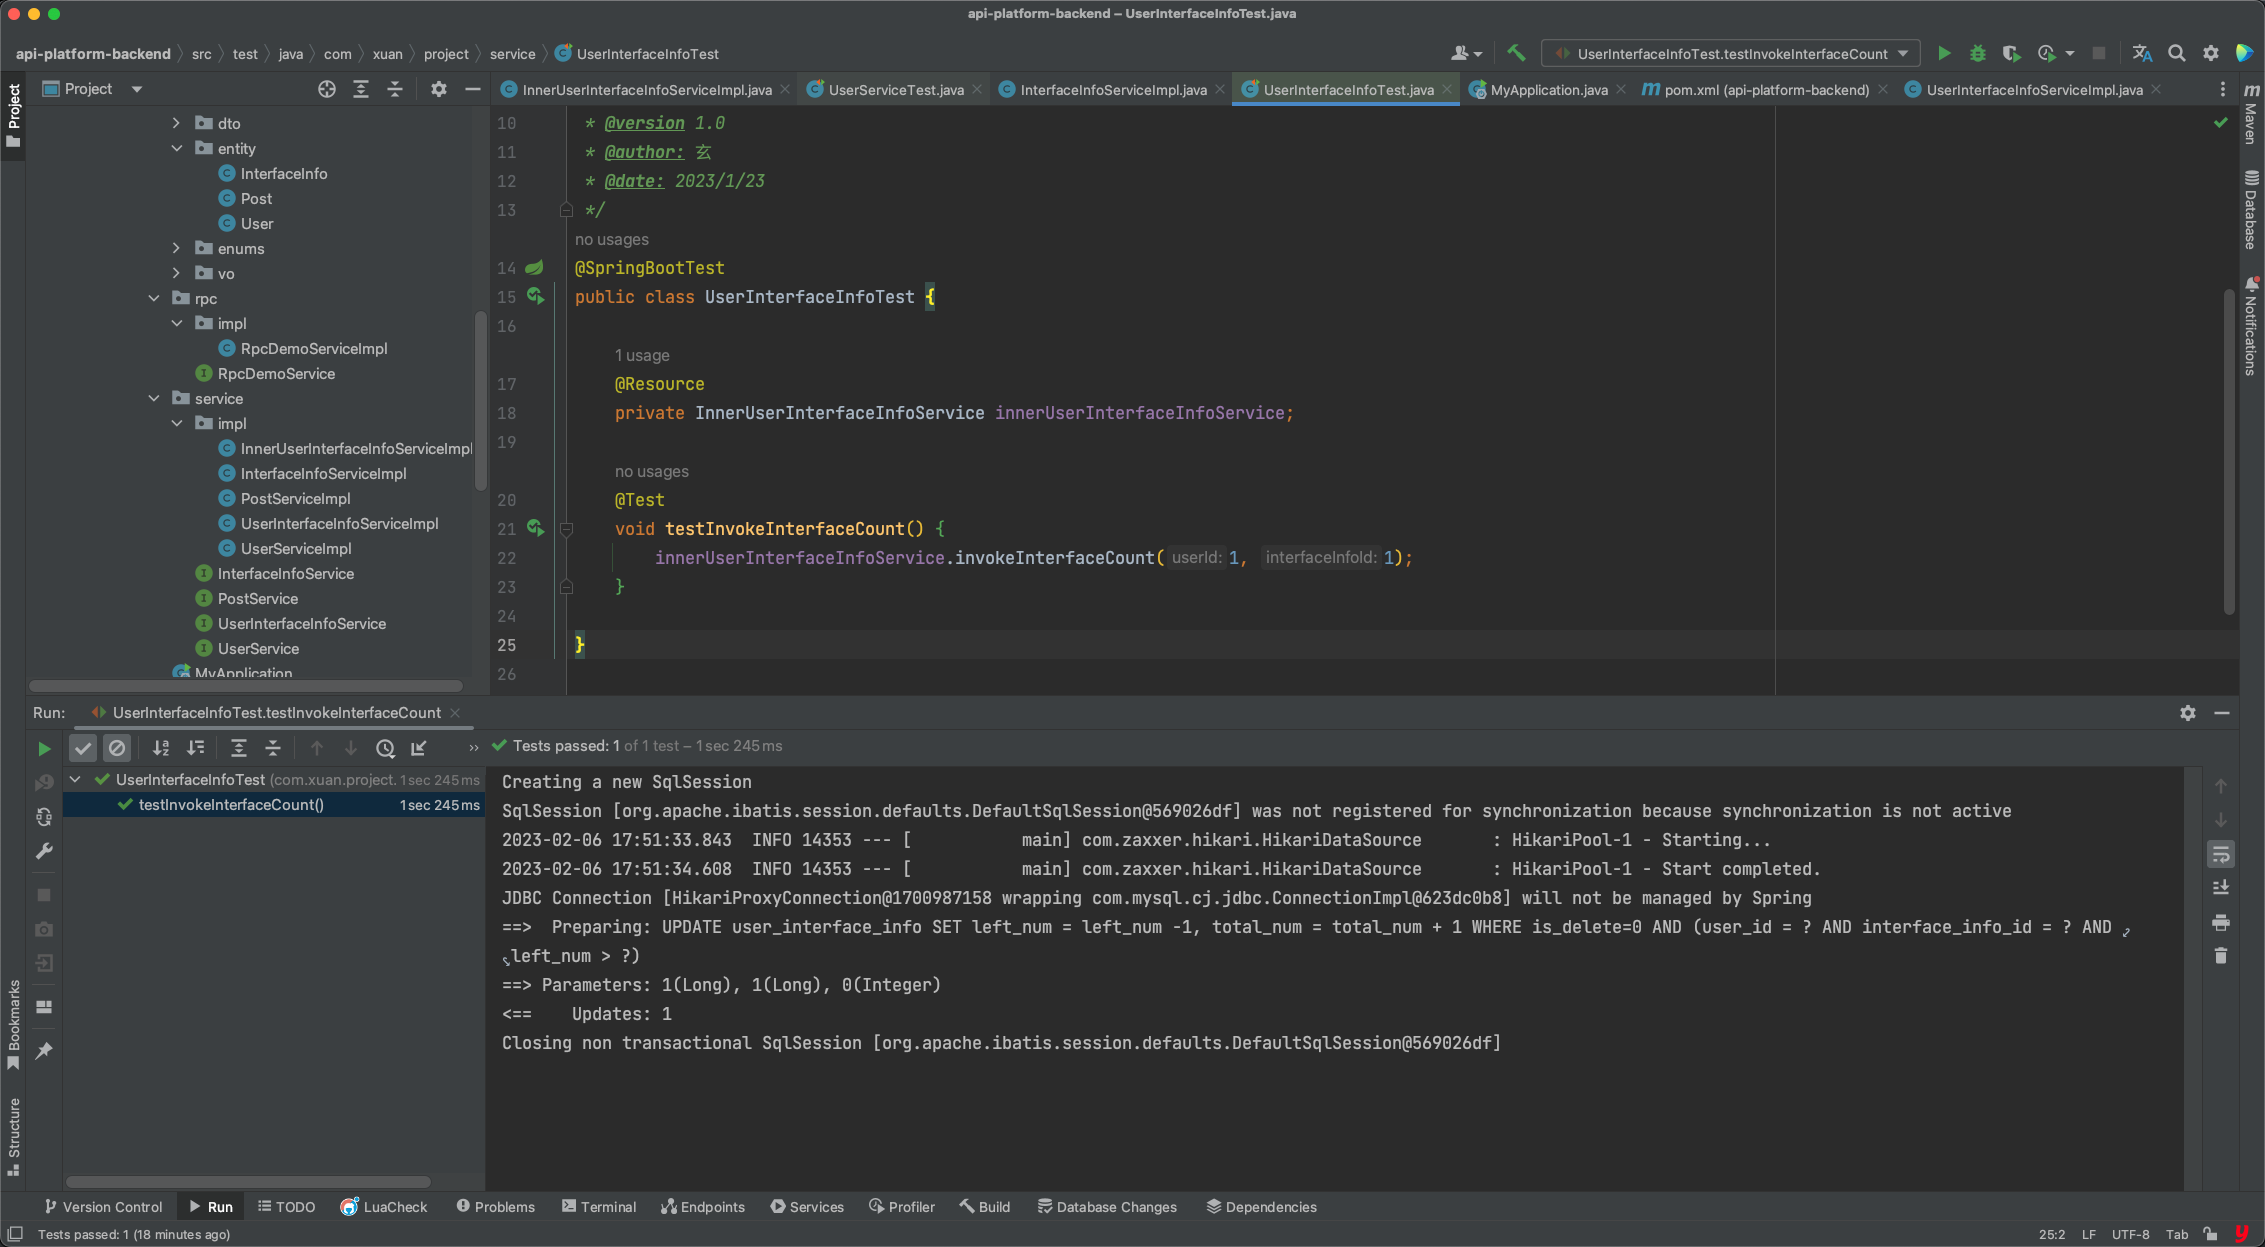
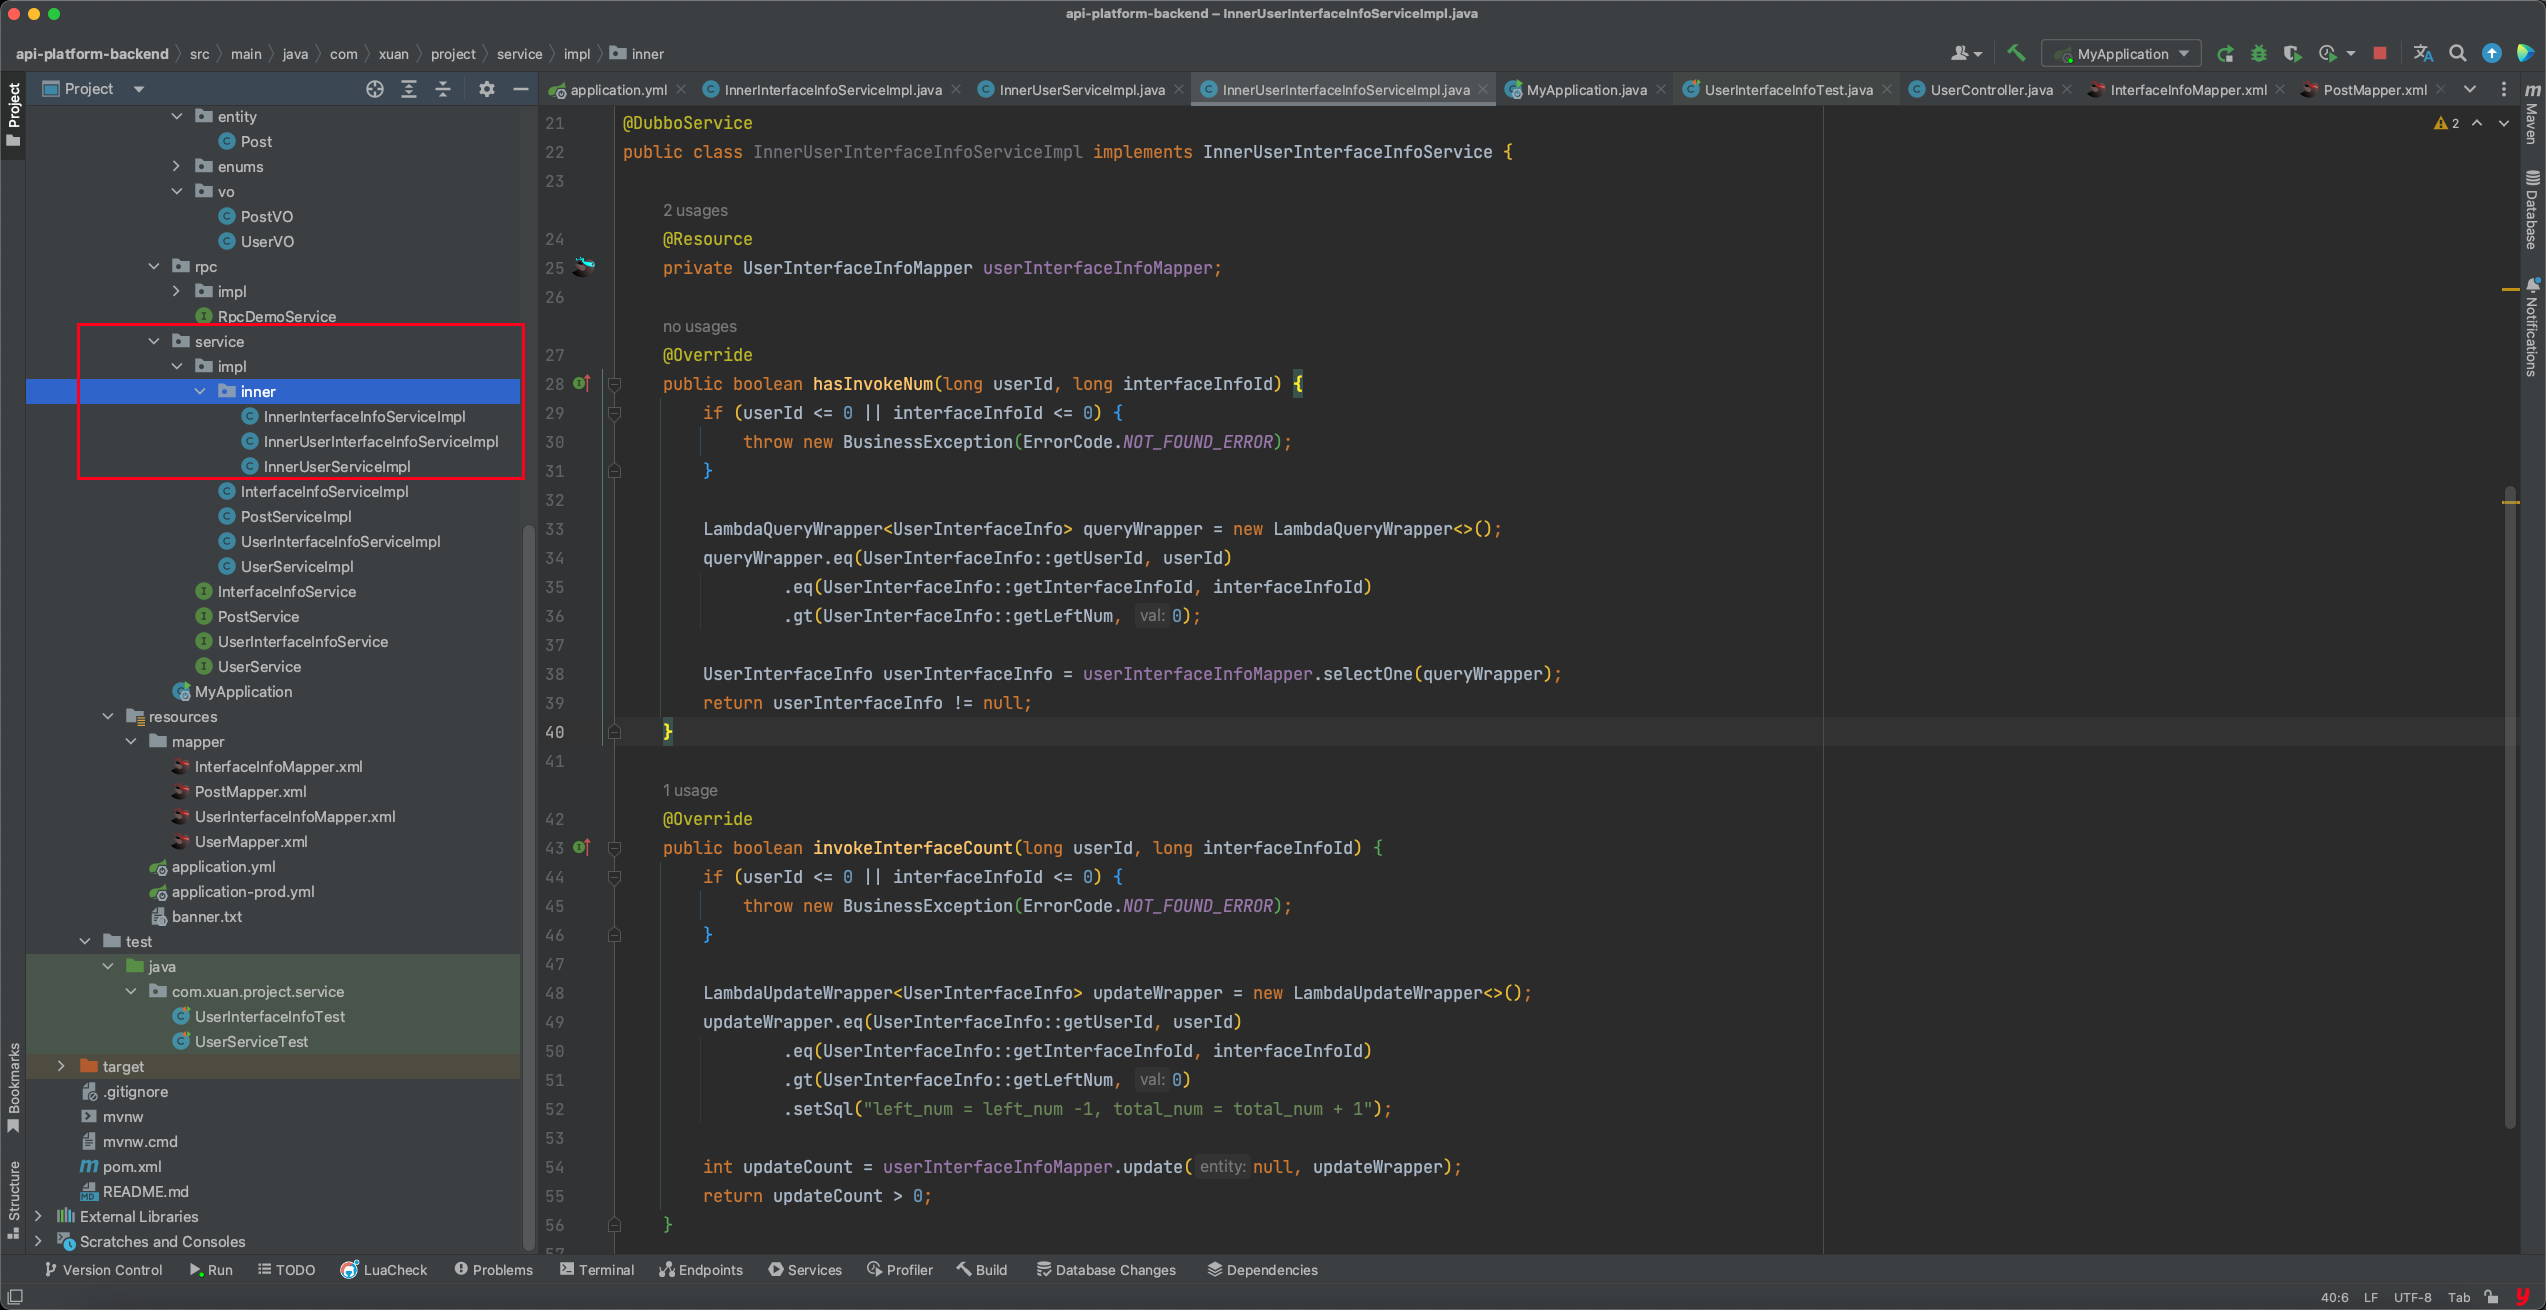
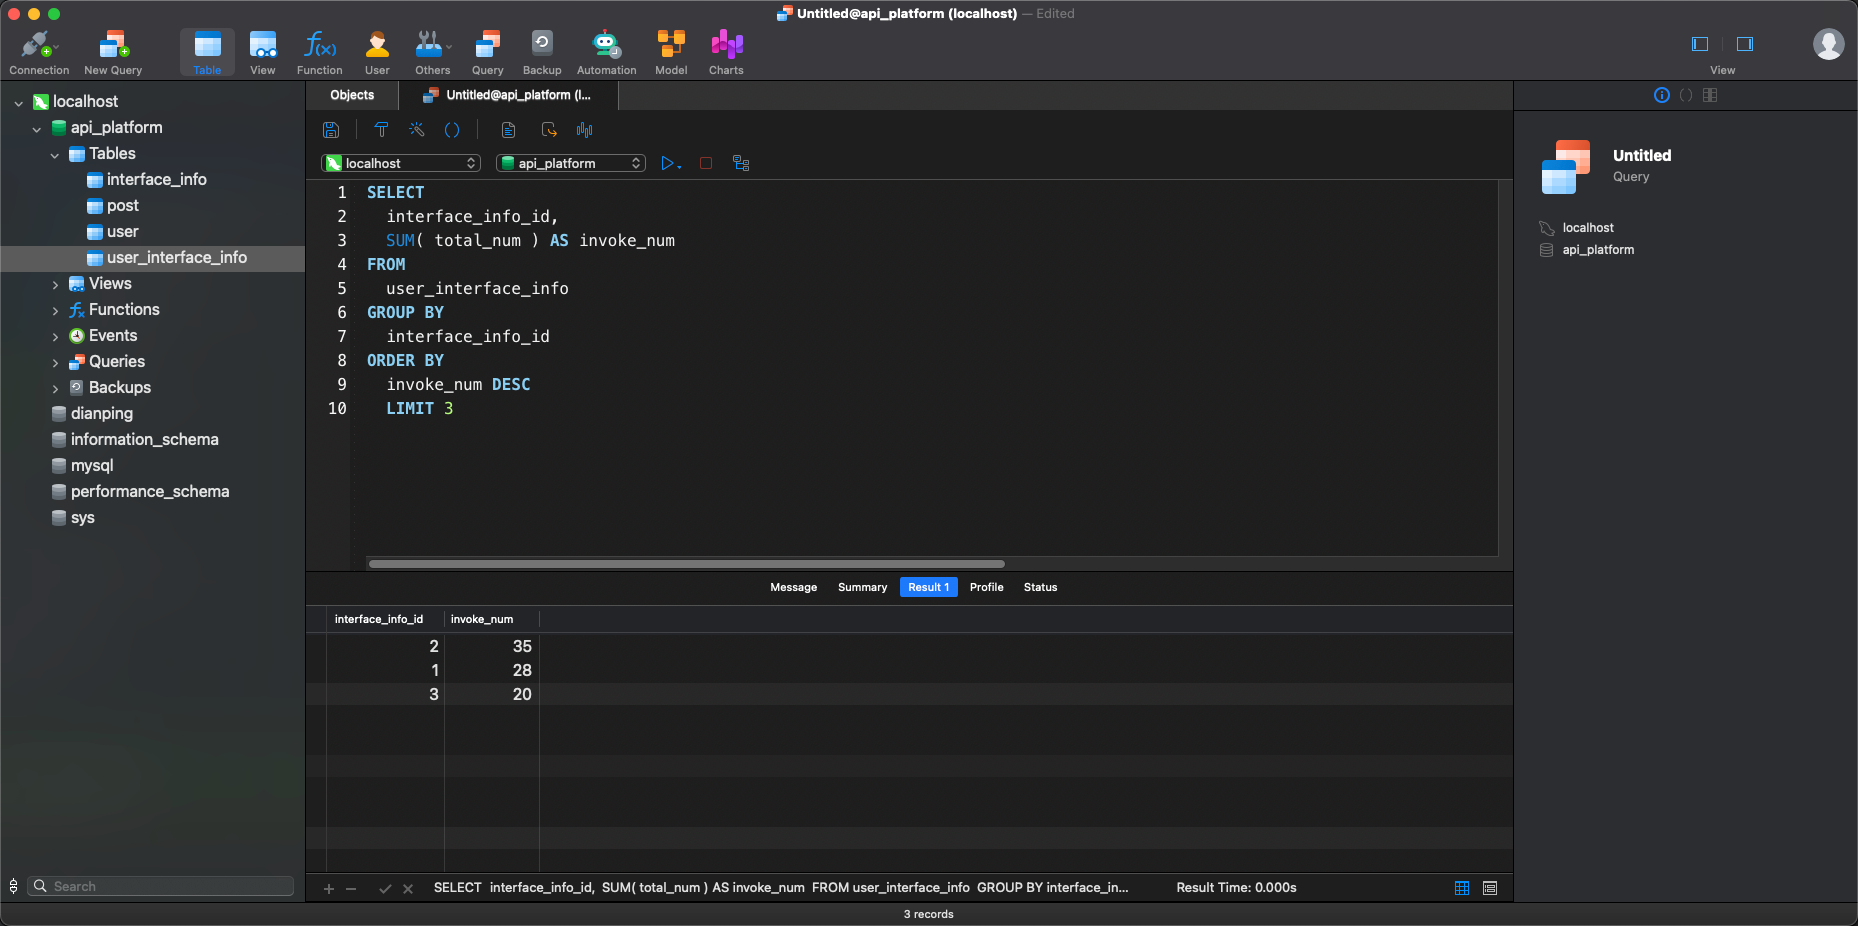
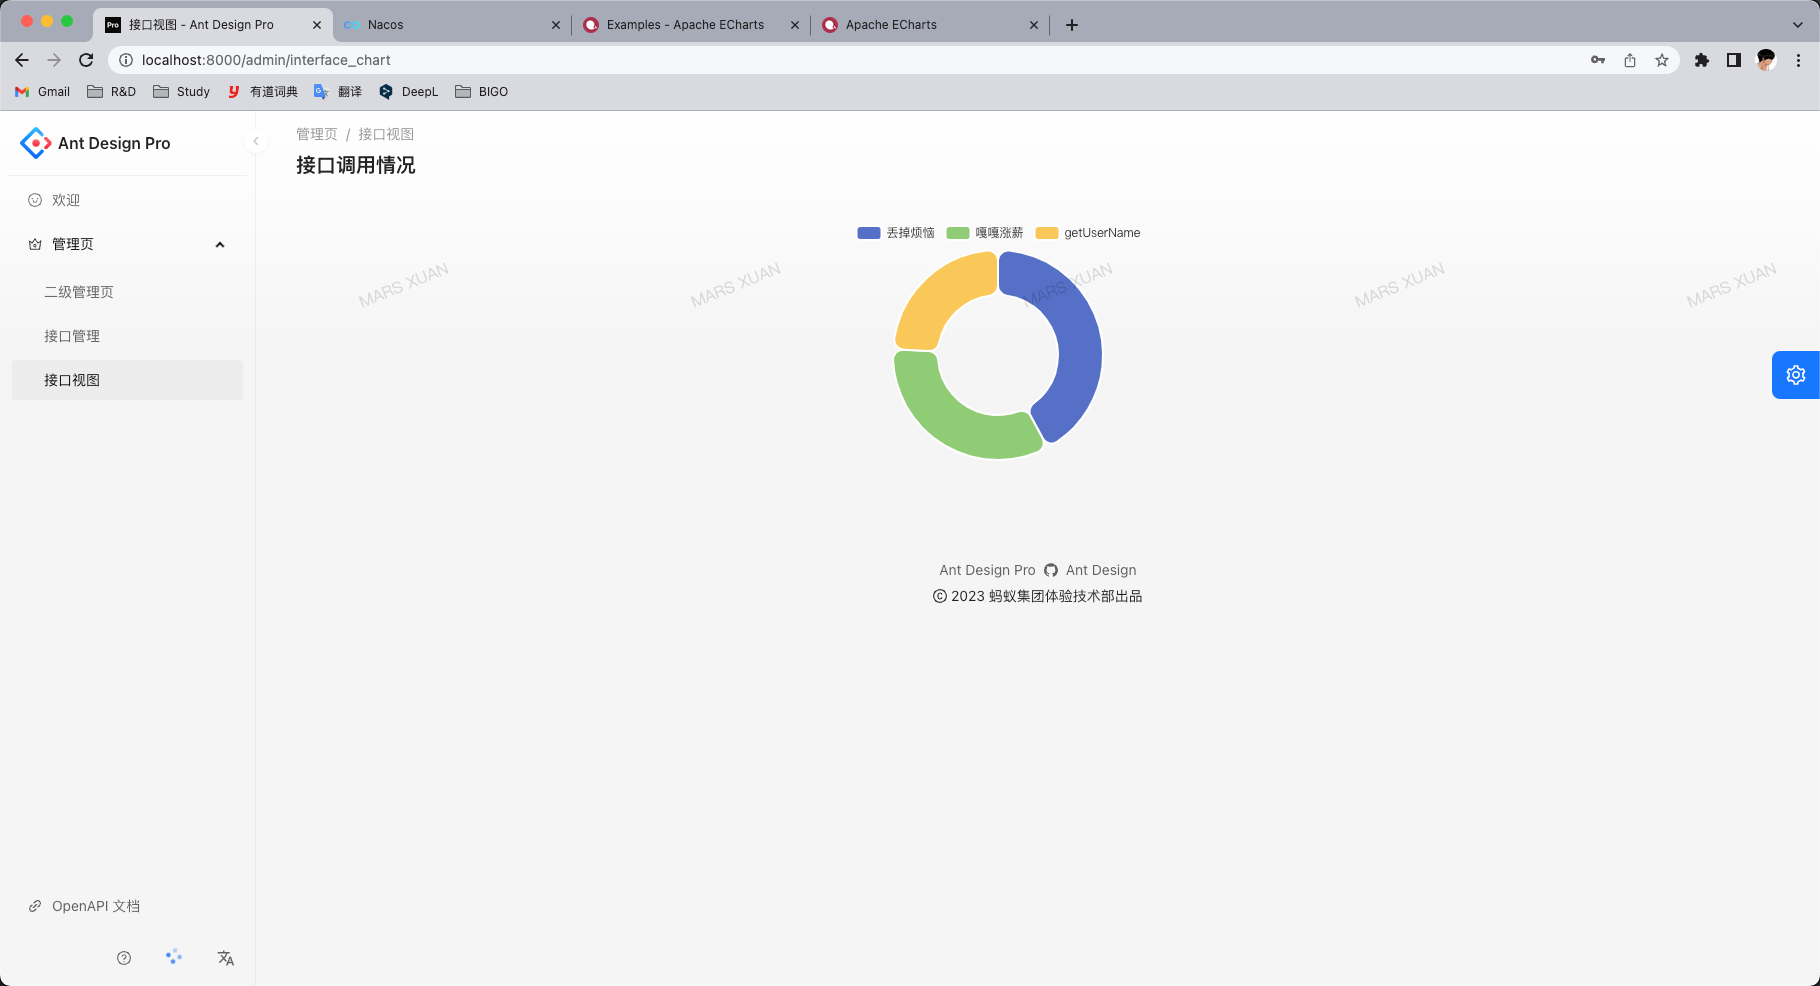
 微信
微信 支付宝
支付宝